The BigWorld engine supports both Mesh Morph Target from 3ds Max and Mesh Blend Shapes from Maya. It does not support UV mapping morph targets.
Morph targets are commonly used for facial expressions and lip sync, although by no means are they restricted to these uses.
When making facial animations, it is best to create a base relaxed pose, and have all the morph targets added to this base.
Morph targets must contain the same vertex count as the base object. It is therefore recommended to create your morph targets only when the character has been taken as far down the art pipeline as possible. A single revision at the mesh level will require the recreation of all your morph targets.
The vertex morph animation is relative to the local coordinate system of the morph target. This allows you to place all morph targets anywhere in the scene. Do not alter the morph target's local coordinate system, otherwise all the vertices will offset relative to that local coordinate change when the animation is played.
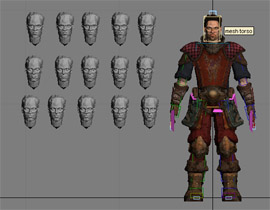
Morph targets in 3dsMax placed around the player character
 Morph target restrictions
There are several restrictions and rules that need to be followed in order for morph targets to work.
The order of morph and skin matter: In both 3dsMax and Maya the morph targets must be applied underneath the skinning otherwise the result seen in BigWorld will differ to the result seen in the 3d App.
Do not alter the vertex count after creating morph targets: Once a morph target has been added you cannot make changes to the mesh which will alter the vertex index. Alterations that commonly effect vertex index include (cutting, extruding, dividing, turn edges, adding geometry, removing geometry). Note: Alterations that do not modify the vertex index such as moving vertices should be OK, but I advise testing your workflow on a simple cube before starting on a character.
3ds Max Morph TargetsIn 3ds Max, the typical workflow for creating morph targets is to make copies of the base object and move vertices within these copies to create the morph targets. Alterations must not affect the vertex count of the copied object. So operations like cut, divide, and extrude cannot be used.
Morph targets in 3ds Max are added using the Morpher modifier.
1 Select your base object and add a Morpher modifier.
2 Click either the Pick Object from Scene or the Load Multiple Targets button to select the morph targets to use for the base object.
3 Once the targets have been added to your object, set key frames for the sliders to create your animation.
Exporting 3ds Max Morph Target Visuals and AnimationsBefore exporting your morph target model, make sure you hide all morph targets and set them to 0%. If you exported the visual mid animation that exported pose would be used as the neutral position. Subsequent animations added to the model would play on top of this "neutral" pose.
Morph targets set to neutral pose 0% on export of visual.
1 Export the object as an animated visual.
2 Export the animations with the Export Morph Animation selected.
Maya Blend ShapesTo add blend shapes to an object in Maya, follow the steps below:
1 Firstly ensure that all your blendshape objects have a uniqe name.
2 Shift select all the blend shape objects then shift select the base object (the base object must be selected last).
2 Select the Create Deformers → Blend Shape→
 menu item
– the Create Blend Shape Options dialog box will be displayed.
menu item
– the Create Blend Shape Options dialog box will be displayed.
3 In the Create Blend Shape Options dialog box's Basic tab:
A In the BlendShape Node field, type the name of your blend shape.
B Click the Create button.
To view and animate your blend shapes, you can select the Window → Animation Editors → Blend Shape menu item – the Blend Shape dialog box will be displayed.
Using blendshapes with skeletal animation
When using morphs on a skinned object it is important to create the blend targets first, then skin the object.
If you create the blend shapes after skinning the mesh will animate differently in BigWorld than it does in Maya.
Exporting Maya Blend ShapesBefore exporting your blend shape model, make sure you hide all blend shapes and set them to 0%. If you exported the visual mid animation that exported pose would be used as the neutral position. Subsequent animations added to the model would play on top of this "neutral" pose.
Blend shapes set to neutral pose 0% on export of visual.
To export the blend shape animation, follow the steps below:
1 Select the File → Export All menu item – the Export dialog box will displayed.
2 In the Export dialog box, specify the folder, file name, and file type (BigWorld Asset) of the animation, then click the Export button – the Visual Exporter dialog box will be displayed.
3 In the Visual Exporter dialog box, select the Visual options button and the Animated Type group box's Animated, skinned option button, then click the OK button.
Copyright 1999-2011 BigWorld Pty. Ltd. All rights reserved. Proprietary commercial in confidence.