Table of Contents
To set up the accurate targeting, the easiest option is to use the BigWorld python console. The first thing we need to do is the create an instance of the model we want to create targeting boxes for. You can create an offline instance of an entity at the players position like this: (in this example we are creating an offline instance of the creature entity)
p = BigWorld.player()
entityDict = {'creatureType':1,'creatureName':'MyTarget'}
entityId = BigWorld.createEntity('Creature', p.spaceID, 0, p.position, (0,0,0), entityDict)
creature = BigWorld.entities[entityId]After creating our model we need to create BoxAttachment objects that the SkeletonCollider can use for the collisions. We give the attachments the same name as the node they are to be attached to so they are easier to manage. We also give the box attachments a rough starting size.
Note
To get the names of the nodes you can enable the watcher "render/Draw Node Labels", this will display the node names on the screen.
headBox = BigWorld.BoxAttachment()
headBox.name = 'biped Head'
headBox.minBounds = (-0.1, -0.1, -0.1)
headBox.maxBounds = (0.1, 0.1, 0.1)
pelvisBox = BigWorld.BoxAttachment()
pelvisBox.name = 'biped Pelvis'
pelvisBox.minBounds = (-0.2, -0.2, -0.2)
pelvisBox.maxBounds = (0.2, 0.2, 0.2)
Note
For simplicity this example only uses two BoxAttachment objects. In a real world game you would probably want to use more than two boxes, and you are free to use as many or as few bounding boxes that you like
The boxes are then attached to the entity's nodes so that we can use them for targeting.
creature.model.node(headBox.name).attach(headBox)
creature.model.node(pelvisBox.name).attach(pelvisBox)
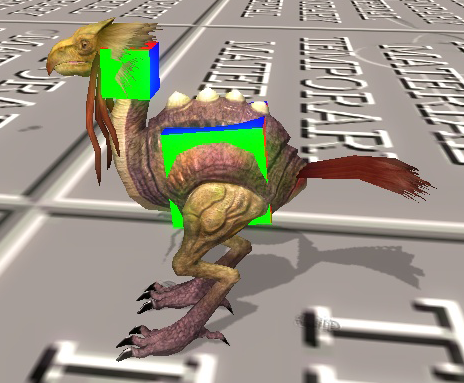
We can now display the boxes by enabling the watcher "Client Settings/displayImpactBoxes", this can be done by entering the following in the python console
# This watcher is only available after the first call to BigWorld.BoxAttachment()
BigWorld.setWatcher('Client Settings/displayImpactBoxes',True)
Alternatively, this setting can be found by navigating through the watcher debugging console, (but only after creating your first BoxAttachment).
Note
Alternatively you could use the BigWorld maxscripts "Add HitBox" and "Export HitBox to XML" to create both the hitboxes and skeleton collider. More information on these maxscripts can be found in the maxscript section of the "Content_creation.chm".

Displaying the impact boxes
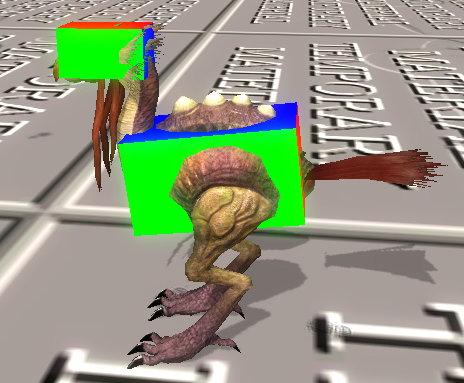
There are two boxes attached to the body, we would like them to match the parts of the body they are meant to cover. To do this we need to tweak the boxes. There are some visual queues to which values are not correct, the bounding box x-axis is red, the y-axis is green and the z-axis is blue. We can change the min and max bounds of the boxes to something that fits the objects better:
headBox.minBounds=(0,-0.1,-0.05)
headBox.maxBounds=(0.2,0.1,0.3)
pelvisBox.minBounds=(-0.3,-0.2,-0.2)
pelvisBox.maxBounds=(0.4,0.2,0.2)

The fixed impact boxes
