 Resource paths
As of BigWorld Technology 1.8, the use of BW_RES_PATH environment variable
to specify the resources path is deprecated.
Instead, the use of command-line arguments and/or paths.xml configuration files local to each tool is recommended. For details, see the
document Content Tools Reference Guide, chapter Starting the Tools.
Creating a new space
A new space can be created as described below:
1 Open WorldEditor.
The executable worldeditor.exe is located in folder bigworld/tools/worldeditor.
2 Select the File → New Space menu item.
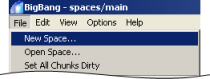
WorldEditor's File menu
3 The New Space dialog box will be displayed.
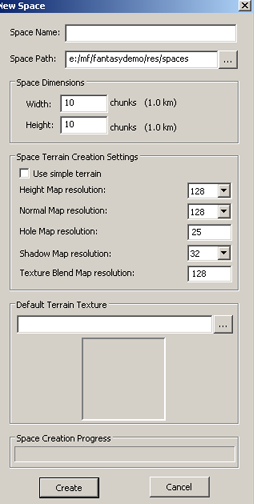
WorldEditor's New Space dialog box
4 To create a new space:,
• Specify a new space in a spaces folder.
• Specify the width and height in chunks of your new space (a typical chunk is 100 metres by 100 metres).
• Choose the appropriate Terrain Creation Settings for your space (see below for a description of each field)
• Click the Create button.
Clicking on use simple terrain determines whether or not to use terrain advanced features in the creation of the new space.
5 WorldEditor will automatically open with the new space.
Terrain Creation SettingsHeight map res
Defines the number of height pols on one axis of a chunk. So a setting of 256 will result in the chunk having at least 65536 verts. That's allot of verts.
I would recommend using 128 or less for spaces over a few kilometers. Using 256 with large spaces will reduce performance.
Normal Map res
This is the resolution of the normal map used to disguise the lower resolution mesh used by the terrain in the distance.
In order to retain the more visually complex information held in the higher resolution chunks we apply a normal map of this information to the lower resolution chunks in the distance.
A setting of 128 adequately hides the lower resolution mesh for most spaces.
Hole map Res
This is the resolution of the Cut Terrain tool (scissors). If set to a low setting you will only be able to cut large holes in the terrain, set it to a high setting and you will be able to cut smaller holes in the terrain. If your not going to cut the terrain very often then I would suggest setting this to a low setting.
Shadow Map Res
Defines the resolution of the terrain shadow map.
If you have a large space (anything over a kilometer) I would recommend using 64. Using 128 or 256 with large spaces will reduce performance.
Texture blend map res
This is the resolution of the map that blends between two different terrain textures. Put simply if you paint texture A and texture B beside each other, the texture blend map resolution determines the distance it takes for texture A to blend into texture B.
The best thing you can do is create several quick prototype spaces of the same proportions as your intended space and play with various settings. The lower you can get the settings without causing serious visual degradation the better your performance will be.
These are the settings for highlands which is a demo space built to run on high end machines. Highlands is a 10km x 10km (100x100 chunks) space.
<heightMapSize> 128 </heightMapSize>
<normalMapSize> 128 </normalMapSize>
<holeMapSize> 64 </holeMapSize>
<shadowMapSize> 64 </shadowMapSize>
<blendMapSize> 256 </blendMapSize>
Terrain Types There are two terrain types available in BigWorld, Simple and Advanced terrain.
| Property | Description |
|---|---|
| Simple terrain |
|
| Advanced terrain |
|
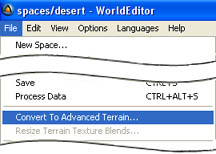
World editor can convert simple to advanced terrain from the File → Convert To Advanced Terrain menu. Just remember to back up your simple terrain first as advanced terrain cannot be converted back into simple terrain.
Changing SpaceTo change from one space to another:
1 Open WorldEditor.
2 Select the File→Open Space menu item.
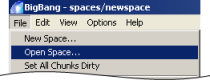
WorldEditor's File menu
3 The Browse For Folder dialog box will be displayed.
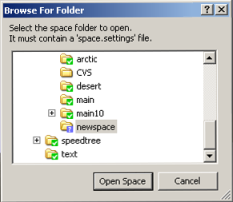
WorldEditor's Browse For Folder dialog box
4 Select the folder space that you wish to change to.
5 Click the Open Space button.
Terrain LOD settings There are two terrain types available in BigWorld. Simple and Advanced terrain. This section explains how the complex terrain LODs and how those LOD settings can be adjusted to optimise performance.
GeomorphingAs you move away from the player, chunks of higher resolution terrain mesh are replaced by lower mesh resolution chunks. This reduces the number of polygons that need to be drawn by the game engine. To avoid a visual pop between chunks we first swap to a higher resolution chunk that mimics the shape of the lower resolution chunk, then slowly morph in the higher resolution details.
In order to retain the more visually complex information held in the higher resolution chunks we apply a normal map of this information to the lower resolution chunks in the distance.
 |
At the bottom of this image you can see that the chunks closest to the player camera are high resolution (high poly count). As you move away to the top of the image, these higher resolution chunks have been swapped for increasingly lower resolution chunks. |
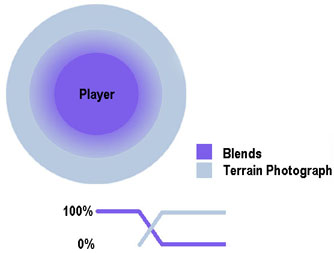
Geomipmapping Directly underneath the player the Adanced terrain allows an "unlimited" number of texture blends per chunk. There are of course performance implications. As you move away from the player these blends are slowly replaced by a simpler overhead projection photograph of the blends. During this transition both the terrain blends and terrain photographs are drawn.
Space.settings file The LOD settings for each space's terrain are described in the space.settings file located in the relevant space folder
<space.settings>
	<timeOfDay>	system/data/sky.xml	</timeOfDay>
	<skyGradientDome>	system/data/sky.xml	</skyGradientDome>
	<bounds>
		<minX>	-48	</minX>
		<maxX>	47	</maxX>
		<minY>	-48	</minY>
		<maxY>	47	</maxY>
	</bounds>
	<terrain>
		<version>	200	</version>
		<heightMapSize>	128	</heightMapSize>
		<normalMapSize>	128	</normalMapSize>
		<holeMapSize>	64	</holeMapSize>
		<shadowMapSize>	64	</shadowMapSize>
		<blendMapSize>	256	</blendMapSize>
		<lodInfo>
			<startBias>	0.800000	</startBias>
			<endBias>	0.990000	</endBias>
			<lodTextureStart>	150.000000	</lodTextureStart>
			<lodTextureDistance>	80.000000	</lodTextureDistance>
			<blendPreloadDistance>	100.000000	</blendPreloadDistance>
			<lodNormalStart>	300.000000	</lodNormalStart>
			<lodNormalDistance>	100.000000	</lodNormalDistance>
			<normalPreloadDistance>	100.000000	</normalPreloadDistance>
			<defaultHeightMapLod>	2	</defaultHeightMapLod>
			<detailHeightMapDistance>	500.000000	</detailHeightMapDistance>
			<lodDistances>
				<distance0>	25.000000	</distance0>
				<distance1>	120.000000	</distance1>
				<distance2>	250.000000	</distance2>
				<distance3>	700.000000	</distance3>
				<distance4>	1100.000000	</distance4>
				<distance5>	1700.000000	</distance5>
			</lodDistances>
			<server>
				<heightMapLod>	2	</heightMapLod>
			</server>
		</lodInfo>
	</terrain>
	<farPlane>	1500.000000	</farPlane>
	<startPosition>	607.810730 211.184265 -206.891937	</startPosition>
	<startDirection>	0.000000 0.010000 0.009964	</startDirection>
	<oldClouds>	false	</oldClouds>
	<minimap>
		<mapName>	spaces/highlands/space.outdoors.dds	</mapName>
		<worldMapWidth>	3200.0	</worldMapWidth>
		<worldMapHeight>	-3200.0	</worldMapHeight>
		<worldMapAnchor>	00.0 00.0	</worldMapAnchor>
	</minimap>
	<skyDome>	system/models/clear_overhead.visual	</skyDome>
	<skyDome>	system/models/horizon_ring_cloud.visual	</skyDome>
</space.settings>
The green section of the space.settings file deals primarily with GeoMipMapping. This particular space.settings file defines that 100% blends should be drawn up to a distance of 150 Meters. The blends then fade out over a distance of 100M whilst the terrain photograph is blended in. After 250M ( <lodTextureStart> + <blendPreloadDistance> = 250) only the terrain photograph is drawn.
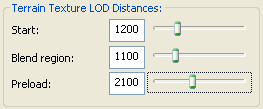
These Terrain Texture LOD Distances can be modified from within World Editors Environment Tab
The key thing to note here is that the blends are drawn up to 250M away from the player. Because blends require more resources to draw its a good idea to try to limit the distance that blends are drawn whilst maintaining visual appeal.
The blue section section of the space.settings file describes GeoMorphing. There are four distinct LOD distances, each distance defines when a higher/lower resolution chunk should be used.
Copyright 1999-2011 BigWorld Pty. Ltd. All rights reserved. Proprietary commercial in confidence.


 Requires fixed function cards or higher