Painting the terrain
 Using masks to texture the terrain
- Terrain texture management
- Terrain texture projection
- Terrain texture tiling
- Specular lighting on terrain
- Terrain texture material type
- Cloud shadows
- Creating terrain textures
Painting the terrainUsing masks to texture the terrainTerrain texture management Terrain texture projectionTerrain texture tilingSpecular lighting on terrainTerrain texture material typeCloud shadowsCreating terrain texturesDepending on the style and look of the area you would like to create in your world, you should consider the types of terrain textures that you would like, and how they might best work together. For example, if you are creating a grass-covered plane, you might like to have two types of grass, and something to offset this grass into paths – dirt, for example, which might clear away into rocks, etc.
 Painting the terrain
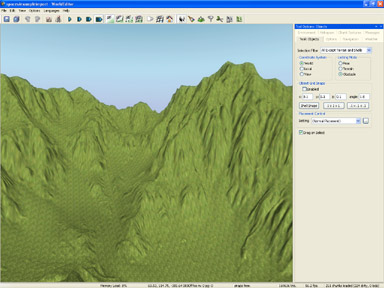
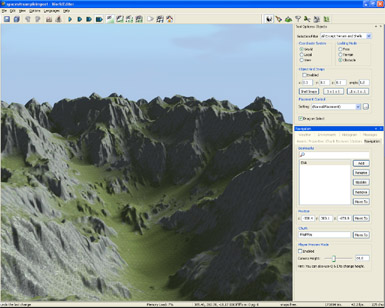
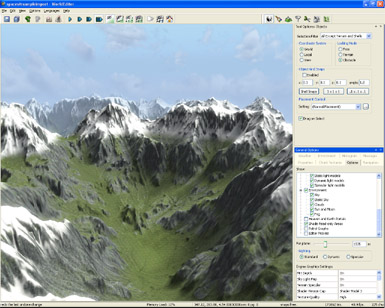
To paint the terrain, follow the steps below:
1 Open WorldEditor.
2 Click the Terrain Texture Tool toolbar button ( ) or use the shortcut key 2 .
3 Select the Asset Browser panel.
4 Select the Textures virtual folder.
5 In the file list, double click the desired texture – it
will be automatically displayed in the Terrain Texturing panel's
Active Texture group box.
You can also drag the texture onto the active texture slot from the Asset Browser.
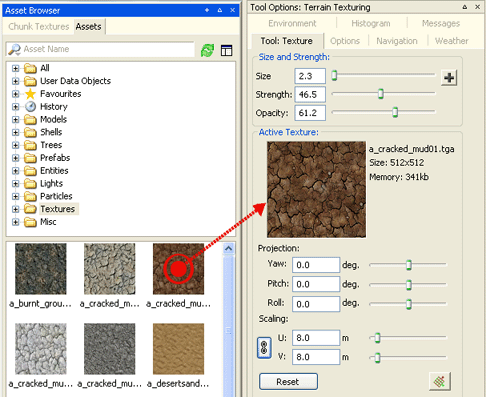
6 Adjust the brush settings before painting the terrain.
 The Size field determines
the diameter of the terrain paint brush. It can be changed by typing a new value,
by moving the slider with the mouse, or via the
The Size field determines
the diameter of the terrain paint brush. It can be changed by typing a new value,
by moving the slider with the mouse, or via the [ (left square bracket) and ] (right square
bracket) shortcuts (which decrease and increase the value, respectively).
The Strength field defines
the "flow of ink" onto the terrain. A high setting will cause the terrain
to quickly adopt the texture you are painting. The strength can
also be changed by typing or by using the slider, but has a different keyboard
shortcut: Shift+[ (left square bracket) and Shift+]
(right square bracket) to decrease and increase the value, respectively.
The Opacity sets a maximum percentage
at which the current texture will be applied to the terrain. This field can
also be changed by typing or by using the slider.
7 Drag the mouse over the terrain to paint it with the active texture.
The Sample Texture feature (indicated by the
 icon) is activated by the
Alt keyboard shortcut, and chooses the strongest texture under
the cursor, making it the active one (automatically updating the
Active Texture group box's panel).
Alternatively you can right click on the terrain whilst in terrain-painting mode, and choose Select Texture for Painting. This will give you access to all the textures underneath the cursor.
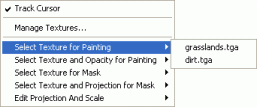
There is also an option to Select Texture and Opacity for Painting
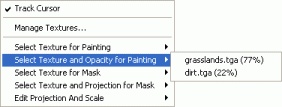
Alternatively, you can right click the Chunk Textures panel to select a texture for painting.
Using masks to texture the terrainJust as with masks in Photoshop, you can use a number of masks to select or deselect areas of the terrain you wish to paint. When using multiple masks they multiply together to mask out the terrain.
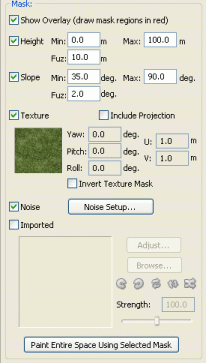
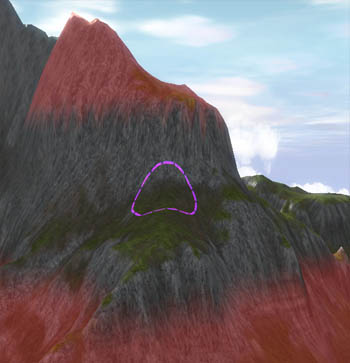
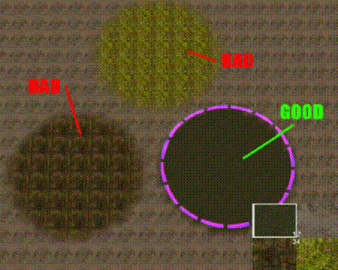
All masks can be previewed actively on the terrain whilst painting by ticking the Show Overlay tick box. The mask will be displayed as a red area (masked off). In the example below a height mask was used to enable editing between the heights 250m and 300m.
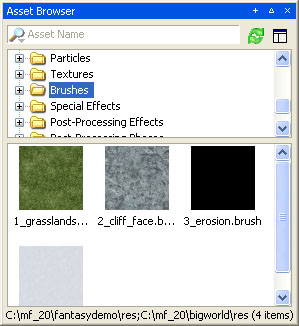
Masks can be saved as brushes to be used at a later date
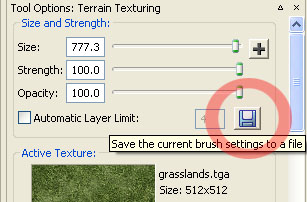
Once saved they will appear in the Asset Browser under the Brushes filter folder
The available masks include:
Height: selects a minimum and maximum height for which terrain painting is allowed. (Fuz adds a blur around the borders of this selection.)
Slope: selects a minimum and maximum slope for which terrain painting is allowed. (Fuz adds a blur around the borders of this selection.)
Texture: selects a texture currently on the terrain to be used as a mask. This selection is handy for replacing one texture with another. You can also use the invert texture mask to invert the selection.
The Include Projection setting will exclusively mask areas with both the same texture and projection. Both of these settings can be chosen by right clicking on the terrain.
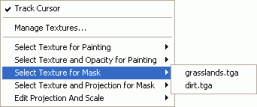
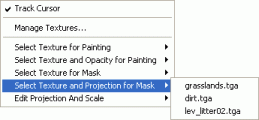
Alternatively, you can right click the Chunk Textures panel to select a texture for use as a mask.
Noise: generates a perlin noise used as a mask on the terrain. The ![]() button accesses a noise generation window which allows the user to alter the noise parameters.
button accesses a noise generation window which allows the user to alter the noise parameters.

Imported: allows the user to import a greyscale texture to be used as a mask over the terrain.
Third party tools like World Machine can create terrain texturing masks which, when used in combination with imported height masks give rapid and realistic results.
There are several example masks in fantasydemo\example_terrain_textures. The following section uses them to demonstrate the power of using imported height masks.
The ![]() button will bring up a top down view of the entire space and allow the user to adjust the position of the imported mask. The interface acts similarly to the terrain height map interface. Supported formats include .r16, *.raw, *.bmp, terragen *.ter, DTED2 *.dt2.
button will bring up a top down view of the entire space and allow the user to adjust the position of the imported mask. The interface acts similarly to the terrain height map interface. Supported formats include .r16, *.raw, *.bmp, terragen *.ter, DTED2 *.dt2.
An entire space can be flooded by using the ![]() . Be warned, this can take a significantly long time to do for extremely large spaces and will sometimes have to flush the undo buffer (you will be warned by a confirm prompt in such situations).
. Be warned, this can take a significantly long time to do for extremely large spaces and will sometimes have to flush the undo buffer (you will be warned by a confirm prompt in such situations).
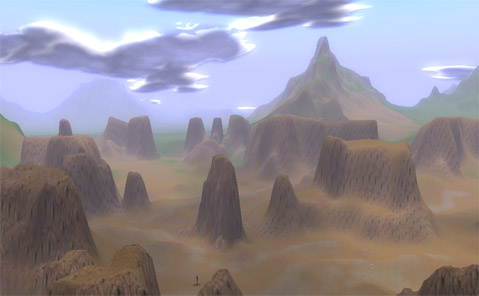
Using imported masks to rapidly texture terrain Firstly a new space is created with a default grass texture map.
A heightmap is imported, creating mountains in minutes.
A texture mask is imported which describes all the cliff face areas and a rock texture is placed in those areas.
A texture mask is imported which describes all the areas that have eroded and a dirt texture is placed in those areas. The height and slope mask settings are used to map the parts of the terrain where fallen snow would rest, and a snow texture is placed on the mountains.
This whole process took only minutes. The masks were generated from World Machine in under an hour.
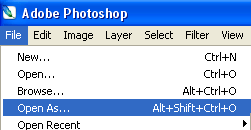
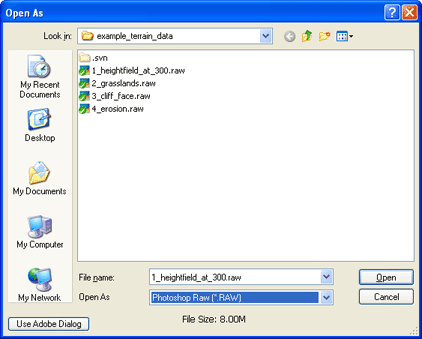
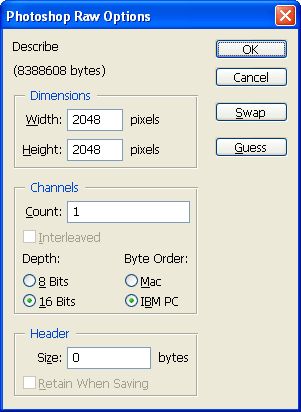
To edit .R16 files in photoshop ( photoshop CS2 & above will be required ):
- Choose File Menu - Open As
- Select .RAW format
- Follow the settings below, then click OK. Now you can edit the file in photoshop!
Terrain texture management The BigWorld terrain engine allows the artist to paint an unlimited number of textures on the ground in any area. However, users should show some restraint – the more textures painted, the more memory used and the more draw calls performed. Therefore, it is crucial that all terrain texturing is done with an informed understanding of the texture management tools.
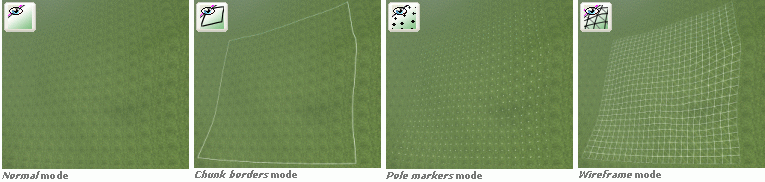
The first thing that must be understood is the concept of chunks. The terrain is divided into 100 x 100m segments called chunks.
 Chunks can be visualised in
WorldEditor by pressing the Chunk Visualisation toolbar buttons.
Chunks can be visualised in
WorldEditor by pressing the Chunk Visualisation toolbar buttons.
Each chunk can support an unlimited number of different textures and projections. However, the number of draw calls performed to draw the terrain is a function of the number of texture layers divided by four. So if you have 1,2,3, or 4 textures on a single chunk the graphics card will be able to draw that chunk in a single draw call, but as soon as you add one more texture, you are adding another draw call.
| Number of textures per chunk | Number of draw calls |
| 1,2,3,4 | 1 |
| 5,6,7,8 | 2 |
| 9, 10, 11, 12 | 3 |
It is therefore useful to browse around the space with the Chunk Texture
panel open and the track cursor option selected. ![]()
When you come across a chunk that is using 5, 9, or 13 textures, removing a single texture from that chunk will decrease the number of draw calls by one.
To manage the number of textures per chunk, follow the steps below:
1 Open WorldEditor.
2 Click the Terrain Texture Tool toolbar button
( ).
).
3 Activate the Chunk Textures panel – on the viewport, right-click the terrain, and in the context menu, select the Manage Textures menu item.
The Chunk Textures panel
can also be activated by selecting the View→Show Chunk Textures Panel
menu item.
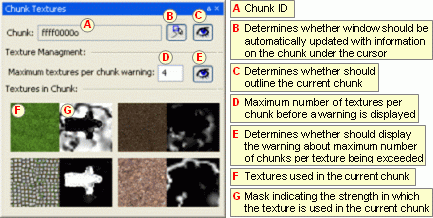
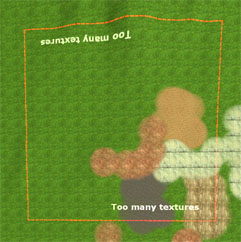
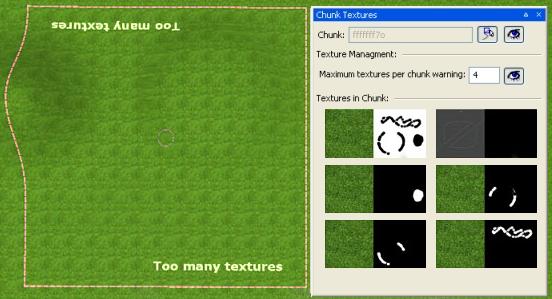
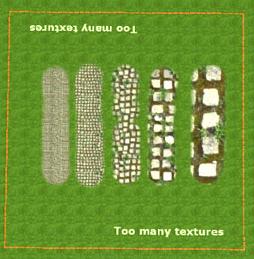
The texture management tool allows you to view those chunks that
exceed a given number of textures (specified in the Maximum Textures Per
Chunk Warning field.) If the  button next to the field is pressed, then a red border will be placed around those
chunks that contain more than the specified number of textures, and the text Too many
textures will be printed on the problem chunks.
button next to the field is pressed, then a red border will be placed around those
chunks that contain more than the specified number of textures, and the text Too many
textures will be printed on the problem chunks.
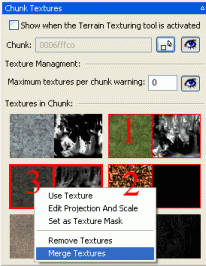
4 To reduce the number of textures in a chunk, right-click the texture that you wish to remove, and in the context menu, select the Remove Texture menu item.

You can also merge multiple textures. To do this, hold down the control key and consecutively select multiple textures from the Chunk Texture panel. The last texture you choose should be the texture and projection you want to merge to. In the case below, the grass (1) and leaf (2) texture will be collapsed to the dark rock texture (3). Note the harder red boundary around texture 3: this indicates the last selected texture. Now right click on the last selected texture and choose Merge Textures.
Alternatively, you can paint over the texture that you want
removed with other existing textures – the automatic texture management
system will remove a texture if its contribution to the chunk falls below a
certain point. To do this, select the strongest texture under the cursor, using
the Sample Texture feature (activated by the Alt keyboard
shortcut and indicated by the
icon). Paint over the
problem texture until it is no longer visible. If you have sufficiently covered
the problem texture, then it should automatically disappear from the Chunk
Textures panel.
You can replace one texture with another by dragging a texture from the Asset Browser onto one of the textures in the Chunk Textures panel.
Another way of limiting the number of textures per chunk is to use the Automatic Layer Limit function.
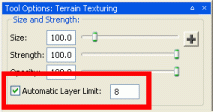
With this option ON, the texture tools will never paint more than the specified number of textures per chunk. Once the chunk limit is reached, adding a new texture will automatically replace the least contributing texture in that chunk. This option defaults to a maximum of 4 textures per chunk when using BigWorld's simple terrain.
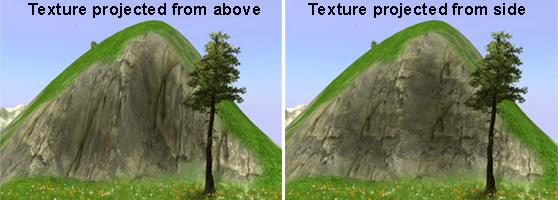
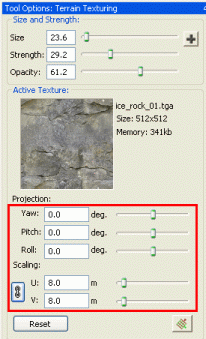
Terrain texture projectionIt is possible to project textures from any angle, just as you would a planar projection in 3dsMax or Maya. In the example below, the rock texture has been projected from two different angles: on the left it was projected from above, resulting in a stretched texture, whereas in the image on the right it was projected sideways onto the side of the hill, thus removing any texture stretching.
There are two ways to alter the projection of a terrain texture that has not yet been applied to the terrain.
Alter Terrain Texturing, Active Texture panel's projection Yaw, Pitch,
Roll and UV fields.
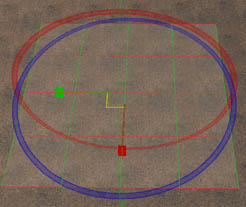
Use the Alt + Shift + Left Click key combination to select a projection from the terrain normal.
If the texture whose projection you wish to alter is already applied to the terrain,
you must use the edit projection button ![]() .
.
This will bring up a gizmo on the terrain which will allow you to alter the projection and scaling of the current texture. Alternatively, you can use the projection and scale sliders in the active texture panel.
Warning: Each newly projected angle creates a new texture layer. Too many terrain layers will impair the engine's performance. Try to limit the use of different projections to instances where it is really necessary.
The example chunk above is using the same grass.tga
texture, projected at five different angles – the result is five texture
layers being used. Each new texture layer is another draw call, which results in
increased memory usage (due to the mask information).
Terrain texture tilingIn the example below, the same path.tga texture has been applied
to the terrain with five different texture scales.
There are two ways to alter the terrain texture scale:
Alter Terrain Texturing
panel's Active Texture group box's U and V fields.
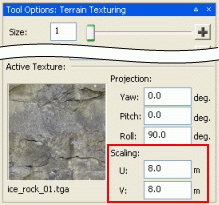
Use the Terrain
Projection gizmo (activated by the Shift keyboard shortcut).
Warning: Each newly resized texture adds another texture layer, even if the same texture is resized multiple times per chunk. Therefore, be careful when painting texture to only change texture scale when absolutely necessary.
Specular lighting on terrainThe terrain exhibits specular lighting. The colour of this specular light is a combination of the terrain diffuse colour and the colour of the sunlight.
The contribution of each can be adjusted using the terrain watcher specular diffuse amount (see below).
The terrain texture has to be a .tga file – this is
because the specular strength is determined by the alpha map, which cannot be
specified in .bmp files.
White areas in the alpha map generate bright specular highlight, while black areas generate none.
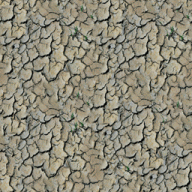
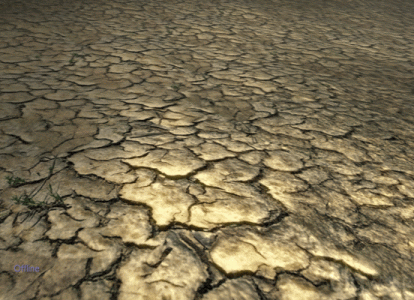
The terrain texture in the example below has specular highlights on the smooth surfaces of the cracked mud, but none within the cracks.
Colour information |
Alpha information |
Specular lighting applied to texture
Adjusting terrain specular properties via watchersIn World Editor you can access controls or "watchers" that describe the terrain specularity, via the Debug (Watcher) console (for details on this and other tools consoles, see the document Content Tools Reference Guide, chapter Tools Consoles).
To change the value of a watcher, follow the steps below:
1 Open WorldEditor.
2 Press control + F7 to open the Debug (Watcher) console.
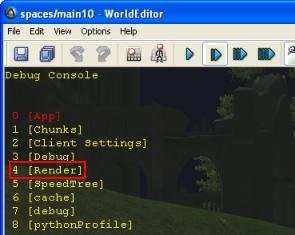
3 Navigate to the [Render] item (either by
using the Page Up and Page Down keyboard shortcuts,
or by typing its list number – in this case, 4), then press Enter – this will navigate one level down in the watcher
tree.
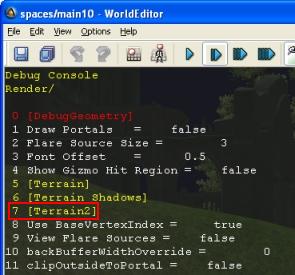
3 Navigate to the [Terrain2] item, then press Enter.
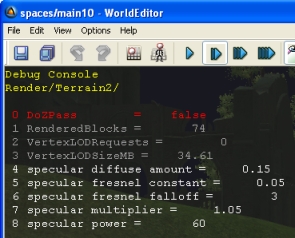
4 Navigate to the desired watcher, then press Enter
to enter Edit mode, where you can change its value. The watcher's specular
fresnel constant, specular fresnel falloff, specular multiplier and specular power
will affect the terrain's specular appearance.
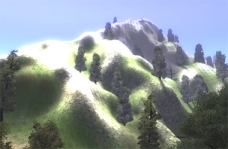
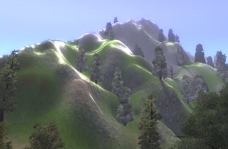
Some of the different effects you can get using the terrain specular watchers.
These effects are not permanently
applied to the terrain – they are only preview features. If you want them
to be permanently applied to the terrain, then the code needs to be updated with
the values that gave you the best result in this exercise.
Terrain texture material typeEach object in BigWorld has a material kind. Material kinds can also be assigned to each terrain texture. This allows you to script different sounds, effects, etc depending on what terrain texture is being interacted with.
Terrain texture material kinds are defined in bigworld/res/system/data/material_kinds.xml
<kind>
		<id>	9	</id>
		<desc>	Snow	</desc>
		<sound> snow    </sound>
		<help> Hard crunchy snow. </help>
		<sfx>	sets/global/fx/sfx/sfx_pchang_snow.xml </sfx>
		<terrain> sets/t_ice/maps/terrain/ice_snow </terrain>
		<terrain> sets/t_ice/maps/terrain/ice_snow_pure </terrain>
		<terrain> sets/t_ice/maps/terrain/ice_snow_pure02 </terrain>
		<terrain> sets/t_ice/maps/terrain/snow_grass </terrain>
		<terrain> maps/landscape/ls2_snow01 </terrain>
		<terrain> maps/landscape/minspec_snow </terrain>
		<terrain> maps/landscape/minspec_mud </terrain>
</kind>
Cloud shadowsClouds dynamically cast shadow on the terrain and outdoor objects. This is done automatically, and is calculated from the actual clouds in the world.
World shadowed by clouds
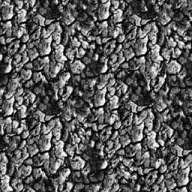
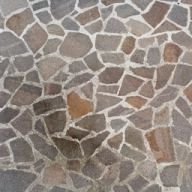
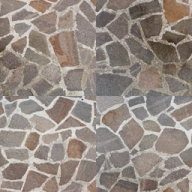
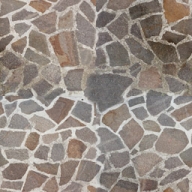
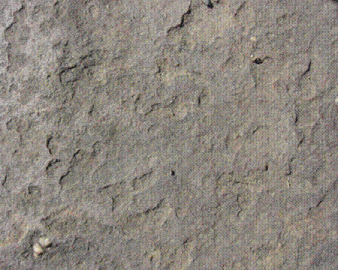
Creating terrain texturesRemoving small frequency tilingA good terrain texture must tile in all directions. If it is to be used over large areas, be careful that it does not look visibly and unnaturally repetitive.
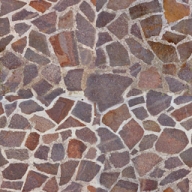
Depending on your preference, you can either paint it by hand in Photoshop, or use photo reference. In this tutorial, we will use a digital photo to create a rock terrain texture.
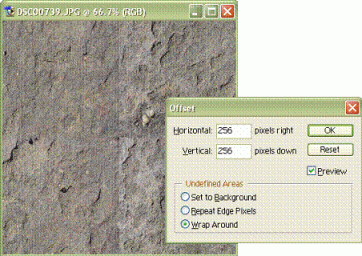
Next, we will make this photo in a tileable texture. In Photoshop, resize the image to something square in dimension (e.g., 512x512).
Use Photoshop's Offset filter to create a tileable texture. Set Horizontal and Vertical fields to 256 (exactly half of the original texture size), and select Undefined Areas group box's Wrap Around option button.
To create a texture that is tileable in all directions, use the Clone tool to hide the edge transitions.
Below is the finished texture. After using the Clone tool, it looks seamless, and is ready to be placed on your terrain.
Save your texture into folder res/maps/landscape, then create
other terrain textures for this landscape, such as grass, dirt etc.
Removing large frequency tilingSometimes larger differences in the texture can be seen when the texture is tiled and viewed from a distance. To remove these larger frequency repetitions, try using Photoshop's High Pass filter, or follow these instructions to mimic the effects of a high pass filter.
The Offset filter is used to remove small scale repetition, as outlined above.
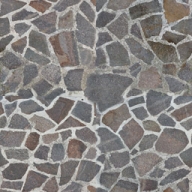
Original texture |
Offset filter applied |
Clone tool and brushes cover up edges |
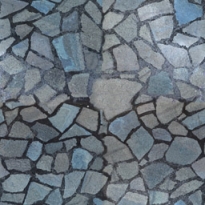
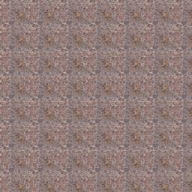
A preview render (3ds Max) of the reworked texture tiled and viewed from a distance shows the large scale frequency visible in the texture.
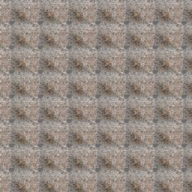
Preview of texture tiled 8x8. Note the repetitive frequency
To remove this visible repetition, you can simulate the effects of a High Pass filter:
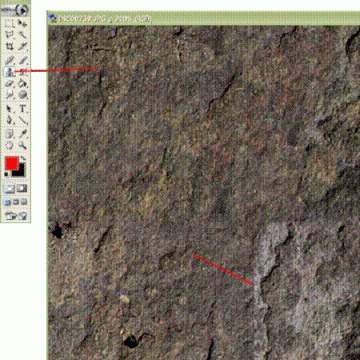
1 Create a backup save of your de-seamed texture.
2 Create a duplicate of the texture on a new layer.
3 Invert the top layer by selecting the Image→Adjustments→Invert menu item.
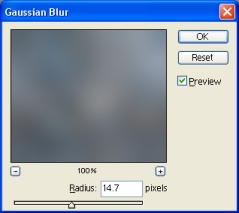
4 Use Gaussian blur to blur the inverted layer by selecting the Filter→Blur→Gaussian blur menu item.
Try to match the amount of blur to the large scale frequency that you are trying to remove.
The amount of blur is the most important part of this process. As you adjust it, watch the preview window. Common blur radii range from 10 to 60 pixels.
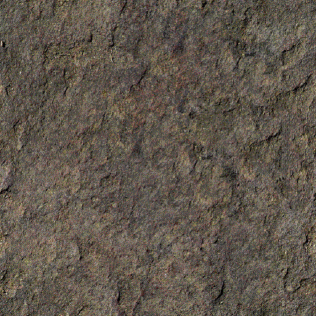
5 Use the overlay layer method to blend the inverted layer with the original one.
If the effect is too strong, then reduce the opacity of the inverted/blurred layer.

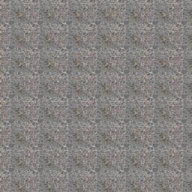
This overlay method has now removed most of the large scale frequency repetition. You can see the results in the tiled preview rendered in 3ds Max.
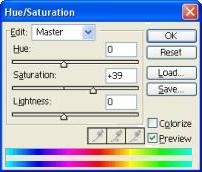
Unfortunately one side-effect of this method is that it pushes all colours
to mid-grey (R=128,G=128,B=128). To
compensate for this de-saturation, you should increase the saturation and play
with the colour balance. The final tiled product is free of most of its
large-scale tiling.
Copyright 1999-2011 BigWorld Pty. Ltd. All rights reserved. Proprietary commercial in confidence.