Positioning characters for interaction with an entity (IsCoordinated)
 Two characters interacting (IsCoordinated and IsImpacting)
- Animating HardPoints
Positioning characters for interaction with an entity (IsCoordinated)Two characters interacting (IsCoordinated and IsImpacting)Animating HardPoints Positioning characters for interaction with an entity (IsCoordinated)
Follow the steps below:
1 Load the Warrior_pull_sword.max file.
2 To construct an interactive sequence between the player character and an entity, you should create the animation with all interactive objects in the same scene.
This will help you to coordinate the animation and accurately position the character in relation to the objects.
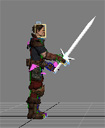
Character and entities for interaction
In the animation above, the character is about to approach the stone and pull out the sword, then return to the exact same start position when finished.
3 With the home grid turned on, you can see the biped is offset from the origin in the default pose (in this case an idle posture).
Idle as the default pose
The idea for this is that during the game, the player will approach the entity and activate the interactive sequence when in a range close enough to trigger the animation. The character will automatically move into the correct position (before the start of this animation), then play the animation all the way through, finally returning to the offset idle position at the end of the sequence. The reason for the offset is to close the remaining distance within the animation itself, so that the player does not need to stand right over the entity in order to interact.
The action for this animation will use the Is Coordinated tag. This tag makes the offset distance available to scrip so the programmer can correctly align the player before triggering the animation.
Animating the contact point for attachment1 Load the Warrior_pull_sword.max file.
2 Using the pull sword animation as an example, look closely at the point of contact where the hand grasps the sword.
The two hard points meet in exactly the same position. The animation for the right hand was deliberately designed this way to conform exactly to the position of the sword handle, so that the two hard points match each other at their pivot axis.
Exact position match at the hard points determines the contact point
During the game, the HP_sword at the contact point on
frame 38 would be linked via script to the HP_right_hand hard
point, thus allowing the sword to be pulled out of the stone and carried by the
player or character.
 Note that it is only linked here
in 3ds Max for the purpose of demonstrating the effect. You should not actually
link the entity or item to the character when exporting.
Note that it is only linked here
in 3ds Max for the purpose of demonstrating the effect. You should not actually
link the entity or item to the character when exporting.
3 This method of matching the animation to existing hard points can be difficult. Another way to approach the problem of getting hard points in sync is to create the animations first, then add the hard points at the contact point afterwards. You would then need to re-export the mesh and any other animations again with the attached hard points.
4 Another hard point will also need to be created, so that
the sword can be attached to the stone. The easiest way to do this is to
select the existing hard point for the sword and make a cloned copy of it. Name
this copy HP_stone, then link it to the stone object, which will
act as a temporary anchor for the sword until the player pulls it out.
Exporting character animation segments The animation for pulling out the sword will need to broken up into segments for exporting. There will be two animation segments exported – an approach segment and a return to idle segment.
This is done so that the programmers can determine the contact point at which the item (sword) is attached to the character (right hand) using the two hard points.
1 Hide (or delete) the stone entity and the sword item along with their hard points.
Only the biped and all its attached hard points should be visible in the scene.
2 In the Time Configuration dialog box, change the Start Time field to 0, and End Time to 38 – this will be the approach segment, with frame 38 being the contact point which then lets the game engine know when to attach the sword to the hand.
Idle position |
Right hand makes contact |
3 Export this segment of animation in the
warrior/animations as
warrior_pullsword_approach.animation. Choose Export node
animation.
4 For the return to idle segment of animation, change
the Start Time field to 39 and End Time to 85, then
export this to the same folder as
warrior_pullsword_return.animation.
Inside the game engine several events must be coordinated to create a smooth sequence in which the player pulls his sword from a stone. Here is a list of the component events.
1. The player targets the sword.
2. The Script recognises the player wants to pull the sword from the stone and uses the
offset distance ( Is Coordinated) in the warrior_pullsword_approach.animation.
to correctly position the character for a warrior_pullsword_approach.animation.
3. The warrior_pullsword_approach.animation is played. At the end of this animation,
the player's hand has contacted the sword and the two Hard Points are perfectly matched.
4. The programmer uses the end of the warrior_pullsword_approach action
to attach the sword HP_right_hand to the player character's HP_right_hand.
(Remember the programmer can only time an event at the beginning or end of an action.)
5. Once the hard points are linked the game will play the warrior_pullsword_return.animation
with the sword now linked to the player's hand.
Exporting the entity object1 Load the Stone_entity.max file.
2 Before exporting, the entity object should be centred at the origin to make placement in WorldEditor easier.
To centre the stone object, select and move it to the origin with the hard point still linked to follow. Align the pivot point of the stone to the origin. The object mesh should sit naturally on the home-grid as though the grid itself was the terrain level.
Stone and hard point centred
3 Leave the hard point linked to the stone in its relative position and save both objects to a separate 3ds Max file.
4 Export this as a Static with nodes object to a new
stone sub-folder, under the name stone.visual, and
reference any texture maps.
Static Visual type
Stone entity folder created
Two characters interacting (IsCoordinated and IsImpacting)In this scenario, two characters are about to interact (fight). Player A character is centered at the origin, and player B (Usually the NPC) is already offset.
Player at the origin with NPC offset
1 Load the Warrior_attack.max file.
As the animation plays, the two characters move from their original positions, and both end up offset from the origin at the end of the sequence.
Player and NPC both offset from the origin
The main point illustrated here is that a character (or animated object) can move off its original position during an interactive sequence and end up in a new position. Compare this to the previous example above using the stone and sword, where the player character returned to its original position at the end of the animation. This distinction will become important after the animation has been exported and the actions are applied – see the next step.
2 Because the player has moved in a non-linear motion from its original position to the last frame, it must have an action assigned to it in ModelEditor, with the IsImpacting check box selected. Also because it is coordinated with player B it must use the IsCoordinated tag. This option will recognise the offset in the game, and update the entity's position at the completion of the animation.
3 In summary player A is going to be using both IsCoorinated and IsImpacting. Whilst player B will use the IsImpacting tag
Animating Hard Points Hard points can be animated. You could use an animated hard point to move a particle system source, or to animate attachments.
Here is how I would create an animation where the character throws a weapon from one hand to the other, spinning it in the air. All I will do is animate the character's HP_right_hand so that any object attached to it will follow its movement.
1 First, import both the character and its item into your 3d Application.
2 Rearrange the sword's hierarchy as shown. Now, if we move
the sword's HP_right_hand, the sword will follow.
3 ![]() Align
the sword's
Align
the sword's HP_right_hand with the character's HP_right_hand
to start the animation.
4 Animate the sword (using the swords HP_right_hand) flipping through the air and landing in the left hand. Make sure the last frame of the animation the swords HP_left_hand matches the characters HP_left_hand.
5 For every frame that the sword HP_right_hand is in the air, use align ![]() to move the characters HP_right_hand to the swords HP_right_hand and set a keyframe.
to move the characters HP_right_hand to the swords HP_right_hand and set a keyframe.
6 Alternatively if animating the hard point whilst it is attached to the players hierarchy is too difficult you could use the Use Reference Hierarchy feature to temporarily break the hierarchy to make animation easier.
7 Hide or delete the sword and its HardPoints and export the characters animation. Create an action for the animation, the programmer will use the end of the action swap the swords attachment in code so that in successive animation the sword will be attached to the left hand.
Copyright 1999-2011 BigWorld Pty. Ltd. All rights reserved. Proprietary commercial in confidence.