Characters to be used in the BigWorld engine should be modelled and
animated facing the BACK view. So, if you look at your model from the
front viewport your
character will be facing away from you. This applies for both 3ds Max and
Maya.
It is very important that you create your characters like this. It will save significant time,
and minimise problems when it comes to incorporating animation into the game.
Trying to rotate or scale a model/rig after it has been skinned and animated
in the wrong direction is usually problematic. Correct setup is highly recommended.
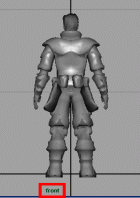
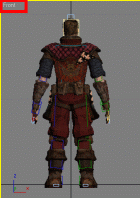
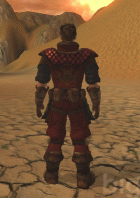
Characters modelled facing the back view in Maya, 3ds Max and in FantasyDemo
If your modelers have problems modelling characters facing away from the
front viewport, simply reverse the mapping of your front and back viewport
keys.
If you have pre existing assets that are rigged to face towards the front view you can use them within the BigWorld engine by using the Opposite Facing feature of the exporter
The translation of the root node in 3ds Max and Maya is used to determine the playback speed of an animation as it translates in the game so as to prevent foot sliding. Without movement translation the Action Matcher will not be able to scale the playback speed of the animation to prevent foot sliding.
Characters must move when animating
Bipeds and other rigs must move off the origin for exporting – Do NOT animate in place. Do not animate foot sliding.
Do not animate on the spot
If the root node does not move, then the character will not move in the BigWorld engine.
In the BigWorld engine, objects derive their speed from the translation of
the object's root node. Due to optimisations on the BigWorld server it
is important that the root node moves at a linear rate for each
animation. If non linear translations are used, discrepancies between the position of the client model and server entity will cause animation glitches or even game play problems (e.g. targeting discrepancies).
Take the following example.

Linear forward movement of the root node ensures model position matches entity position
When the root node's forward movement is not linear discrepancies between avatar and entity position occur.
This means that an object such as a biped can only have two keys for its
horizontal movement: a start key frame, and an end key frame. Any number of keys
is allowed for non-translational keys. For example, the root node may move side
to side, and up and down.
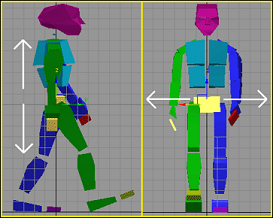
Permissible biped centre movement – only vertical and horizontal sideways
To ensure that a 3ds Max biped is moving with linear movement, delete all
the horizontal keys in between the first and last key.
Select and delete the middle Horizontal body
movement keys, leaving the start and end keys remaining.
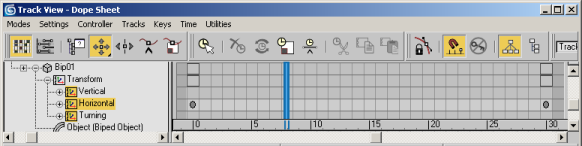
Middle horizontal keys are deleted leaving only a single beginning and end key.
|
This will make the biped's forward movement linear from start to finish,
so that the avatar's perceived position mimics the position of the avatar on the server.
The only variable movement allowed for the biped centre between the
start and finish is either vertical (Z-axis) 'bobbing' movement, or
sideways horizontal (X-axis) movement for pelvic weight shifting.
|
The same rules apply to non-biped rigs. The root node must have a linear
rate of movement from its beginning position to its end position.
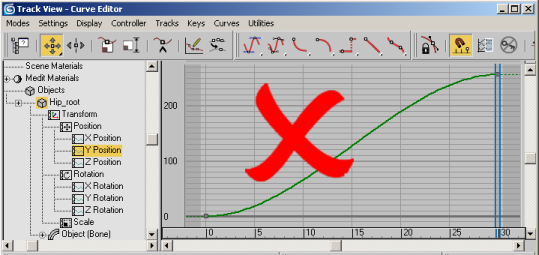
This type of movement for the root node is NOT allowed. The character will
clip through the ground,
and its position indicated by the model will
not match that of the position of the entity on the server.
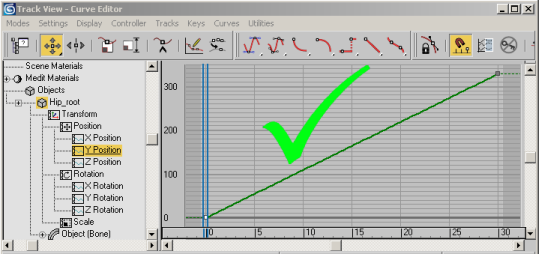
This movement is allowed for the root node. The position of the model matches
that of the entity on the server.
The same goes for animations in Maya. A character's root node must move
linearly along the direction of intended travel.
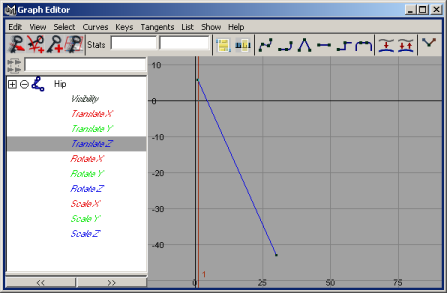
Just remember that the centre node must translate with linear tangents
between two keys at the start and finish.
Its always best to ensure that the root node of the model is centered to the world coordinates (X=0 Y=0 in 3dsMax and X=0 Z=0 in Maya) for the first frame of most animations. This makes the task of synchronising animation blends simpler.
When an action tagged as IsMovement blends into another IsMovement tagged action the BigWorld engine will synchronise the point at which the two animations blend.
Example 1. In the image below demonstrates a 30 frame walk animation (Blue) transitioning into a 30 frame run animation (Red). The walk animation just happens to complete its entire cycle before the run animation is blended in. Such an example would have perfect blending providing the position of the feet match during both walk and run cycles.
Example 2. This transition occurs as the walk animations is half way through its cycle (frame 15). The BigWorld engine cleverly blends in the new run animation at half way through its cycle (frame 16) to maintain perfect blending.
Example 3. Even when the run animation is half the number of frames as the walk animation, the BigWorld engine maintains perfect blending by finding the half way point of the run animation (15/2 = ~8) and uses this point to blend.
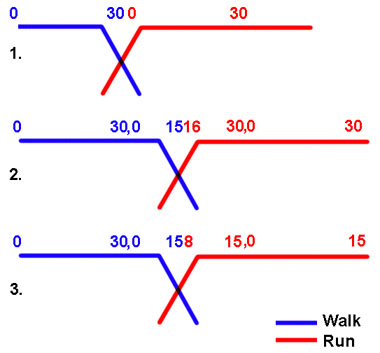
The conclusion to all the above examples is that the animator only needs to follow one simple rule when creating an animations.
Ensure that each animation is a single cycle of movement, and all animation cycles that need to blend with one another should start and end at the same pose.
So if frame 1 of the walk animation starts with left foot forward, then frame 1 of the run animation should also start with left foot forward.
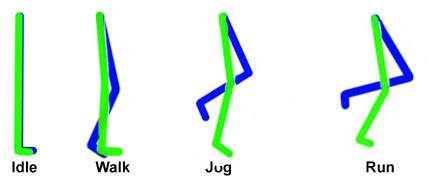
How to position the first frame of Idle, Walk, Jog, Run to ensure a nice blending between actions.
When creating Turn_left and Turn_right animations it is best to get the initial pose from the first frame of the idle animation and duplicate it. That first frame of the Idle animation should be the first frame of the turn animation.
The last frame of the turn animation should also be the same frame as the first frame of the Idle animation with the root node turned 90 degrees. There should be no forward or backward translation of the models root node.
Model position:
Its always best to ensure that the root node of the model is centered to the world coordinates in X=0 Y=0 in 3dsMax and X=0 Z=0 in Maya.
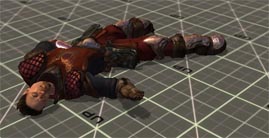
When creating falling animations, do not translate the root node of your
character in your modelling package. The model should remain in place and flail
its arms around as if falling. The avatar model will be translated by code in-game.
The corresponding action for a falling model should use the model is falling tag.
Death animations are usually broken up into at least two sections: the death
animation playing in its entirety, and a repeat of the last frame of the death
animation.
Create a single animation of the character's death in your 3d package, then
in ModelEditor import the animation twice into the
animation tab. Name the second import
something identifiable such as death:endframe.
The first animation should be set to play in its entirety.
The second animation should be set to play only the last frame of the animation.

Create two death actions, one for the
entire animation and one for the repeated last frame.
We suggest using a frame rate of 30 frames per second or higher for
animations to be used in the BigWorld engine.
Using a frame rate lower than 30fps does not give a visually appealing
result. Remember, animations are automatically compressed by the BigWorld
engine, so you are better off creating your animations at a higher frame rate
and then adjusting the compression in ModelEditor.
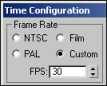
To set frame rate in 3ds Max, open the Time Configuration dialog box
via the  button.
 In the Frame Rate
group box, select the Custom option button.
In the Frame Rate
group box, select the Custom option button.
Set the FPS field
to 30.
To set frame rate in Maya, open the Animation Preferences dialog box
via the  button.
Set the Playback Speed to Other, and enter 30 in the
Other Speed dialog box.

In 3ds Max the range of animation exported is defined by setting the
Start Time and End Time within the Time Configuration
dialog box.
For example, if you wanted to export only the animation between keys 75 and
105, you would set the following in the Animation group box:
Set Start Time to
75.
Set End Time to
105.
In Maya, the exporter will read from the Playback Start Time to the
Playback End Time.
Any animation keys outside these extents will not be exported.

Only information stored from frames 1 to 10 will be exported
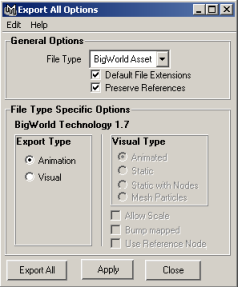
1 Select the File→Export menu item.
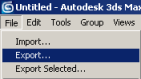
2 In the dialog box that appears, select the Animation
Exporter (*.ANIMATION) entry in the Save As Type drop-down list box
– this will select BigWorld's proprietary 3ds Max plug-in.
3 Enter the name of the animation in the File Name
field.

4 Click the Save button – this will open the
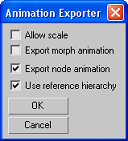
Animation Exporter dialog box.
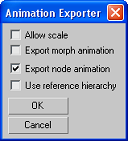
The following check boxes are available:
Allow Scale:
determines whether mesh scale animations should be exported along with the
animation. If you do not scale a mesh in your animation, then do NOT select this
option.
Export morph animation:
determines whether 3ds Max morph target and Maya blend shape animations should
be exported. See the Morph Target and Blend Shape section for further
information.
Export node animation:
determines whether skeletal node animations should be exported.
Use reference hierarchy:
determines whether another hierarchy should be used to animate the character
– see below for explanation.
For a character animation such as a walk cycle:
Make sure that only the
Export Node Animation check box is selected.
Click OK.
There will now be a walk.animation file located in the resource
structure to which you exported the animation.
1 Select the File→Export All menu item.
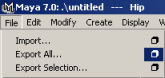
2 In the File Type Specific Options group box's
Export Type group box, select the Animation option button, then
click the Export All button.
3 Specify the location in which to save your
*.animation file, then click the Save button.
Characters and NPCs should be modelled so that they are facing away from the front
viewport. If a character has been rigged with the incorrect BigWorld setup
(i.e.. facing forward) it can be fixed using the Opposite Facing Direction
option within the exporter.
Let's suppose we have a character that has been rigged facing the front viewport
(the incorrect way). Simply rotating this character will result in what appears to be
a fix. However, when this character is implemented into the game the rotation of the
root node will cause irregularities with its animations.
To correctly fix an character facing the wrong way:
1 Export the .visual using the advanced option Opposite Facing Direction;
2 Export the .animation using the advanced option Opposite Facing Direction;
The model should now face the correct direction within BigWorld and its animation data will also move in the correct direction.
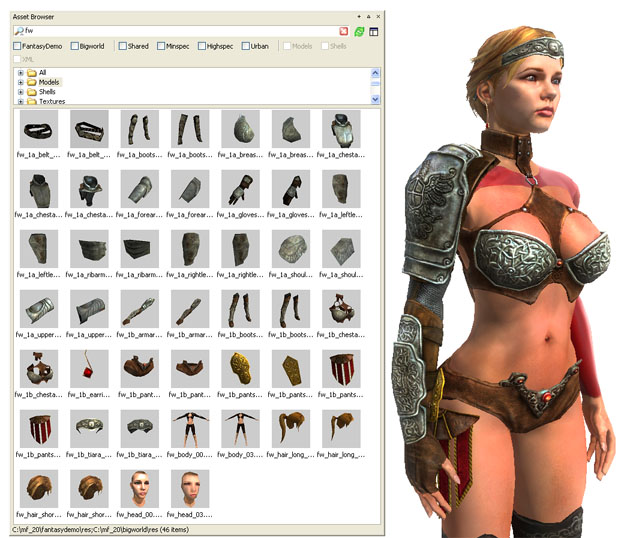
Many games require highly customisable player and NPC models. This section deals with some of the possible techniques you can use to customise your model.
A supermodel is a model made up of several separate model files that are all rigged to the same skeleton. A good example of this is the Female Warrior character in the Fantasy Demo. Each piece of the warrior's armour is rigged to the same skeleton that the warrior's base mesh is rigged to. The BigWorld engine simply loads both models and deforms them with the same skeleton. The image below shows the large number of separate models that can go together to make the final supermodel.
For character customisation purposes supermodel pieces are best used if the piece to be attached is meant to deform with the characters animation. If the piece being attached is static or animates in an unrelated/unsynchronised manner to the characters animation then a Hard Point attachment should probably be used.
When creating a Super Model in your 3d application simply skin multiple objects into the same skeleton and export each one individually.
Parts of a supermodel can be viewed together in Model Editor by using File - Add Model or Ctrl + drag from Asset Browser. Note this is only for preview purposes.
Although Hard Points usually have static objects attached to them, it can sometimes be desirable to attach fully animating objects to the player model via Hard Points.
Items attached via Hard Points can have their actions automated "revved" via the parent models action matcher. Put simply, you can attach a model via a Hard Point and have its actions driven by the parent models action matcher.
The types of animating models best attached via Hard Points are those who's animations do not have to be synchronised with the base models animations.
For example, a pinwheel stuck in the players hat would be very suitable for an action matcher driven Hard Point attached item. Clothing, A cape, or ponytail need to be synchronised with the base models animations and would be best done using supermodel.
Several changes have to be made to the python code in order to enable action matcher driven attached objects. If you want to use this feature ensure that a programmer has made these changes.
1. Add an action matcher motor to the attached model (e.g. the staff), and set
its useEntityModel property to True.
2. Set $p.model.moveAttachments to True
To see this work in Fantasy Demo (the FD scripts currently aren't setting this
up automatically), take out the staff and enter these commands into the Python:
am = BigWorld.ActionMatcher( $p )
am.useEntityModel = True
$p.model.right_hand.addMotor( am )
$p.model.moveAttachments = True
$B.debugAQ( $p.model.right_hand )
You should then see the actions being triggered on the staff as you move the
character around.
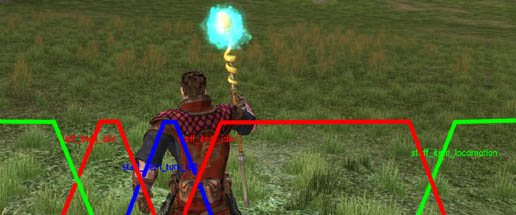
Note: That if you need to scale the playback speed of a movement animation then the animation of the HardPoint attached item will also require translation in its animation. Please see the staff.model animation staff_item_locomotion_world_transform.animation as an example.
The staff.model used by the player character in FantasyDemo has its actions driven by the player model.
To view the actions on the staff model type the following into the python console (~tilde +P)
$B.debugAQ($p.model.right_hand)
Note that the staff model actions react to the players movement.
When creating a supermodel it is common to want two separate meshes to share a common boundary. When meshes are cut into separate pieces they each get their own new vertex normal which unfortunately does not match the vertex normal of the neighbouring mesh. The result is a lighting seam which can be seen in the image below along with the two newly made vertex normals
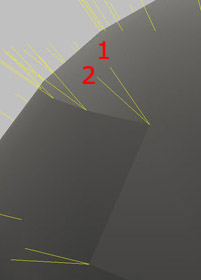
Lighting seam resulting from split mesh
Fortunately these normals can be consolidated using the Edit Normals modifier in 3dsMax or the Vertex Normal Edit tool (Lock Normals) in Maya
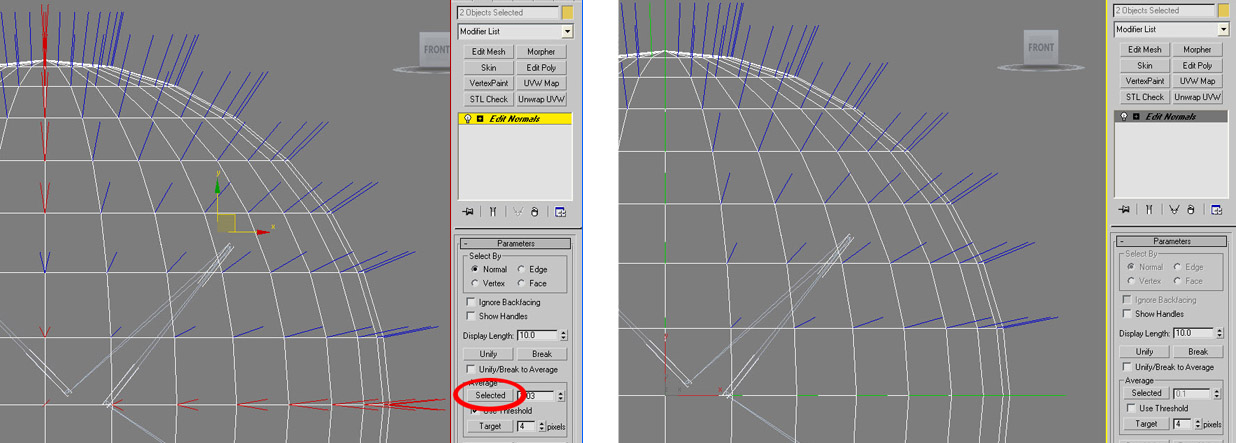
Vertex normals being consolidated using the Edit Normals Modifier
For 3dsMax:
Note: Editing a models vertex normals only works when the model is skinned.
1. Select both assets you wish to consolidate vertex normals
2. Give them a shared Edit Normals modifier
3. Select by Normals
4. Average the Selected normals
5. Make modifier unique
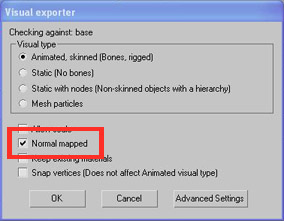
6. Ensure that each part of the model is exported separately using export selected and the model is exported with Normal mapped selected
For Maya:
1. Lock Normals neighbouring normals using the Normals > Vertex Normal Edit Tool
2. Ensure that each part of the model is exported separately using export selected and the model is exported with Normal mapped selected
The Reference Hierarchy option allows animators to animate a model using a different hierarchical setup to the default setup exported with the model.
For example if you decided for a specific animation it would be easier to animate the character if the root node was the hand (hanging from a tree) rather than the default root node being in the hips, then you could use the Reference Hierarchy option. Sound strange?, well this is exactly what occurs when you create an IK target for a limb. The hierarchy becomes reversed and the limb rotations are solved by the IK controller. In such a case the reference hierarchy solution is essential.
To use the reference hierarchy option:
1 The default hierarchy (hip as root) visual should be exported without any modifications to the hierarchy. This visual will be used as the reference hierarchy.
2 The 3d file should be saved as a separate backup file.
3 The 3d file is altered so that a new hierarchy exists (hand as root).
4 The model is animated with the new hierarchy (hand as root).
5 Export the animation selecting the Use reference hierarchy option. When you select the option it will bring up a dialog asking for the location of the reference hierarchy. Simply select the original visual exported in point 1.
The aim of this example is to export animations to BigWorld without exporting unnecessary objects like animation handles & controllers which may get exported along with the rest of the skeleton. In order to achieve this, we will need to export a .visual file without the controller objects, this will be our reference hierarchy visual.
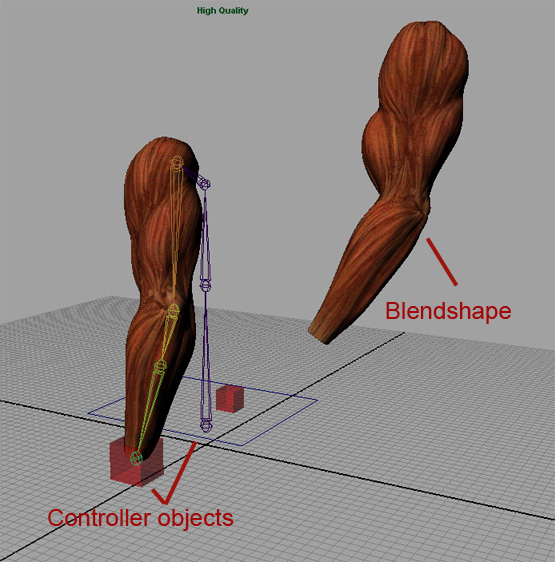
- The example scene contains dummy /controller objects which we do not want exported when we save out a .visual file.
- Save the original rig and in a new copy delete the controller objects within the scene that should not be included in the exporting process.
- Save out this basic scene with just the skeleton and blendshape as a different scene.
- Export this model File/Export All - Bigworld Asset as a .visual animated,skinned. This is our reference hierarchy model.
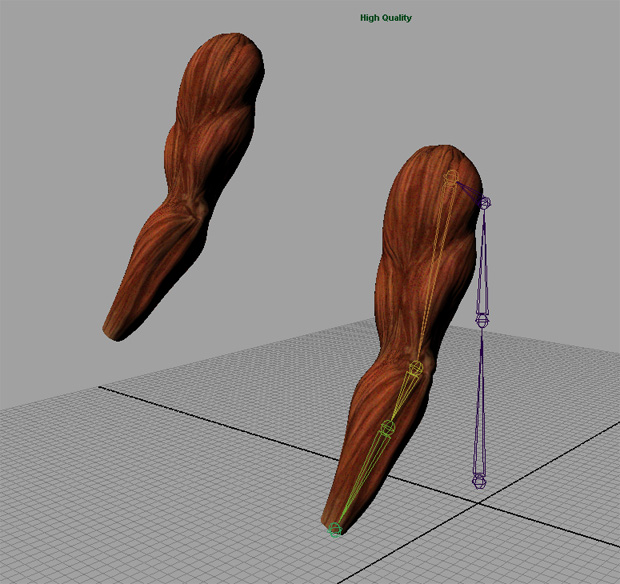
- Open up the previous scene with the controller objects and go to File/Export All options and this time, export the scene as "Animation". Be sure to check "Use Reference Node".
- A new window will pop up asking you to select the clean base scene. Browse for the .visual file you saved out previously and click " OK".
- Load up Model Editor and load in the .visual and .animation files that you exported. if you have followed the proper steps, you should end up with a clean animated scene, without the controller objects.
In a conventional rig the Hard Points of the characters hands will be children of the Hand Node.
This works perfectly and is easy to animate providing those hard points remain in exactly the same place relative to the hand (i.e. they don't move).
Problems arise if you want to animate those hard points, for example if the player throws his weapon into the air and then catches it. It becomes very difficult to animate the hard point whilst it is attached to the players hand node.
In such a case you may want to detach the hard point and animate the HP directly (or attach it to another object like the weapon and animate that object).
If a rig hierarchy is modified as above for an animation purpose, and it differs from the default rig exported with the primitive file. then the "use reference hierarchy" feature must be used.
In the case where a HP is detached from the hand and then attached to a weapon the following should be performed.
1. Export the model, visual, and primitive file with the conventional rig (HP attached to hand)
2. Export all conventional animations (HP attached to hand) as normal
3. Export all non conventional animations (HP detached from hand) using the "use reference hierarchy" feature. When prompted for a reference visual refer to the conventional .visual file exported with 1.
Note tracks are only supported from 3dsMax. If you use Maya please refer to the section on splitting up actions
Note tracks are a way of inserting information at specific times into animation so events like sounds and special effects can be triggered.
In order to add a note track, select the node you wish to add the track to in the 3d viewport.
Open the Graph Editors - Dope Sheet
The node you selected in the 3d Viewport should be visible.
It is essential that note tracks be added directly to a node. Note tracks added to the global scene or deep with a nodes parameters (such as its transforms or materials) will be ignored.
Once the node is selected chose Tracks - Note Track - Add
Edit the notes parameters by right clicking on the note on the dope sheet.
BigWorld will recognise the following inputs
cue:name
sound:name
Replace name with the event you wish to trigger. It is essential that no spaces or carriage return be entered after the note
For example, sound:ui/boop will trigger the sound event named "ui/boop".
When you export your animation tick the box "Export cue track"
These notes will trigger a callback which a programmer can use to set up special effects.
Copyright 1999-2011 BigWorld Pty. Ltd. All rights reserved. Proprietary commercial in confidence.
 Translation of the root node for animations
 Synchronising blend transitions
  Animations must translate the root node