 Texture formats and compression settings
- Animated texture maps
 Creating Cube Maps
- Authoring textures for re sizable GUI windows
Texture formats and compression settingsAnimated texture mapsCreating Cube MapsAuthoring textures for re sizable GUI windows Texture formats and compression settings
BigWorld supports the following texture formats
"dds", "bmp", "tga", "jpg", "png", "hdr", "pfm", "dib", "ppm"
These formats are compressed automatically at runtime into .dds files.
TGA (targa) files are converted to the DXT3 format, all other file formats are converted to the DXT1 format.
Because DXT3 uses twice the disk space than DXT1 you should only use tga when you require an alpha channel.
Any file with the suffix _ norms or _normal will be converted to an A8R8G8B8 texture. This is to
prevent compressing BigWorld's normal maps.
Texture detail levels - texture compressionThe texture_detail_levels.xml file found in fantasydemo/res/maps
is used to globally define the texture compression of multiple textures either by folder or by file name.
For example, if all the GUI images in your project were being over-compressed, causing undesirable
visual artifacts, you could define the following within the texture_detail_levels.xml to prevent them
from being compressed.
<detailLevel>
<! -- Defines the directory which compression rules should be applied -->
<prefix>gui/maps</prefix>
<! -- Files including the word "gui" -->
<contains> gui </contains>
<! -- Defines what file type should be compressed. Alternatives include tga -->
<postfix> bmp </postfix>
<! -- Defines what compression the defined file should use. Alternatives include DXT1, DXT3. DXT5 -->
<format> A8R8G8B8 </format>
<lodMode>1</lodMode>
</detailLevel>
Texformat - texture compressionAlternatively, if you find a texture is being over-compressed by the Direct X
standards, then you can force it to remain 8-bits per channel (A8R8G8B8) by
including a .texformat file with the same name in the same
folder. (Such .texformat files can be created in any text editor, such
as Notepad, for example.) It is usually a better idea to use the texture_detail_levels.xml file
described above, as this can be tied in with graphics settings. However, in some cases
it is easier to use a .texformat file.
So, for the following example, let's say that sky_gradient.tga
was being over-compressed, resulting in compression artifacts. The file
sky_gradient.texformat would then be created and added to the same
folder as sky_gradient.tga, thus preventing its compression. The
contents of the sky_gradient.texformat file would be the
following:
<sky_gradient.texformat>
   <format> A8R8G8B8 </format>
</sky_gradient.texformat>
You can prevent mipmaps from being created entirely if you add the following tag <noResize> true </noResize> to a texformat file. In fact, this will force the engine to simply use the file provided, and not generate a .dds. This should be used sparingly.
Animated texture mapsCreating the texture animation fileTo create an animated texture map, follow the steps below:
1 Create a sequence of animation frames in your preferred software. For this example we will use six frames of an electric field.
2 A text file has to be written to play the sequence.
Open a text editor like Notepad and write the following lines
(which will later be saved as a .texanim file):
    <root>
       <frames>abcdef</frames>
       <fps> 30 </fps>
       <texture>texturepath/electric1.bmp</texture>
       <texture>texturepath/electric2.bmp</texture>
       <texture>texturepath/electric3.bmp</texture>
       <texture>texturepath/electric4.bmp</texture>
       <texture>texturepath/electric5.bmp</texture>
       <texture>texturepath/electric6.bmp</texture>
    </root>
The syntax of the .texanim file is described below:
 The
The <frames>
tag determines the order in which the frames will be played – in this
example, six frames (a-f) in sequence.
If you wished to swap frames 2 and 5, the line would read:
<frames>aecdbf</frames>.
If you wished to play frame 4 twice to draw out the animation, the
line would read: <frames>abcddef</frames>
If you want to use more than twenty-six frames in a texanim, you can leave out
the frames section and the textures will be played back in the order
they are defined in the .texanim file.
The <fps> tag
determines how fast the animation will be played – in this example, thirty
frames per second.
The texture tag
determines the file to be played – the files have to be numbered and
written in sequence.
The texture path should be relative to the resources path. For details on how to set up your texture paths, see the lesson Manage Resources.
When saving the file, name it the same as the first frame in the
sequence (but with a .texanim extension) within the same folder as
the frames – in this example, it would be electric1.texanim
within folder texturepath.
Applying animated texture map to a materialTo apply an animated texture map to a material, follow the steps below:
1 Open ModelEditor.
2 Load the model to which you want to assign an animated texture.
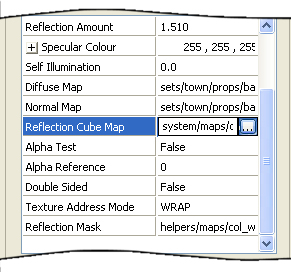
3 In the Material Settings panel, select the material that you want to change.
4 In the Properties table, select the Diffuse
Map row, then click the Browse
( ) button next to it
– the Open dialog box will be displayed.
) button next to it
– the Open dialog box will be displayed.

5 In the Open dialog box, navigate to the folder
where the animated texture file is (in our example
<res>/texturepath), then specify the file name (in our
example, electric1.texanim).

6 The selected animated material can be previewed in a variety of stand-in objects.
To preview it in such a away, select the Preview check box, and choose an item in its drop-down list.
7 Save the modified model.
Creating Cube MapsA cube map is composed of six separate images which combine to create a 360 degree panorama. Cube maps are generally used in Bigworld for environment reflection purposes. Cube Maps allow you to do " fake reflections " versus the more processor intensive " raytraced " reflections. Cube maps can be applied to the reflection map channel of BigWorld shaders.
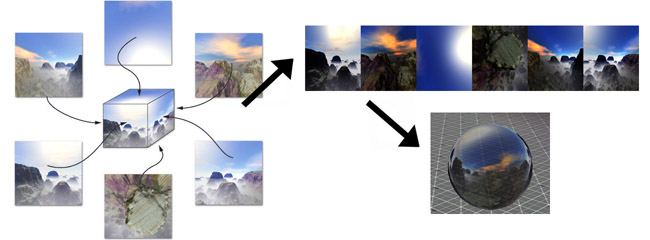
Creating a Cube Map:
Make 6 screen shots of the environment around you ( e.g.. Top, Bottom, Left, Right, etc ). It would be best to have the images tile together to form a seamless panorama.
There are many 3rd party tools available that make this a task a piece of cake.
Use an image editing program to ensure that the images are square and to the power of 2 (ie. 256, 512, 1024 etc ).
Download CubeMapGen by ATI. ( http://www.ati.com/developer/cubemapgen/index.html ). This is a great little software that makes creating Cube Maps easy. Below is a quick tutorial on how to create simple Cube Maps.
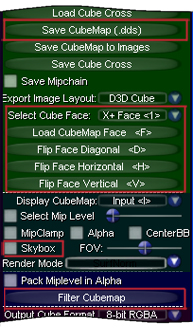 |
0 Select the "Skybox" checkbox so you can see your cube map faces in the background as they're loaded. 1 In the green section on the right, set "Select Cube Face" to +Y (the up direction). Select the "Load CubeMap Face" button. From your set of 6 images, choose the image that's in the up direction. 2 Set "Select Cube Face" to -Y (the down direction). Hit the "Load CubeMap Face" button. Select the image that's in the down direction. 3 Set "Select Cube Face" to +Z (the forward direction). Hit the "Load CubeMap Face" button. Select the image that's in the forward direction. 4 Set "Select Cube Face" to -Z (the back direction). Hit the "Load CubeMap Face" button. Select the image that's in the back direction. 5 Set "Select Cube Face" to +X (the right direction). Hit the "Load CubeMap Face" button. Select the image that's in the right direction. 6 Set "Select Cube Face" to -X (the left direction). Hit the "Load CubeMap Face" button. Select the image that's in the left direction. 7 Now that all six of your panels are loaded, switch the "Display CubeMap" drop-down to "Output". The sphere in the center will turn black because you haven't generated any output yet. 8 Hit the "Filter Cubemap" button toward the bottom. CubemapGen will work for a few seconds and then your sphere will display the filtered version of your cubemap. 9 To save out your cube map, Hit "Save CubeMap (.dds)" toward the top and give your cube map a name. |
You can now load the resulting .DDS file into an FX shader as a cube map in Model Editor.
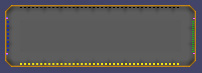
Authoring textures for re sizable GUI windowsWhen creating textures for re sizable GUI windows it's important to follow a few rules so as to decrease the number of draw calls. The two textures below are for the "GUI.Frame2" GUI components (the python code framework for creating GUI in BigWorld). This Frame2 is a re sizable window frame for GUIs such as tool tips, chat window etc.

Example texture, used to create re sizable GUI window.
The resulting GUI window
Frame2 draws the entire gui component 1 draw call. To do this, the elements of the frame need to be packed into one .tga file in a specific way
The first texture is a debugging bitmap, which demonstrate how to author the file (frame2_example_source), the second texture is the resulting window (frame2_example.bmp).
The coloured dashes indicate 2 things
1. Which side of the frame's edges are which (this is especially for the bottom
half of the source image) - you can see therefore that the four edges go top,
bottom, right, left
2. How the tiling occurs. You can see the corners are displayed only once, and
the edges are tiled to produce the correct sized frame.
The final piece of this puzzle is the background of the frame, this is tiled
from a single pixel at uv (0.5, 0.125). Note the white dot at the top of the first image.
The original source files in their correct formats can be found in the Bigworld/doc/tools_tutorial_examples/helper_maps/example_GUI_textures/
Copyright 1999-2011 BigWorld Pty. Ltd. All rights reserved. Proprietary commercial in confidence.