Table of Contents
This First Run section assumes that the user is completely new to a BigWorld server setup and is working on a freshly installed machine. As such we will step through some basic setup steps such as creating a new user account for the developer to run a BigWorld server with. Feel free to step over any steps you already feel confident with.
The following procedures will also assume that the operations will be performed using a Linux console or terminal. While there are graphical alternatives available for users that have chosen a GUI installation, by describing the text based alternatives we are able to simplify the steps to the core behaviour being performed.
Note
If you are working in a large office environment you may wish to talk to your Systems Administrator about the user configuration mechanism that is already in place in the office. The approach described below may conflict with other distributed account mangement systems such as LDAP or NIS.
Each developer that will need to run their own server must have a Linux user account created for them. This is to enable them to have a location that stores their individual development files and the configuration files which determine how their server instance will be started.
The following command which is run as the root user is used to create a new user account in Linux.
# useradd usernameUpon issuing this command a new user home directory will be created
by default as /home/.
username
With the user directory created we now need to set a password for the user to ensure they are the only one who is allowed to login. To do this issue the following command as root:
# passwdusernameChanging password for userusername. New UNIX password: Retype new UNIX password: passwd: all authentication tokens updated successfully.
With these two steps completed you now have a new user account that you should be able to login with and continue the First Run steps.
To fully illustrate the steps described above we will show the entire process of creating a new user account for a new server developer called Alice.
# useradd alice
# passwd alice
Changing password for user alice.
New UNIX password:
Retype new UNIX password:
passwd: all authentication tokens updated successfully.
While we haven't discussed multiple computer installations in much detail up to this point, one of the most common mistakes with user accounts can occur when a user account is created on different machines in the network with different numerical user IDs (UID). For example, suppose we had two server machines host-A and host-B and we performed the following operations:
# On host-A
useradd alice
useradd bob

# On host-B
useradd bob
useradd alice
Notice that the sequence of operations has been reversed on host-B compared with what was performed on host-A. As a result the UID that is created for the user bob on host-B may be the same as user alice on host-A. If the UIDs conflict for two users, there will be issues with server management and server monitoring.
There are a number of alternatives you can use to resolve this potential issue which will depend on how many machines you will need to use in your network. The most simple approach is to specify a UID when you create the accounts, such as:
$ useradd -u6001username
In this example the UID of 6001 was specified as the user was created, which allows us to specify the same UID when we create the account on another machine. This approach however becomes unfeasible when dealing with a large number of machines, in which case we may look to use a centralised account management solution such as LDAP or NIS. These approaches are more complex and are out of the scope of this document. There are numerous online resources that will guide you through the process of setting up these account management solutions.
With your user account created you can now login and start your first project which will enable you to start a server. Once you have a terminal logged in to your newly setup machine as the user created in Creating a Developer Account creating an initial example project is quite simple. As part of the server installation a program called bw_configure was installed which is used to assist in configuring your user account to run a BigWorld server. By running this script with a new project name it will both create a new project as well as set our configuration file that is used to start a server.
To create a new project run the following command, replacing the
string project_name with the name of your own
project:
$ bw_configure project_nameFor example if the server developer Alice were to create a new project called 'bigworld_first_run' she would see the following output:
$ bw_configure bigworld_first_run
'bigworld_first_run' project directory not found.
Create 'bigworld_first_run' with tutorial resources [y/N]? y
Creating new project at /home/alice/bigworld_first_run
Generating for chapter 6 - BASIC_NPC
    from /opt/bigworld/2.1/server/bin/res
    to /home/alice/bigworld_first_run/res

Writing /home/alice/bigworld_first_run/run.bat
Writing to /home/alice/.bwmachined.conf succeeded

Installation root : /opt/bigworld/current/server
BigWorld resources: /opt/bigworld/current/server/res
Game resources    : bigworld_first_run
This command will create a directory that is populated with the
resources from the Tutorial. It will also
create a new configuration file in your home directory called
.bwmachined.conf. As a starting point it is useful to
understand the basic breakdown of the
.bwmachined.conf file in case you need to modify it
at a later stage.
The .bwmachined.conf file is a file that
contains a single line that is used by the bwmachined process on each
machine to determine how to start server processes for a user. The
information contained inside this file then has to point to the server
binaries to be used as well as the game resources. The breakdown of the
file is as follows:
server_binary_directory:game_res_directory[;secondary_res_directory]
In the .bwmachined.conf file that was created
for you by the bw_configure program the three paths
mentioned above will be set as follows:
-
server_binary_directoryis automatically filled in with the installation path of the BigWorld server binaries. -
game_res_directorywill most likely be filled out with a directory path that resembles /home/username/project_name/res. Thisproject_namedirectory will be where all your additions and modifications will occur: it is where your game will be implemented. -
secondary_res_directoryis automatically filled in with the BigWorld resource directory. The BigWorld resource directory is generally required for all games as it contains default configuration files and Python libraries that are used by the server processes.
For more details on the .bwmachined.conf file,
please refer to Appendix E, Understanding the BigWorld Machine Daemon (BWMachineD).
Both the Indie and non-Indie BigWorld server packages require some key files to be generated and placed in the correct location in order to work correctly. Please refer to the section below that is relevant to your package.
In order to ensure that a Client is connecting to an authentic game server and the username / password sent by the Client are not able to be intercepted from a public network, the initial communication with the BigWorld server to the LoginApp is encrypted using a public keypair.
The BigWorld Technology package ships with a default LoginApp keypair, however since all customers receive the same keypair it is strongly recommended to create your own keypair from the start of your project and store it in your game resource directory rather than in the BigWorld resource directory.
For information on how to go about creating your own custom game
keypair please see the Server Programming Guide
section Generating your own RSA keypair. Once you have created your
keypair, place it into your game resource directory that was created in
Create a new project. For example the
loginapp.privkey would be placed in /home/
while the username/project_name/res/serverloginapp.pubkey would be placed in the
directory /home/.
username/project_name/res
With a project created and with all the relevant configuration files set, we can look to start our server. In order to interact with a BigWorld server cluster we provide both a web interface and a set of command line tools. For most server interacts we recommend using the web interface and we will describe this approach here.
The web interface to the BigWorld server is called WebConsole. It provides a number of features for interacting with a BigWorld server cluster that are more fully outlined in the Server Operations Guide's chapter Cluster Administration Tools.
WebConsole is automatically started and runs on port 8080 of the
machine on which the bigworld-tools RPM was installed.
To connect to the WebConsole we would then use a URL such as
http://hostname:8080/
replacing hostname with either the IP address
of the machine or its hostname depending on how the other machines in your
network have been configured. To avoid confusion when testing WebConsole
for the first time we recommend using the IP address of the WebConsole
machine to confirm that any issues aren't related to hostname or DNS
resolution problems.
When connecting for the first time you should be presented with a screen similar to the following:

The user accounts on the WebConsole now need to be created and the default administration login password changed. To do this, log in with username admin, password admin.
To add a new user, click on the "Add New User" menu item on the left hand side of the page. You will then be presented with a form to input as follows:
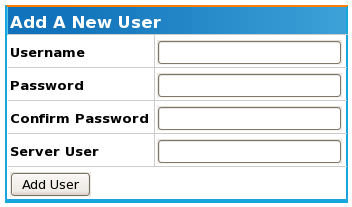
The table below summarises the input fields providing sample input:
| Field | Description |
|---|---|
| Username | The username that for the new user. |
| Password | The password with which the new user will log in. |
| Confirm Password | The password from the previous field, retyped to ensure no mistake was made on entry. |
| Server User |
The Linux user this account will be associated with. This will be the Linux user that the BigWorld server processes will be run as. If you are uncertain of this field, please talk to your system administrator to find out what your Linux user account is. |
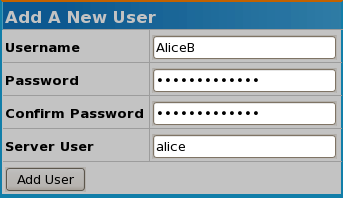
The following image shows a new user account AliceB being created and associated with the Linux user account alice:
Once all the user information has been entered, simply click the button and you will be returned to the main user listing, which will include the new user:

Now that a WebConsole user account has been created, you can login and start your first BigWorld server instance. To do this, return to the WebConsole login screen, enter the username and password that you created in the previous section, and press the Log In button. You should now be presented with a screen similar to the following:
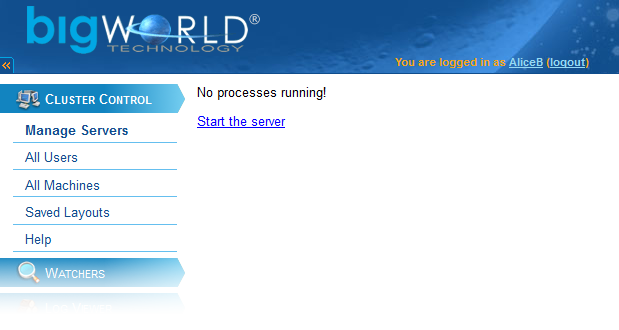
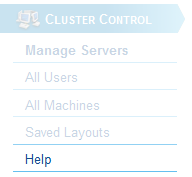
Each blue bar on the left hand side of the page contains a collection of loosely related functionality for interacting with a BigWorld server cluster. For information about each section refer to the 'Help' menu option in each module. For example, in the default display the help option is located as follows:
With all the hard work out of the way, you are now only a few mouse clicks away from having your first server up and running. From WebConsole's Cluster Control→Manage Servers module click the Start the server link:
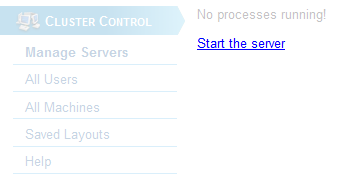
You should now be presented with a web page outlining your user
information, the separate components of the
.bwmachined.conf file, and a list of machines on
which you can start the server:
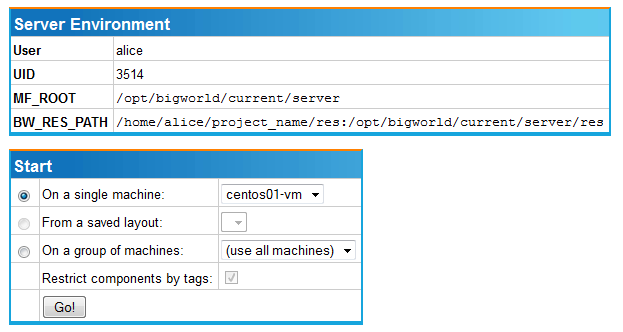
The purpose of this page is to allow you to review both your configuration settings and the machine (or machines) on which you would like to start the server prior to launching the cluster. For our purposes we will use the default settings which should launch the server on a single machine, identified using either your hostname or the IP address of your local machine. To start the server simply press the 'Go!' button. You should now see an interim web page that automatically updates as each server process starts:
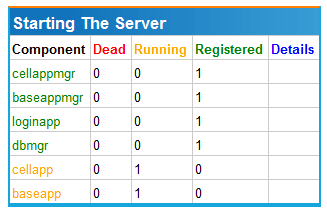
The above image shows us all the server processes except the BaseApp and CellApp have started running and are operational. The BaseApp and CellApp processes are the last to start as they rely on all the other server processes to operate correctly.
You should now have an active server instance which presents you with a web page similar to the following:
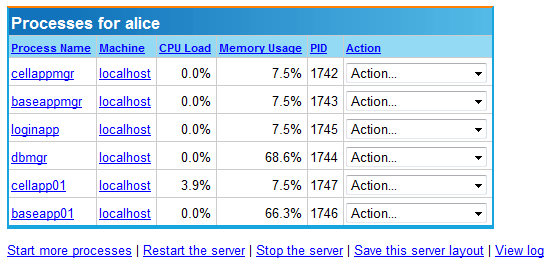
At this point you should be ready to move on to the Tutorial which will start to lead you through the process of creating your own game and understanding the programming concepts involved in interacting with BigWorld.
Good luck with your development!
