Importing an object
- Manipulating the camera
- Changing a model's shader/material
- Changing a model's texture
 Using MFMs
- Exposing a material parameter to Python
- Enabling a texture feed
- Changing the model's thumbnail
Importing an objectManipulating the cameraChanging a model's shader/materialChanging a model's textureUsing MFMsExposing a material parameter to PythonEnabling a texture feedChanging the model's thumbnailModelEditor allows artists to:
 associate animations with models,
create actions, LOD trees and tints, and
modify materials and properties.
This section of the content creation manual covers material editing.
 Importing an object
To import an object in ModelEditor, follow the steps below:
1 Run ModelEditor.
 The executable
 ModelEditor.exe is located under
folder \bigworld\tools\modeleditor\.
2 Load the model file that was exported from your 3d package in the previous lesson.
Select menu item File→Open (Ctrl+O.)
-or-
Use the Asset Browser’s dynamic search field to find and select the
object you wish to edit – from the Asset Browser, choose the
Models virtual folder, then either double-click a model or drag
it to the viewport.
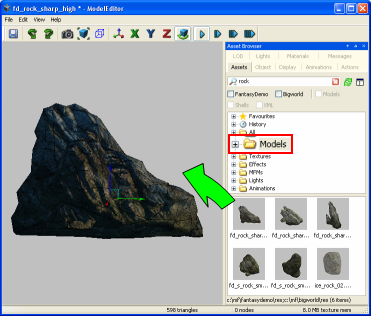
Asset Browser with model filter folder selected displaying available assets named "rock".
Manipulating the cameraThere are two camera modes to choose from.
1. Orbit Camera toolbar button –  –, which can be toggled ON and OFF
To rotate the view (look around), hold the right mouse button and drag.
To automatically rotate the camera left, press A.
To automatically rotate the camera right, press D.
To move in, press W.
To move out,
press S.
To move up,
press Q.
To move down,
press E.
2. Free camera mode
To rotate
the view (look around), hold the right mouse button and drag.
To move left,
press A.
To move right,
press D.
To move in,
press W.
To move out,
press S.
To move up,
press Q.
To move down,
press E.
Changing a model's shader / materialThe first time you load your model in ModelEditor it will be displayed with the same texture maps you applied in your 3d application. If you did not specify a BigWorld shader from 3ds Max, or if you are a Maya user, the exporter will have automatically assigned a BigWorld shader to your model.
To alter the type of shader used by your model, follow the steps below:
1 Click on the tab Materials to display the material list with associated properties.
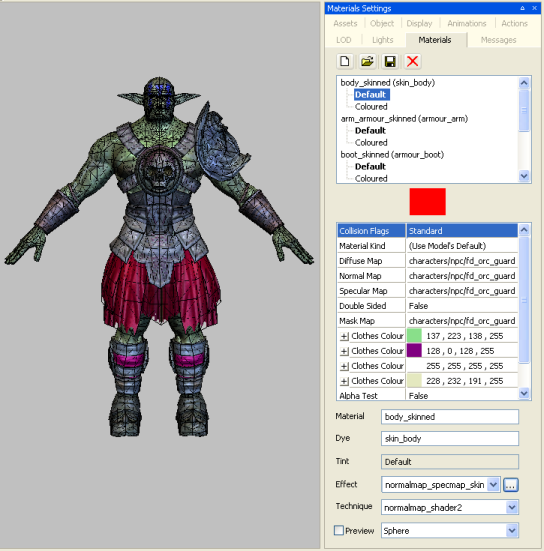
Materials tab displaying list of assigned texture maps
At the top of the material tab you will see the list of materials applied to your model. These materials derive their names from the material name in your 3d package.
2 Select the material you wish to edit from the material list.
The properties of that material will be displayed in the properties box below the material list.
Different material properties will be displayed depending on the type of BigWorld shader assigned to your model. These parameters may include such things as:
Collision Flags (Does your object need a collision volume?)
Double Sided (Whether your model is rendered double sided or not)
Diffuse Map (The colour map assigned to your model)
Further information about material properties can be found in the lesson BigWorld Shaders and Materials.
The Effect field allows you to choose the BigWorld shader to be applied to the active material type.
3 The current shader can be changed several ways:
Click the  button to display a list of BigWorld shaders.
Drag an effect from the Asset Browser into the above field.
Assign the object an MFM (explained below).
Choose a new shader in the dialog box.
A complete list of all BigWorld shaders (and their properties) can be found in the lesson BigWorld Shaders and Materials.
.
Changing a model's textureA model's texture is specified in the Materials Settings panel, and can
be changed in three different ways: via the
 button, via copy-and-paste
(from the Asset Browser panel's Textures virtual folder to the
field), or via drag-and-drop. The methods are described below:
button, via copy-and-paste
(from the Asset Browser panel's Textures virtual folder to the
field), or via drag-and-drop. The methods are described below:
Via the button:
1 Select the Materials Settings panel.
2 Click the field whose texture you wish to change. (In the example below, we change the Diffuse Map field.)
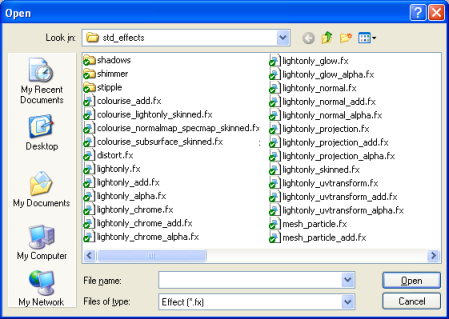
3 Click the
button – the Open dialog box will be displayed.
4 In the Open dialog box, select the texture that you want to be applied to the field, then click OK.
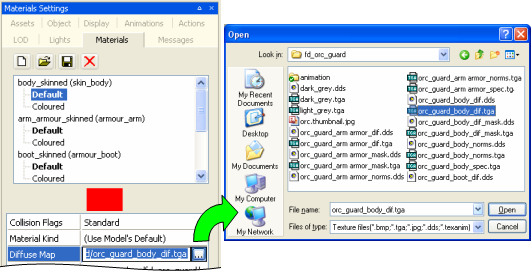
Specifying a texture via the button
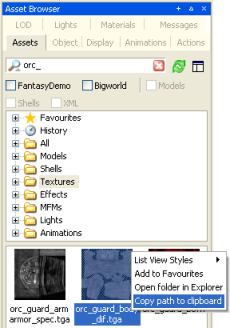
Via copy-and-paste:
1 Select the Asset Browser panel.
2 Select the Textures virtual folder.
3 Right-click the texture that you want assigned to the field, and in its context menu, select the Copy Path To Clipboard menu item.
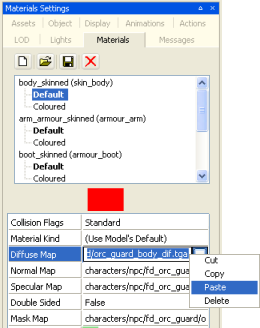
4 Select the Materials Settings panel.
5 Right-click the field whose texture you want to change (in the example below, we change the Diffuse Map field), and in its context menu, select the Paste menu item.
Copy the name of desired texture |
Paste the name of desired texture |
Via drag-and-drop:
1 Select the Asset Browser panel.
2 Drag the panel's title bar and drop it in a location such that you can view both Asset Browser and Material Settings panels at the same time.
3 In the Asset Browser panel, select the Textures virtual folder.
4 Drag the desired texture and drop it in the field in the Material Settings panel to which you want it assigned.
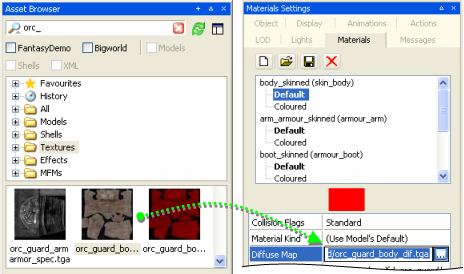
Drag the desired texture from the Asset Browser panel, and
drop it in the field in the Material Settings panel.
Using MFM'sMaterial files (.mfm) contain BigWorld material information such
as shader type, bitmap paths, and property setting.
When a .mfm file is referenced in ModelEditor, the contents of that
material file are stored within the model's visual file. You do not need to use
MFM files, but they can be a handy way of storing and transferring complex
material property settings.
Create an MFMTo create an MFM file, follow the steps below:
1 Select the Materials Settings panel.
2 Click the  button – the Save As dialog box will be displayed.
3 In the Save As dialog box, specify the folder and a name for your new MFM file.
4 Click the Save button.
Apply an MFM to a model1 Select the Materials Settings panel.
2 Click the  button – the Open dialog box will be displayed.
3 In the Open dialog box, select the MFM file that you want applied to your model.
4 Click the Open button.
 The data in the MFM file is
written to the model's
The data in the MFM file is
written to the model's .visual file – once the model is
saved, any changes made to the MFM will not affect the model's materials.
Exposing a material parameter to PythonIf you wish to change a material property in-game (for example increasing the self-illumination) then you must expose that property to Python so that the programmers have access to the material property from code.
Any material parameter that can be represented as a Vector4,
and is part of a material tint can be exposed to Python scripts for use within
the game.
This means that any of the examples below can be altered from script within the game providing you expose them to Python.
| Data Type | |
|---|---|
| Floating-point |  |
| Boolean |  |
| Slider |  |
Vector4 |  |
Types of material property exposable to Python
To expose a material parameter to Python, simply right-click it, and in its context menu, select the Expose to Python menu item. After that, the game programmer will have access to that material parameter from script.
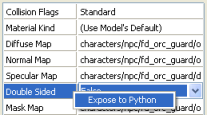
Exposing a material property to Python
Exposed parameters must be part of a material tint.
Enabling a texture feedTextures generated from script in-game, such as a render to texture can be set up within Model Editor to be fed into a particular texture path.
For example, the bone TV in the fantasy demo is displaying a texture feed directly from a camera placed in another part of the world.
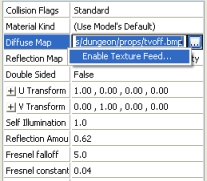
This is set up by enabling a texture feed into the TV's diffuse slot. To do that, follow the steps below:
1 Right-click the texture field that you wish to texture feed, and in its context menu, select the Enable Texture Feed menu item – the Texture Feed Name dialog box will be displayed.
2 In the the Texture Feed Name dialog box, type the name of texture feed, then click the OK button.
3 Give this name to the programmer, so that he can match the texture to the feed via script.
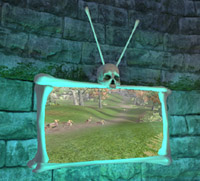
Enabling a texture feed (left), and its final in-game result (right)
In the example above I have put
the texture feed on a material tint (tv2) of the
bone_tv model. But it is not necessary to create a tint for a
texture feed – I only used tints in this case because there are multiple
channels that feed into the TV, thus requiring multiple tints.
Changing the model's thumbnailThe thumbnail used in the Asset Browser is automatically created, but you can
manually change it via the  button.
This button replaces the existing thumbnail with a thumbnail version of what appears in ModelEditor's 3d viewport.
Copyright 1999-2011 BigWorld Pty. Ltd. All rights reserved. Proprietary commercial in confidence.