Character Orientation
- Node/Bone Limit
- Order of Modifiers and History
- Orientation of nodes for use with the Head Trackers
- Rigging the character with
Biped  Skinning
- Hard Points
- Referencing the character texture maps
- Exporting the character
Character OrientationNode/Bone Limit Order of Modifiers and History Orientation of nodes for use with the Head TrackersRigging the character with BipedSkinningHard PointsReferencing the character texture mapsExporting the characterBefore you begin creating your character, make sure you have read the lesson Create and Export a Static Object in 3ds Max and Maya
 Character Orientation
Characters and NPC's should be modelled so that they are facing away from the Front Viewport.
So if you select Views→Front in 3ds Max, or View→Predefined bookmarks→Front in Maya, the model will be facing away from you. This setup will make more sense when the animations are created. Animations will be moving away from the front view, just as they are visualised in the game.
It is very important that you create your characters like this. It will save significant time, and minimise problems when it comes to incorporating animation into the game.
Although correct setup is highly advisable it is possible to get animations that are moving in the incorrect direction to work within the BigWorld engine. To do so, please see the section on Opposite Facing Direction .
In Maya and 3ds Max, when looking at your character from the front viewport, the character should be facing away from you.
 If you are familiar with modelling in
the front viewport, and find it difficult adjusting to modelling in the back
view, then try re-mapping your shortcut key for front view to load up the back
view.
If you are familiar with modelling in
the front viewport, and find it difficult adjusting to modelling in the back
view, then try re-mapping your shortcut key for front view to load up the back
view.
Node/Bone LimitThe exporters have a bone count limit of 256 bones per skin modifier. Rigs can have more than this number of bones, but a single skin modifier can only use a maximum of 256 bones.
Order of Modifiers and History The order in which modifiers (Max) and history (Maya) are applied is extremely important in getting a correct result.
Mesh modifiers should be applied first, then morph modifiers and blend shapes and finally skin modifiers.
1st: Edit poly, Edit Mesh, Xform, bend, etc.
2nd: Morpher modifier (max) Blend shapes (maya)
3rd: Skin, Physique, Skinwrap (Max) softskin (Maya)
Orientation of nodes for use with the Head TrackersThe Bigworld engine contains a simple IK system for pointing the head bone towards a certain direction.
In order for this to work correctly the bone must be correctly oriented within the 3d package in a certain orientation.
In 3ds Max, the head tracker will point the bone's positive Y (local
coordinates) direction towards the tracker direction. This is the default
orientation of a Biped head.


In Maya the head tracker will point the bone's negative Z (object coordinates) axis in the direction of the tracker. This cone will point in the direction of the object being tracked.
Trying to rotate a bone's orientation after it has been skinned and animated is usually problematic. Correct setup is strongly advised.
Rigging the character with BipedIn the example below Character Studio's Biped was used as a rig for the
character. Using Character Studio's Biped is not a requirement; most
custom rigs will work with the BigWorld engine.
For the purposes of this tutorial we will use the warrior_model.max
example found in the tutorial files.
In the front viewport create a Biped inside the
mesh_warrior.
Note: In 3ds Max 9.0,Bipeds are set to renderable by default. This will cause
the Biped to be exported along with your character mesh. To prevent this simply
deselect the Biped's renderable flag (right click - Properties).
SkinningSkinning the character using the Skin modifierThe BigWorld engine supports 3ds Max's Skin and Physique Modifier for skinning purposes. The following is a description of how to use the Skin Modifier. We recommend the use of the Skin- rather than the Physique Modifier, due to the more robust skinning tools of the former.
BigWorld skinned shaders allow each vertex to be affected by a maximum of three bones. When you skin a vertex in 3ds Max the skin modifier will default to 20 bones influencing a single vertex. The BigWorld engine will take the top three strongest-weighted bones and normalise them, effectively ignoring the rest.
If you want to get an accurate view of how your model will look within BigWorld from
within the 3ds Max viewport it is important to set the Bone Affect Limit within the
Advanced Parameters of the Skin Modifier rollout to 3.

1To skin your character, select the mesh you want to skin and apply the Skin Modifier to it.

2 Select the Add Bones button to add bones to be used by the skin modifier.
3 In the example below I split the model up into head, torso, and legs. The leg mesh will only require the lower body's bones to be added to the Bone list as we do not need the upper body's bones to affect the leg movement.
4 Select the Edit Envelopes button within the Skin Modifier's parameters rollout. This will display the envelope of the bone selected within the Skin Modifier bone list.
5 Alter the envelope's field of effect by selecting and moving the dark grey control points of the envelope.
6 Individual vertex weights can be altered by manually selecting vertices.
7 Select the Vertices tick box and select the vertices that you would like to weight, then select the bone for which you want to change the vertex weights.
8 Change the Abs. Effect to alter the selected vertices' weighting.
9 Vertex weights can also be painted onto the model using the Paint Weights button.
Vertex weights can be mirrored using
the skin modifier. If your model is symmetrical, then it is best to adjust the
vertex weights on one side of the model and then use the mirror weights function
to weight the other side of the mesh.
Skinning the character using PhysiqueThe BigWorld engine supports 3ds Max's Skin and Physique Modifiers. We recommend the use of the Skin Modifier over the Physique Modifier as the Physique Modifier has had very few updates in the latest revisions of 3ds Max whilst the Skin Modifier is constantly refined and improved. The addition of the Skinwrap Modifier (see 3ds Max help) has made the Skin Modifier even more powerful. The following is a description of how to use the Physique Modifier.
1 Select the mesh_warrior again, and apply the
Physique Modifier to it.
2 Set the Physique Modifier Skin Update to Deformable.
The BigWorld engine does not support dynamic blending for skinned meshes, nor joint intersections, bulges, tendons, and skin sliding. This option is only ticked on to allow us to select envelopes in a later part of this tutorial. It will be turned off at the end of skinning.
3 Use the Biped's Pelvis as the attachment node.
Select Deformable and choose the Biped centre node.
Selecting Deformable for joint intersections, bulges, tendons and skin sliding is only temporary, allowing us to edit the physique envelopes. At the completion of skinning, this setting will be changed back to Rigid + Link Blending.
4 Set the Blending Between Links drop-down list box to 3 Links – the BigWorld engine supports only 3 bone weights per vertex.
5 Enter sub-object mode of Physique, and select all the envelopes, then change them from Dynamic (red) to Rigid (shown as green) using the Active Blending checkbox options.
Active Blending section in Physique panel.
All envelopes made rigid
6 Increase the envelopes' size slightly to make sure any stray vertices are included in the influence areas.
You can check this by going to Vertex mode and using Select by Link with the Root Vertices option (blue cross) in Vertex Type. Any unassigned vertices will show up as blue in the viewport.
Check for stray vertices |
Unassigned vertices displayed in blue |
7 Once all envelopes have been scaled to influence their local vertices, you can refine the associations on a per link basis.
Enter Vertex mode and use Add to Link to include selected vertices or Remove from Link to exclude selected vertices from nearby links as needed. You will need to toggle between Select and Select by Link to accomplish this successfully.
8 Now go to Select mode in the Vertex Operations and highlight all vertices in the viewport; then use Lock Assignments on them to give you access to weight blending.
9 Create a simple test animation or rotate each link to help you see how the vertices stretch and move around the joints.
Use the Type-In Weights blending feature to refine the influence of the parent and child links in order to get the best deformation.
 Only locked vertices can access
the Type-In Weights blending feature in Physique.
Only locked vertices can access
the Type-In Weights blending feature in Physique.
Type-In Weights dialog box in Physique
10 Follow this same
process again (steps 3 to 8) for the mesh_arms object.
11When complete, it is important to reset the mesh to Rigid + Links Blending.
Note: Non-uniform scale of physique skinned bones is not supported by BigWorld.
Skinning the character in Maya When skinning an object in Maya use the Smooth Bind skin option. To do this, select your character mesh and shift + add select the character rig, choose Skin - Bind Skin - Smooth Bind.
Because BigWorld shaders limit the influence of vertices to a maximum of three bones, you may want to set the Max influence setting
to 3. This will give you a more accurate representation of the way vertex weights function
within BigWorld from the Maya viewport.
Setting Max influence to 3 will more accurately represent the way skin weights function within BigWorld
Hard pointsPlacing hard points on your character for attaching itemsHard points are extra nodes within your skeletal hierarchy which are used in the BigWorld engine to attach interactive objects to the skeletal structure so characters can carry items on their body or in their hands.
Hard points are defined by their naming convention. If a node contains the
prefix HP_, it is recognised as a hard point.
1 To create a hard point, simply create an object in your 3d package out of geometry, then link it to the object's hierarchy. It is crucial that the Hard Point is geometry-based, as other object types are not supported.
For hard points, we like to use an object that represents the x, y,
and z-axes, and is textured in a bright and obvious manner. This makes aligning
the object easier in your 3d package. However, the type of object you use and
its texture map are unimportant – the only thing recognised by the
exporter is that the node has the prefix HP_.

Hard point with pivot-point aligned
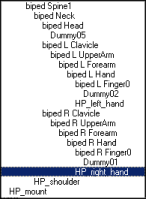
2 Name the first hard point HP_right_hand.
3 Hide Biped, and position the hard point so that it just
touches the inside of the Biped R Hand in the location and
orientation that would be suitable for attachment of items.
Hard point positioned at right hand
4. Now link the hard point directly to the
right hand of Biped.
Hard points on characters must be linked to the skeleton
5 For additional hard points, create copies of this
hard point and position them around other areas of the body. Rename them
accordingly, then link them to their nearest Biped part.
Hard points are not counted towards any bone count limitations imposed by the exporter.
Placing hard points on your itemsTo link an object, such as a sword, to your character, both the object and
the character must share a hard point with the same name. For each attachment
point on the character, you will require a unique hard point. So if you wish to
attach a sword to your character's right AND left hands, then you will need an
HP_righthand and an HP_lefthand on both the sword,
AND on the character.
The simplest way of creating a perfectly aligned hard point for an object is:
1 Merge/import the character model with all its hard points into the item's scene.
2 Position the item so that it sits perfectly in the characters hand/holster etc.
3 Make a copy of the characters hard point and link it to the item.
4 Hide, or delete the character.
5 Move the item (now with its attached HP) to the correct position for export (probably near the origin).
6 Detach the hard point (break the hierarchy), and export as Static with Nodes.
If during production an item's position when attached does not
correctly align, only adjust the position of the HP on the item; do NOT alter the position of hard points on your
characters as this will then affect the alignment of all the other items that will be attached to your character.
Referencing the character texture mapsAll art assets to be used in the BigWorld engine must reside in the resource
folder <your_game>/res or one of its subdirectories.
This includes bitmaps referenced by any models you may create. If your
character is referencing bitmaps from another location other than the
res directory, then you must move those bitmaps into the resource
folder (or one of its subfolders).
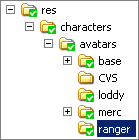
As an example we will reassign the bitmaps used on the ranger
model to the res/characters/avatars/ranger folder.
1 Open Windows Explorer.
2 Create the following file structure within your game
directory res/characters/avatars/ranger.
3 Copy the final texture maps from your working drive to
the new ranger folder.
4 Open 3ds Max.
5 Using the Bitmap/Photometric Path Editor utility, reassign the materials to the folder used in your game.
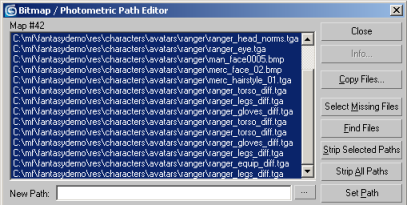
3ds Max utility for reassigning bitmaps
Now that the bitmaps have been sourced to the res folder or one
of its subdirectories, the BigWorld engine can access them.
Exporting the character1 Make sure that Biped is in Figure Mode in the
General rollout.

Figure Mode on
2 Select and hide all of the Biped structure
(including the Biped Footsteps, which may be frozen) and
unhide the character mesh object and ALL its linked hard points.
Character with multiple hard points
Hard points must be unhidden in the
3ds Max scene for exporting.
3 Select the File→Export… menu item,
then select the (*.visual) extension from the drop down list.
Note: if you have multiple rig controller objects you may want to try selecting your character's mesh and using File→Export Selected instead. This will prevent the controller objects being exported along with your character.
BigWorld proprietary 3ds Max plug-in selected
4 Locate the resource subfolder to which you would
like to export your character file (in this case use
res/sets/characters/avatars/warrior), then type the name
warrior in the field and click Save – this will bring
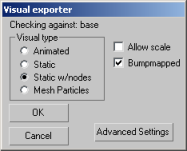
up the Visual exporter dialog box.
Visual Exporter dialog box
5 Make sure the Visual type option is set to Animated, and make sure the checkboxes are cleared.
6 Click the OK button.
There will now be a warrior.visual file located in
the resource structure under the warrior folder.
Copyright 1999-2011 BigWorld Pty. Ltd. All rights reserved. Proprietary commercial in confidence.