Although this section primarily deals with getting
static (non animated) models from your 3d package into the BigWorld engine, much
of the information also applies to creating animated non-static objects such as
characters and NPC's. Specific information regarding non-static models can be
found in the section Create Low-Polygon Characters.
Taking the time to set up export paths for your 3d package will minimise unnecessary directory browsing every time you come to export a Model or Animation.
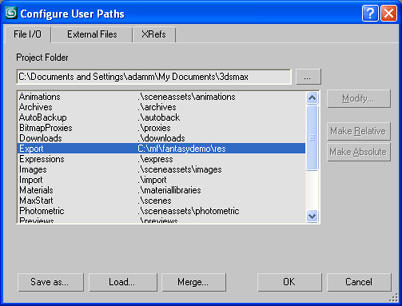
You will almost exclusively be exporting Models and Animations to a subdirectory of your_game/res, so point your 3d package to this location.
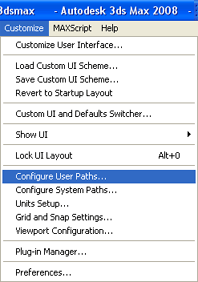
In 3ds Max go to Customise&rarr Configure User Paths. Now set the Export Path to the /res directory of your game.
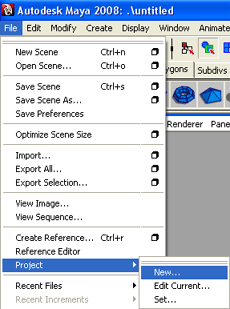
In Maya you can set up a BigWorld Project and point the exporter directly to the path you wish to export to.
File - Project - New
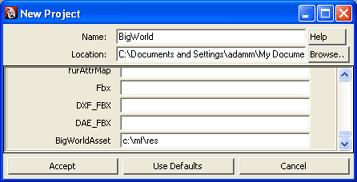
Set the Project name to BigWorld and the BigWorldAsset line to the /res path of your game.
Note: The exporters must be installed before either the above setups can be performed. Please see the Content Tools Reference guide for exporter installation.
The BigWorld 3ds Max exporter recognises settings defined within 3ds Max's System Unit Setup.
If you have used BigWorld exporters before and want to use the previous BigWorld
standards of 10 Generic Units = 1 Metre, then simply set the System Unit Setup to 1 Unit = 10 centimeters.
The unit setup can be used to scale models that were created at the incorrect size.
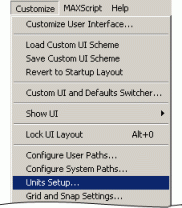
3ds Max Customize menu |
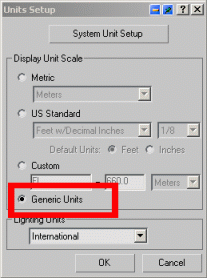
3ds Max Units Setup dialog box |
For internal development we set 1 Unit = 10 Centimetres.
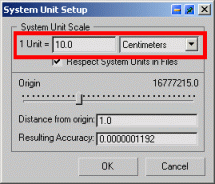
3ds Max System Unit Setup dialog box
The BigWorld Maya exporter recognises the Working Units type set in the
Preferences dialog (invoked by the Window→Settings/Preferences menu item).
A model 1m tall in Maya will be 1m tall in BigWorld.
Because Maya has no way of changing the size of its generic units there is no way of scaling (on export)
models made within Maya. It is therefore extremely important when setting up models that are going to be
rigged and animated that they are modelled to the correct size. Scaling a model after it has been rigged is usually
problematic: correct setup is highly advised.
If you have used BigWorld exporters before and want to use the previous
BigWorld standards of 10 Generic Units = 1 Metre, then simply set Ignore maya units: preference to true within the advanced preferences of the Maya exporter.
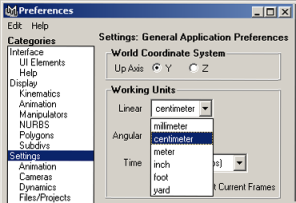
Maya Preferences dialog box
The BigWorld exporters use World Coordinate System Up axis Y. In Maya set to Y axis up, an object facing the front view port will also face the front view port in Model Editor.
We do not support Z axis Up. Models exported in this manner will be facing the wrong direction.

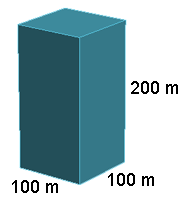
Objects cannot exceed (BigWorld Coordinates) X =100m, Y = 200m, Z = 100m (100m wide and 200m tall).
If an object exceeds this size it becomes difficult for the engine to correctly cull the object as it will inhabit many chunks at once. This can result in the object disappearing whilst it is still in view of the camera.
The exporter will prevent the exportation of objects that exceed this size.
Z fighting occurs when two triangles (surfaces) lie within close proximity of each other. The result is that the two surfaces flicker back and forth especially as the camera position moves.
When modelling it is always best to leave a gap between surfaces to prevent this problem from occurring.
This problem typically appears on character models' hair and clothing.
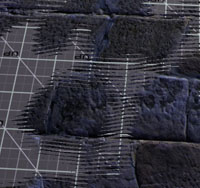
Z fighting in Action.
Objects using alpha blend can only sort reliably if they are part of the same material. Therefore if you are going to use alpha blend on multiple parts of an object, ensure that those parts share the same material name.
Alpha-blended polygons are sorted before being drawn each frame. If two transparent objects are
entwined but do not share a material then they will not sort relative to each other.
Some handy tips to avoid sorting problems:
1. Avoid large alpha blended objects.
2. Try to minimise self-intersection of objects using alpha blend as this can lead to artifacts
in the polygon sorting.
3. Consolidate a single objects alpha blended sections into a single material.
4. Be aware that alpha blended skinned models will not take
advantage of GPU skinning. All transformations will be performed by the CPU.
Before you begin creating objects for BigWorld you should be aware of the problems which scaling can cause.
Scaling an object usually results in the object's "node" retaining the scale information. Any mathematical
operations performed on that object in the BigWorld engine will then inherit the scale information, resulting in unwanted visual artifacts.
For example, if an artist creates a hard point that has
been scaled during its creation, any object linked to that hard point would inherit the scale information of that hard point.
This could result in the character pulling out his sword, only to find that it has shrunk to half its size.
There are several things you can do to avoid such problems.
Limit Scale to sub components
In 3ds Max, scale the object whilst in sub object mode.
In Maya, choose one of the objects sub components and scale from there.
Although most scale problems can be fixed using the reset/freeze transform technique described next,
it is good to get into the habit of scaling whilst in sub object mode.
Reset/Freeze the objects Xform/Transform
Once modelling is complete, and previous to rigging, you should always reset the object's transforms. This will remove any scale that has been placed on the object's node.
To reset an object's transforms in 3dsMax use the Reset Xform option.
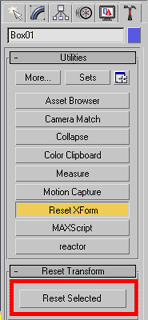
To reset an object's transforms in Maya use the Freeze Transform operation.

Scaling a Rigged/Animated object
Do not scale a rigged/skinned model. This will undoubtedly result in problems further
down the art pipeline. Animated characters that have been scaled within a 3d Application
may look correct within their 3d App, but once brought into BigWorld problems can arise.
For example, scale hidden within nodes can suddenly appear when a sword is attached to
the player's hand. The sword inherits the node's scale resulting in a character wielding
a disproportionately enormous sword.
If you must change the scale of an object imported into BigWorld do it by altering the
Unit Setup within 3ds Max. Unfortunately Maya
only offers quantised changes to its unit setup. Correct setup is strongly advisable.
This will prevent problems where multiple interacting files have different unit sizes. It
is always prudent to import the model into BigWorld before rigging just to check that the size is correct.
The world origin coordinates (0,0,0) of your 3D application are used as an
object's pivot point when exported to the BigWorld engine.
1 Objects should be positioned so that the pivot point will lie within the object's bounding box. Because the engine uses the pivot point of the object to identify its position, placing the pivot point a sizable distance away may cause problems with chunk lending (the process of sharing objects between two chunks) or culling.
2 BigWorld World Editor uses the pivot point of objects
to place them via snap-to-terrain and snap-to-object modes. It is
therefore important to consider the origin position when exporting an object.
This consideration can make the work of world builders much easier. For
example, in the tree below, the bottom row of vertices at its base is lower than
the world origin (0,0,0). This will ensure that the base of the tree is below
the terrain when the tree is placed using WorldEditor's terrain snap feature.
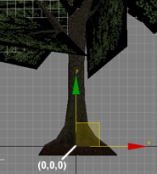
World origin is used as object pivot point
In 3ds Max you can apply BigWorld shaders directly to your model.
This allows you to bypass the creation of materials within Model Editor (a
process to be covered in later chapters), and gives you from within the 3ds Max
viewport an accurate representation of what the model will look like in-game.
 DirectX 9
materials are only supported in 3ds Max 7.0 and above. If DirectX 9.0 viewport
support is required, then we recommend using 3ds Max 7.1 or above.
DirectX 9
materials are only supported in 3ds Max 7.0 and above. If DirectX 9.0 viewport
support is required, then we recommend using 3ds Max 7.1 or above.
For optimal performance, we suggest using the latest DirectX end-user runtimes. They
can be downloaded from Microsoft's web site.
Unfortunately, at the time of writing this guide there was no way to
directly assign BigWorld DirectX 9 shaders to objects within Maya. It is
therefore advised that you use the technique described in lesson
Modify a model in Model Editor to assign
BigWorld shaders to your model.
Before you get started, you should ensure that 3ds Max is using DirectX. Please follow the steps
below:
1 Open 3ds Max.
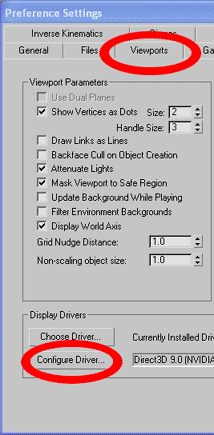
2 Select menu item Customise→Preferences.
The Preference Settings dialog box will be displayed.
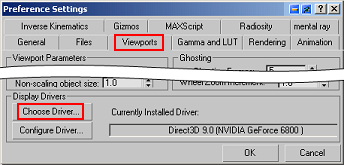
3ds Max Preference Settings dialog box
In the Preference Settings dialog:
A Select the Viewports tab.
B Click the Choose Driver... button.
The Direct3D Driver Setup dialog will open.
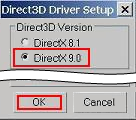
Direct3D Driver Setup dialog
In the Direct3D Driver Setup dialog:
* In the Direct3D Version group box, select the
DirectX 9.0 option button.
* Click the OK button.
If your
drivers are not set up to use DirectX, then the Material Editor will not display
the material.
C Click the OK button.
To assign BigWorld shaders directly to models within 3ds Max:
1 Select menu item Rendering→Material Editor.
The Material Editor dialog will open.
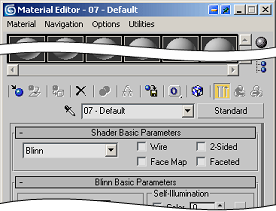
3ds Max Material Editor dialog box
In the Material Editor dialog:
A Click the Get Material -  -button.
The Material/Map Browser dialog will open.
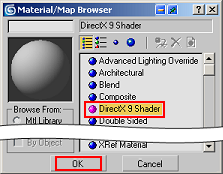
3ds Max Material/Map Browser dialog box
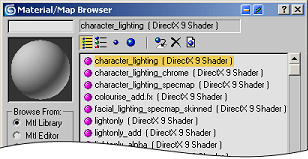
In the Material/Map Browser dialog:
* In the Shaders list, select DirectX 9 shader.
* Click the OK button.
The Replace Material dialog box will open.
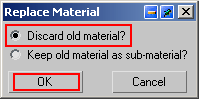
3ds Max Replace Material dialog box
In the Replace Material dialog box:
+ Select the Discard Old Material? option button.
+ Click the OK button.
B Material Editor will display the rollouts DirectX 9
Shader, Default .fx parameters, Technique, and Software
Render Style.
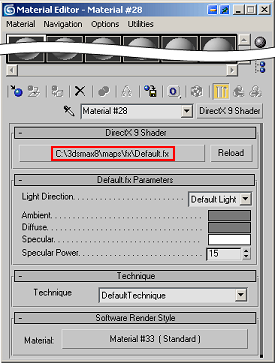
3ds Max Material Editor dialog box, after selecting DirectX9 shader
C In the DirectX 9 Shader rollout, press the
Shader button (in this case, labelled
C:\3dsmax8\maps\fx\Default.fx).
The Choose an FX File dialog will open.

3ds Max Choose an FX File dialog box
In the Choose an FX File dialog:
* Browse to the BigWorld shader directory located in \bigworld\res\shaders\std_effects\
* Click the Open button.
D Material Editor will display rollout with parameters for
the selected shader/FX file.
3ds Max Material Editor dialog box displaying parameters for the selected shader
For a detailed list of available BigWorld shaders
and their properties see the BigWorld shader and
Materials section.
E Close Material Editor.
4 The viewport should now display the shader applied to the
object.
3ds Max Viewport with BigWorld shaders applied to object
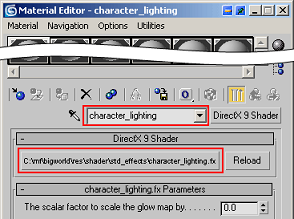
When you export the object and open it in Model Editor, the BigWorld DirectX
9 Material will be already assigned to it.
To see the interaction of a light source with the shader, place a single directional light into the scene.
When previewing the effect of a BigWorld shader using scrolling UV's within the 3dsMax viewport you must turn off incremental scene updates within 3dsMax.
To do this go to Customize - Preferences - Configure Direct3d - Use Incremental Scene Updates and turn the option OFF.

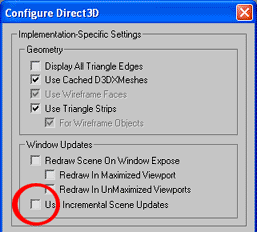
Because the scrolling UV effect occurs over time, the effect can only be viewed when the Play Animation button has been pressed.
Repeating the above process for every object that requires a material can be
tiresome and inefficient. You can speed up the process by creating a material
library within 3ds Max.
This process requires a single artist to set up a template scene
containing each of the BigWorld materials. This scene is then shared between
artists and used as a material library, allowing artists to quickly apply
BigWorld materials directly to objects within 3ds Max.
1 Open 3ds Max.
2 Create a new scene.
3 Create several sphere objects, one for each BigWorld
shader type.
4 Using the technique described in this lesson's topic Applying BigWorld shaders
directly to 3ds Max models, apply a different BigWorld shader to each of the
objects in the scene.
5 Be sure to correctly name the 3ds Max material - a good
rule is to use the name of the FX file.
3ds Max Material Editor dialog box – Naming the material
6 Save the scene as
BigWorldMaterialLibrary.max.
This file can now be distributed to your art team to be used as a BigWorld
material library.
Note: BigWorldMaterialLibrary.max can also be found at \mf\bigworld\doc\tools_tutorial_examples.zip
To use this BigWorld material library simply:
1 Open 3ds Max.
2 Select menu item Rendering→Material Editor.
The Material Editor dialog will open.
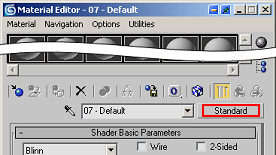
3ds Max Material Editor dialog box
3 Click the Standard button.
The Material/Map Browser dialog will open.
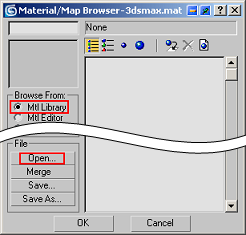
3ds Max Material/Map Browser dialog box
In the Material/Map Browser dialog:
A In the Browse From group box, select the Mtl
Library option button.
B In the File group box, click the Open
button.
The Open Material Library dialog will open.
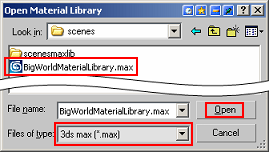
3ds Max Open Material Library dialog box
In the Open Material Library dialog:
* In the Files of Type combo box, select 3ds
max (*.max).
* In the file list, select
BigWorldMaterialLibrary.max.
* Click the Open button.
C A list of BigWorld shaders will be displayed in the
dialog.
3ds Max Material/Map Browser dialog box displaying BigWorld shaders
Now you have the entire list of BigWorld shaders easily accessible via
3ds Max's material editor.
All art assets to be used in the BigWorld engine must reside in the resource folder your_game/res or one of its subdirectories. This includes
bitmaps referenced by any models you may create. If your 3d model is referencing
bitmaps from another location other than the /res directory, you must move those bitmaps
into the resource folder (or one of its subfolders).
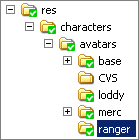
As an example we will reassign the bitmaps used on the ranger model in 3ds Max to the
\res\characters\avatars\ranger\ folder.
1 Open Windows Explorer.
2 Create the following file structure within your game
directory.
Our example is \res\characters\avatars\ranger\
3Copy the final texture maps from your working drive to the
new /ranger folder.
4 Open 3ds Max.
5 Using the Bitmap/Photometric Path
Editor utility, or the Asset Tracking Dialog, reassign the materials to the folder used in your game.
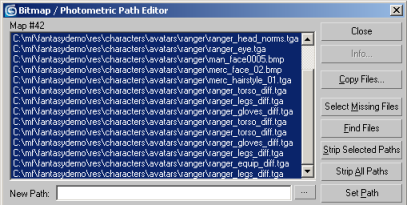
3ds Max Bitmap/Photometric Path Editor dialog box. A utility for reassigning bitmaps
Now that the bitmaps have been sourced to the /res folder or
one of its subdirectories, the BigWorld engine can access them.
The BigWorld engine automatically compresses textures and uses a process called mipmapping.
Mipmapping creates a series of smaller resolution textures from the original
texture. This helps keep texture memory use to a minimum and thus improves
performance. For more information on automatic texture compression see the section Defining texture compression settings
Example mipmap
When a bitmap is resized via mipmapping it samples pixels from the
surrounding area to create the new pixel. If the neighbouring pixel is black
then the newly created pixel will be darker than it should be. This results in
the compression artifact seen on the right side of the image below.
When viewed from afar (right), the model is rendered
with a line in the middle |
To avoid mipmapping compression artifacts, extend the
painted area outside the UV coordinates by several pixels |
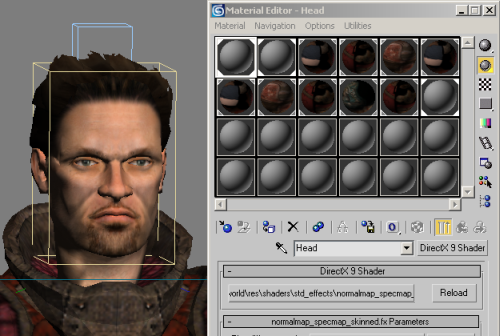
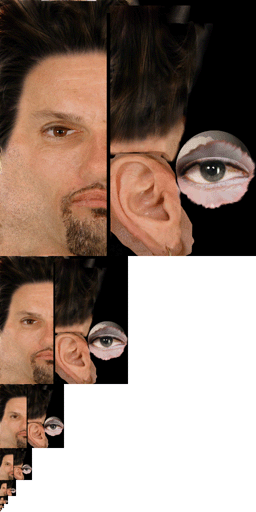
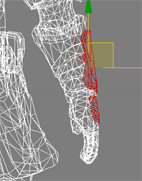
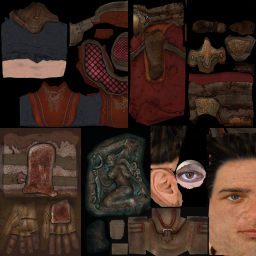
Not all objects are made of a uniform material. For instance the character in this picture is
made of several different material types yet remains a single mesh.
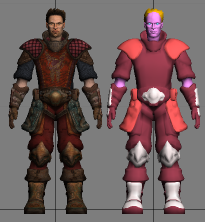
BigWorld character displaying multiple material types
The table below describes the meaning of each colour:
| Colour | Material type |
|---|
| Pink | Skin |
| Yellow | Hair |
| Blue | Eyes |
| Red | Fabric type 1 |
| Maroon | Fabric type 2 |
| Grey | Metal |
Material type per colour
This material heterogeneity can be replicated within the BigWorld
engine by assigning different shaders to parts of a single object. For example,
a chrome shader with reflection maps could be used on the metal sections, while
a sub surface shader would be better assigned to skin areas.
For the BigWorld exporters to recognise multiple material types it is important that you
set up your character correctly within your 3d
application.
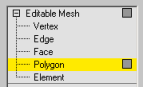
To assign a single object multiple materials from 3ds Max:
1 Go to sub object Polygon selection mode.
2 Select the parts of the model that consist of a
particular material type. In this example, I have chosen the steel plates on the
character's glove armour.
|
|
Select the polygons to which you wish to give a specific material |
3 Assign it material with a unique name from the
Material Editor – essentially this is the same as using a
multi/sub-object material on your object.
Apply the materials either separately or as part of a Multi/Sub-Object.
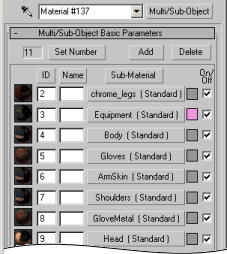
4 When the character is exported and brought into
ModelEditor, it will have the same material types and names as assigned in
3ds Max.
ModelEditor's Materials Settings dialog box
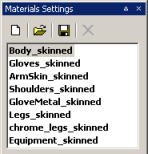
The image above shows how materials are displayed in ModelEditor. Note
that the suffix _skinned has been automatically added to the
material names.
To assign multiple materials to a single object from Maya:
1 Select the region of your model to which you will assign a material. I'll do this by going to Face mode. Right click -
Face.
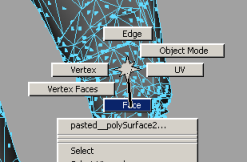
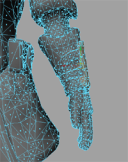
Select the regions to which you wish to assign a specific material.
2 Select the faces of the model that consist of the material
you wish to add. Here, again, I have chosen the steel plates on the character's glove
armour.
3 Assign this area a unique shader. This can be done
multiple ways; I prefer to use Maya's Render tab as it is
fast and easily accessible.

Maya's Rendering tab
4 You should re-name the default materials with a
sensible name. These names will be used in the BigWorld engine to define the
models material groups, and programmers might not be happy if you have called
something Blinn04.
5 One of the best ways to manage your materials in Maya is
to use the Hypershade editor. From here you
can see materials, rename materials, and select areas on your model that use a
specific material.
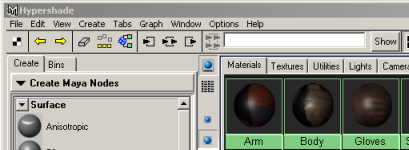
Maya's Hypershade editor
The only information exported from Maya's materials
is the diffuse texture. Unlike 3ds Max, Maya does not support direct
assignment of .fx files. For Maya users, shader assignment must be done in Model
Editor.
The more material types you have on an object the more draw calls have to be
performed by the graphics card. This will slow down your game's performance, so
it is best to limit the number of objects that have multiple material types.
There are several things you can do to improve game
performance.
1 Minimise the use of multiple material types.
If an object is made of a single material
type, then only use a single material. Take for example the cargo crate,
centrepiece of all game designer's dreams. The crate is made of a single uniform
material. The worst possible thing you could do is give each side of the crate a
different material type. Leave separate materials for important things like
player characters, and if you must use multiple materials, LOD them away to a
single material type.
2 LOD away material types.
At further distances, effects of numerous complex shaders become negligible,
and only serve to weigh down the performance of the engine. It is therefore
advisable to apply a reduced set of simple shaders to distant LOD models.
For example, the first LOD model of a character, displayed closest to the
camera, may have 3 separate material types: metal,
skin and hair, each using a different shader and
referencing several texture maps (Diffuse map, Normal map, Reflection map). At
LOD3, because the character will only be represented by a few hundred pixels on
screen, the character may only require a single simplified shader that
references the diffuse texture only, therefore reducing the load on the graphics
card.
3 Single Texture sheet.
If parts of an object use different shaders they do not have to use different texture sheets. It is best if an object uses a single texture sheet. This will save on texture memory D3D state change costs. In the example below the same texture sheet is applied to all parts of the model regardless of its material type. Note that every mesh part that uses a unique FX shader will require a separate draw call.
A single texture sheet can be accessed by multiple materials.
BigWorld supports multiple UV coordinates exported from both 3dsMax and Maya
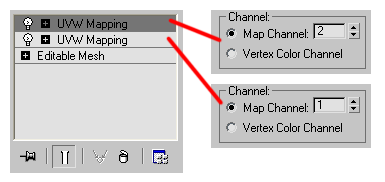
To create a second uv channel inside 3dsMax simply add another UVW Mapping modifier and set the map channel to a different number
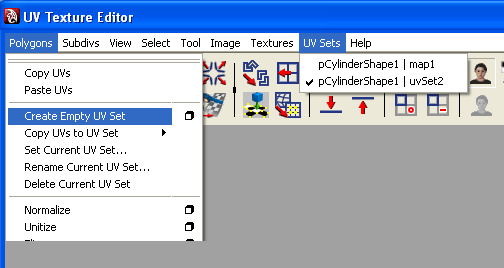
To create a second uv channel inside Maya simply Create a second UV Set
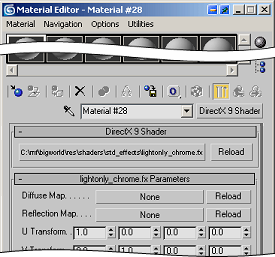
Multiple UV's will only work with a shader that supports a second UV channel, see shader "lightonly_dual.fx" for shaders compatible with multiple UV's
BigWorld supports vertex colour exported from both 3dsMax and Maya
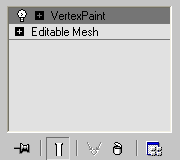
To create vertex colour in 3dsMax simply add a VertexPaint modifier to the stack and paint each vertex
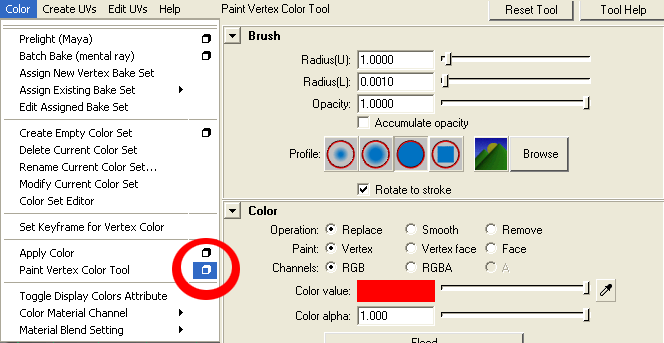
To create vertex colour in Maya select Colour - Paint Vertex Colour Tool
Vertex colour will only work with a shader that supports vertex colour, see shader "lightonly_vertexcolour.fx" for shaders compatible with vertex colour.
BigWorld supports changes made to the vertex normals via 3dsMax's Edit Normals modifier
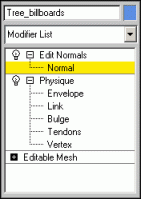
The Edit Normals mofier is selected on export
Importantly, the Edit Normals mofifier must be selected on export for the normals modification to be valid in game.
If multiple objects require exporting, each with edited normals then a single edit normals modifier should be used.
To export a static object as a Visual file,
follow the steps below:
Firstly, ensure that the exporter plug-in for your 3d application is
installed. Instructions for installing the exporter plug-ins can be found in the
Tools Reference Guide,
chapter 3ds Max and Maya Exporters.
1 Open 3ds Max.
2 Select menu item File→Export.
3 In the dialog Select File to Export, drop-down
list box Save In, locate the resources sub-folder where you would like
to store the file.
In this case use res\sets\trees:
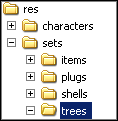
Resource sub-folder
4 In the field File Name, type oak_tree.
5 In the drop-down list box Save As
Type, select Visual Exporter (*.VISUAL).
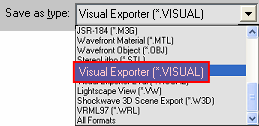
Save As Type options
6 Click button Save.
7 In the dialog Visual Exporter:
 Set Visual type to
 Static.
Static objects are non-skinned (no bones), non-animating objects. For a
description of how to get an animating character or NPC into the
BigWorld engine, see the lesson Create
Low-Polygon Characters.
Clear the Allow scale check box.
This option only applies to the export of animated objects.
When you are exporting an object with scale animation, check this option.
Otherwise clear it.
Select the Normal mapped check box.
This option should be checked if you are using a normal map
on your object.
Select the Keep existing materials check box.
This option prevents the exporter overwriting any changes that were made to the material properties post export. For example, if you exported a crate with a wooden texture then later change its texture to a metal texture in Model Editor, re-exporting this crate would result in the loss of the metal texture (the box reverting back to the assigned wooden texture). If you tick Keep existing materials then you will avoid this problem.
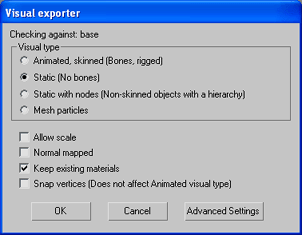
Visual Exporter dialog box
Click OK.
8 Located in the folder you selected, there will now be the
following files:
name.model
name.primitives
name.visual
To export a static object as a Visual file, follow the steps below:
Firstly, ensure that the exporter plug-in for your 3d application is
installed. Instructions for installing the exporter plug-ins can be found in the
Tools Reference Guide,
chapter 3ds Max and Maya Exporters.
1 Open Maya.
2 Select menu item File→Export
All→
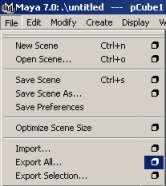
Maya's File menu
3 In the Export All Options dialog box:
Select Export
Type group box's Visual radio button.
Select Visual
Type group box's Static radio button.
Static objects are non-skinned (no bones), non-animating objects. For a
description of how to get an animating character or NPC into the
BigWorld engine, see the lesson Create
Low-Polygon Characters.
Clear the Allow scale check box.
This option only applies to the export of animated objects.
When you are exporting an object with scale animation, check this option.
Otherwise clear it.
Select the Bumpmapped check box.
This option should be checked if you are using a normal map
on your object.
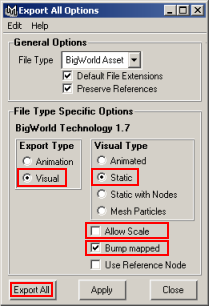
Maya's Export All Options dialog box.
4 The Export dialog box will be displayed.
In the File Name field, type the name of the object that
you are exporting.
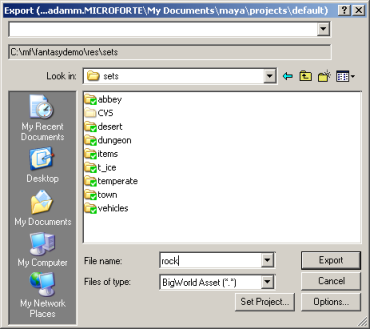
Maya's Export dialog box
5 Click the Export button.
6 Located in the folder you selected, there will now be the
following files:
name.mode
name.primitive
name.visual
The Collada to Bigworld converter located in bigworld\tools\collada_converter\dae2bigworld.exe allows users to convert collada (.dae) files into BigWorld .model files.
The converter can be run from the command prompt.
The syntax for the converters use is as follows.
dae2bigworld.exe infile.dae [-o outfile.model] [-a] [-n] [--res respath;otherrespath]
Only infile.dae is required when you run the converter, this will convert your .dae file to infile.model, as a static model. This requires your .dae file to be in the bigworld res tree..
It requires the resource paths to be set up, the easiest way of setting this up is to add a paths.xml file to the folder where you keep dae2bigworld.exe, that way you don't have to add the paths to the command line.
The options are:
-o outfile - specify the output file, if this is not specified the output filename will be the same as the input filename with .dae extension
-a to create an animated model
-n to force the nodes to be included in the model .visual file (for static models with nodes, if -a is specified, the nodes are already included)
--res to specify the res path to use.
-static - output a static model, all parts of the model will be combined to
one model.
-animated - output an animated model that can have an animation applied.
-shell - output a shell model, similar to a static model but with portals and hulls.
-static_with_nodes - output a static model with the node hierarchy in tact.
-animation - output a .animation file.
-bone_limit ## - number of bones allowed per mesh piece (default is 17).
-no_bump - do not generate bump mapping information, by default tangents and binormals are generated.
-ignore_materials - clear the existing materials from the model and visual.
--res respath;otherrespath - override the res path used by the model
The converter is built using the opencollada framework (http://www.opencollada.org)
It is not fully compatible with the fbx collada exporters for 3ds max (and possible the maya one) as they do not adhere to the collada spec. It should work as long as you don't have any materials assigned to your objects though.
If using 3ds max or maya it is probably better to use the free exporters available from opencollada.org.
Materials are not converted (only material names are included), so you will need to apply them in ModelEditor after conversion.
Bsp tree for collisions will be generated for static models.
Vertex data that is supported at the moment: positions, normals, uvs, skinning information.
The converter requires the february 2010 directx runtimes or later, these can be installed from:
http://www.microsoft.com/downloads/en/d ... laylang=en
An easy way to use the exporter is to create create 5 shortcuts of the dea2bigworld.exe file and named them as follows
Animated
Animation
Shell
Static
Static With Nodes
I then modified the properties (right click - properties) of each file to add the following arguments to the Target:
Animated ---- "F:\mf_20\bigworld\tools\collada_converter\dae2bigworld.exe -animated"
Animation ---- "F:\mf_20\bigworld\tools\collada_converter\dae2bigworld.exe -animation"
Shell ---- "F:\mf_20\bigworld\tools\collada_converter\dae2bigworld.exe -shell"
Static ---- "F:\mf_20\bigworld\tools\collada_converter\dae2bigworld.exe"
Static With Nodes ---- "F:\mf_20\bigworld\tools\collada_converter\dae2bigworld.exe -static_with_nodes"
These shortcuts can now be placed anywhere you wish (I have them on my desktop).
From Maya/Max/3dTool export or save a .dae collada file to the location you want the final BigWorld file (within your res path). To convert the .dae collada file into a BigWorld file all you need to do is drag the .dae file from the res path location on top of the appropriate exporter shortcut.
If an original art asset is lost it can sometimes be necessary to convert BigWorld assets back into 3d models so that further changes can be made within your modelling package of choice.
The VisualToCollada.py script located in \bigworld_pssm\tools\misc\visual_to_collada\VisualToCollada.py can convert static BigWorld .model files into .dae collada files.
To use the VisualToCollada.py script you will need python 2.6 installed.
Then from the command prompt, navigate to the location of the VisualToColladay.py script
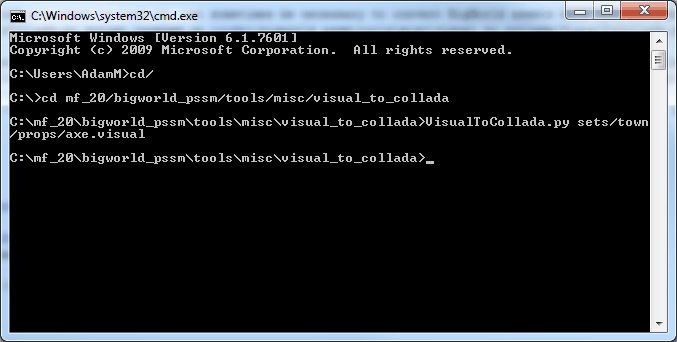
Include the relative path of the .visual asset you wish to convert.
Once executed the .dae file will be located in the same location as the .visual file.
Note: This tools is in its extreme infancy. It will only convert static models, it does not retain material information.
Copyright 1999-2011 BigWorld Pty. Ltd. All rights
reserved. Proprietary commercial in confidence.
 3ds Max and Maya export paths
 Applying BigWorld shaders directly to 3ds Max models
 3ds Max and Maya Export Paths