 Overview
- Night sky dome
 Day sky dome
- Static sky boxes
- Dynamic sky boxes (Weather)
- Weather system special effects and particle systems
- Bloom
- Space environment options
- Pre 1.9 Clouds
OverviewNight sky domeDay sky domeStatic sky boxes Dynamic sky boxes (Weather)Weather system special effects and particle systemsBloomSpace environment options Pre 1.9 CloudsEach world space has a space.settings file, which can be found
in the folder where the space's chunk data is stored. The
space.settings file for the main space in Fantasy Demo is located
in fantasydemo/res/spaces/highlands. This file references the
sky.xml file, which controls all environmental variables discussed
below. The sky.xml file for FantasyDemo is located in
fantasydemo/res/environments/sky.xml.
Each space.settings file can point to a different
sky_spacename.xml file. Therefore, you can make a different
sky.xml file for each space, which allows different environment
effects per space. The desert's space.settings file, for example,
points to desert_sky.xml, which changes the environmental effects
to use a different colour sky.
Many of the properties outlined in sky.xml file can be modified
in WorldEditor's Environment Options panel, and are described in the
sections below.
 Overview
The diagram above shows the multiple sky boxes available within the BigWorld Engine
2. Day Sky dome (Sky Gradient map)
4. Dynamic Sky Boxes (Weather Systems)
Night Sky domeThe fx_skydome.model displays the stars at night. It is located
in the bigworld/res/system/models, and uses the texture bigworld/res/system/maps/star.bmp. Its material properties are described in bigworld/res/system/materials/sky_dome.mfm
This sky dome is displayed behind all other sky domes.
Day Sky domeIn front of the night sky dome is a day sky dome. This sky dome is textured with the skygradient map
Sky gradient mapThe sky gradient map determines the colour of the sky as the time of day changes. A single vertical line of pixels is chosen from the sky gradient map, depending on the time of day. The colour from these pixels is then stretched across the entire sky.
The image size of a sky gradient map should be 64 pixels wide and 256 pixels high.
The sky gradient map is referenced by the sky.xml file, and can
be chosen on a per-space basis in WorldEditor's Environment Options panel.
At night the alpha in a sky gradient map is used to fade out the skygradient colour
as nightfall sets in, allowing you to see the night sky dome behind it. Therefore, a skygradient texture must be saved as a
32-bit TGA file. To prevent sky gradient maps from being compressed to the DXT3
format, an associated .texformat file is required (for details,
see lesson Texture Maps, section Texformat - Defining texture
compression settings).
Note in the image below the increase to black as nightfall sets in. This allows the player to see the night sky dome behind the skygradient colour.
Below are three examples of sky gradient textures.


Example sky gradient textures
The relationship of the texture colours in the gradient to the actual sky colour can be seen in the example below. The bottom of the texture represents the horizon leading upwards to the centre of the sky dome, exactly where the sun would appear around midday.
In the example below, you can see what can be achieved by making quick changes to the sky gradient texture. You can also see the effect of the alpha channel, allowing the stars on the night sky dome to show through the evening.
Fog Colour The fog colour is determined by the time of day and colour of the bottom line of pixels in the sky colour gradient texture. The texture is read from left (morning) to right (night), as illustrated below.
Static Sky BoxesStatic Sky boxes will completely obscure both the night and day sky domes. They are generally used when you want to define a non dynamic sky, or a ring of mountains/building around the player.
You can add a sky box to the world through the Environment Options
panel in WorldEditor. Simply click the Sky Bitmaps And Gradients group box's Add
button, and specify the .visual file representing the sky box. If no skybox is used the Day Sky Box will be visible.
Sky boxes defined in this section of the environments tab can be thought of as non changing fixtures to the world. For example a non changing hand painted sky, a ring of mountains, or a sister planet in the sky.
The grayed out Weather Systems entry within the sky box window allows you to decide if your static sky boxes are to be drawn in front or behind the weather systems by moving them above or below the Weather Systems entry. A mountain ring for example would need to be drawn in front of the weather systems (The clouds do not obscure the mountains), whilst a large planet in the sky is definitely going to be obscured by weather systems.
There are several types of effect files that can be used with a sky dome, all of them are located in bigworld/res/shaders/environment. These effects can be applied to your sky domes from within Model Editor and are described in the following section.
Weather Systems are described below
Static Sky box shaders The static sky box shaders include:

sky_box.fx This is a static sky box which should
be used for spaces that do not need a dynamic time of day. – see the example sky box
fantasydemo/res/sets/temperate/props/skybox.visual. in the fantasy demo desert space. This type of sky box will generally be used to cover the entire sky. Using the static day sky dome is not recommended in conjunction with a
dynamically changing time of day, because the illustrated light direction within
the sky dome will not match the dynamic sun light source, and the same sky dome
is used both during day and night.

sky_box_alpha.fx
This is also a static sky box, it can however be used with a dynamic time of day as it has the option of receiving time of day lighting. This sky box effect also uses the diffuse map alpha to define transparency which allows the sky behind the dome to be seen. This sky box can be used to simulate a distant mountain range, or city scape. By setting the material property - Sunlight Response to 0.0 the sky box can be used to simulate astral objects in the sky, like a sister planet or space station. See the example skybox_alpha fantasydemo/res/sets/t_ice/props/skybox_withmount.visual in the fantasy demo arctic space.

Create a Static Sky Dome Model What Shape?:
When using the sky_box.fx or sky_box_alpha.fx the shape of a sky box can differ significantly, with some tricky mapping a cube can be used (there are many third party applications that may help you create a cube sky dome). Alternatively you could use a sphere or cylinder (especially for mountain rings). To get an idea of what your sky box might look like from your 3d application position the camera at the world origin (0,0,0 coordinates). The sky box should surround the camera, ensure that the faces of the sky box geometry are pointing in towards the camera.
How big?:
Objects using the above sky box effect shaders are drawn first in the scene, this ensures that the sky box will be behind every other scene object giving it a distant appearance. The shader also ensures that the sky box position is fixed to the camera. This simulates the lack of parallax movement that occurs with very distant objects.
When creating a sky box in your 3d application, the size of the sky box doesn't matter. A 10meter X 10 meter sky box will appear the same as 1km X 1km sky box because of the way it is rendered and its position relative to the camera.
Dynamic Sky Boxes (Weather)Of all the sky domes, Weather sky domes are usually drawn closest to the player.
Weather in BigWorld is a combination of multiple effects including, Dynamic Sky boxes, Particle Systems, alteration to Sun and Ambient colour and alteration to Fog Colour and Fog Distance.
Weather systems can be created and modified from the Weather tab in WorldEditor. Changes made in this tab are saved in the weather.xml file located in C:\mf\fantasydemo\res\scripts\data\weather.xml
Here is an example of the Snow weather system in the Weather Systems Tab and its related data in the weather.xml file.
 |
<Snow> <sky box> system/models/storm_overhead.model </sky box> <sky box> system/models/horizon_ring_storm.model </sky box> <sun> 1.0 1.4 1.8 1.0 </sun> <ambient> 1.1 1.1 1.1 1.0 </ambient> <fog> 0.8 0.8 1.0 2.0 </fog> <temperature> -5.0 </temperature> <sfx> sfx/snow.xml </sfx> <windSpeed> 5.0 0 </windSpeed> <windGustiness> 1.0 </windGustiness> <exclude> spaces/desert </exclude> <bloom> <attenuation> 1.010000 0.990000 0.980000 1.005 </attenuation> <numPasses> 10 </numPasses> <power> 8.000000 </power> <width> 2 </width> </bloom> </snow> |
The first window (1) contains all the available weather systems. You can chose which weather systems should play in a chosen space by ticking the box next to each weather system. In the example above, the Blizzard weather system will not appear in the space being edited.
Selecting a weather system will cause it to be previewed in the space.
Ensure that sky boxes are set to visible from the General Options tab, otherwise you will not be able to preview the weather systems.
Once a weather system is selected, the Sky Boxes window (2) will display the dynamic weather sky boxes used in the selected weather system. Multiple sky boxes are used in the Rainy example above. The weather system sky box material properties can be edited within ModelEditor.
Apart from the sky boxes, each weather system has associated with it a number of properties which can be edited in the Properties window (3).
Special Effect File: <sfx> The special effects file to be associated with the weather system allows you to associate particle systems and other effects with the weather system.
Rain Amount: <rain> Determines the amount of rain associated with the weather system.
Sun: <sun> Defines the sun RGB colour and sun multiplier
Ambient: <ambient> Each weather system have its own unique ambient colour RGB and ambient multiplier
Fog: <fog> RGB value of fog colour, followed by a multiplier on the Fog (farplane) distance higher numbers bring the fog plane closer to the camera
Sky Box Fog Response: <fogFactor> Determines how much of the fog colour is inherited by the skydome
Wind Speed: <windSpeed> Wind speed in the X and Z world coordinates in meters per second. Wind speed can reach a maximum of 15.
Wind Gustiness: <windGustiness> This value adds noise to the wind speed to simulate gusting wind.
Temperature: <temperature> Each weather system have its own unique temperature which can be used in script to call other events. e.g. the Ranger character breaths fog when the temperature drops
Bloom Settings: <bloom> The Bloom parameters are described here
Weather systems can be triggered from the chat console (enter) by typing "/weather SystemName" where the SystemName is replaced by any of the weather systems listed in the weather.xml file.
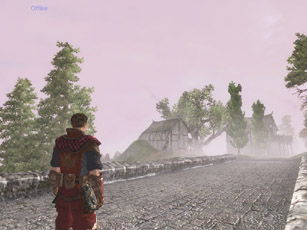
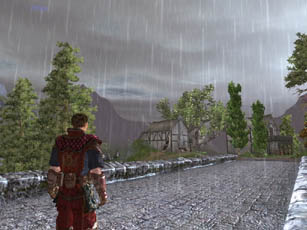
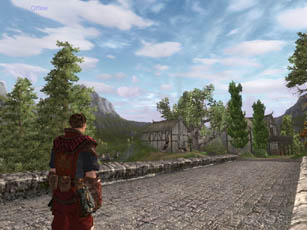
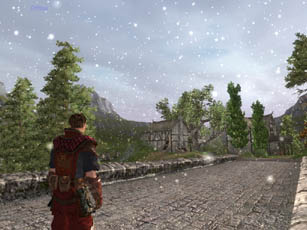
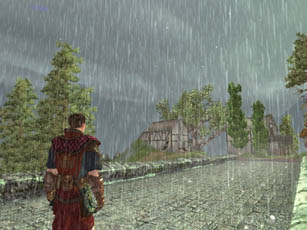
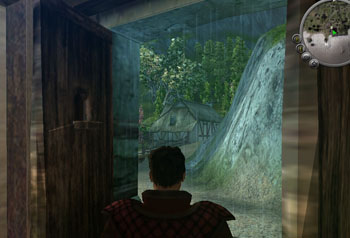
Examples screen shots of the same position with different weather systems
Dynamic "weather" Sky box shaders The dynamic weather sky boxes include:
cloud_layer.fx Is designed to work with a dynamic time of day. The cloud_layer shader uses the Diffuse map alpha to determine the rims of clouds and subsequently light them. The Rim and Scattering parameters offer fine control of how this cloud rim lighting is applied.
dual_cloud_layer.fx Works the same as the cloud_layer.fx except it has a second layer to allow the appearance of higher and lower cloud layers.
Shader model compatibility
Shader model 2 cards and higher can use the dual_cloud_layer.fx with simulated light scattering
Shader model 1 cards can use the single layer cloud_layer.fx with simulated light scattering
Fixed function cards can use the dual_cloud_layer.fx without simulated light scattering
The parameters defining the cloud_layer.fx and dual_cloud_layer.fx can be altered from within Model Editors material tab.
When tweaking cloud_layer material properties ensure that the Lighting Setup is using Game Lighting, otherwise the position of the directional light that represents the sun will be offset from the actual sun position.
Diffuse Map: Defines the colour (RGB) and Opacity of the cloud layer
Fog Map: Determines the amount of fogging applied to the skydome. White areas receive more fog than dark areas. This is useful for fading off the skydome as it approaches the horizon.
Rim Power: This factor determines how far away from the sun the cloud rim lighting effect will occur. Higher numbers will cause only clouds close to the sun to be effected by rim lighting, lower numbers will cause clouds further away to be effected.
Rim Detect Power: This determines how quickly the rim lighting fades away. Higher values result in quicker falloff, lower values fade away slowly.
Rim Detect Width: When a cloud rim is detected the Rim Detect Width will offset the point at which the Rim Detect Power begins to fade the rim lighting.
Rim Strength: This factor scales the combined effect of the above rim parameters. Allowing you to dial down/up the rim power as a whole.
Scattering Strength: Adds white to the general area around the sun, it does not take into consideration the cloud rims. Higher numbers cause a larger area to receive the scattering effect.
Scattering Power: Determines the falloff of Scattering Strength, it does not take into consideration the cloud rims. Higher values result in quicker falloff, lower values fade away slowly.
Wind Speed: Determines the UV scrolling speed of the sky box Diffuse map. Use this to simulate wind moving the clouds across the sky. The wind direction is provided in-game, this wind speed value scales the amount of the effect.
Texture Tile: Determines the UV tiling and UV offset of the skydome Diffuse map.
Sun Flare Occlusion: The alpha value of the diffuse map is also used to occlude the sun flare. When the sun goes behind an area of the sky box containing alpha above the Sun Flare Occlusion value, the sun flare will not be rendered.
Parallax: Adds a small amount of parallax to the sky box position. This helps reduce "sky box stuck to camera effect" as the player increases altitude.
Multiple sky boxes can be used simultaneously. Simply add them sequentially to
the Sky Model And Gradient group box's Sky Model: list box.
The sky boxes will be rendered in order, from top to the bottom of the list.
The order of the sky boxes can be changed via the  and
and  buttons. So if you want your mountain box in front of your sky box the sky box should be at the top of the list.
Ensure that the static sky option is ticked within World Editor's options tab, otherwise the sky box will not be shown.
Create a Dynamic SkyDome ModelWhat Shape?:
The cloud_layer.fx and dual_cloud_layer.fx shaders are intended for weather system sky boxes. There are two types used in the Fantasy Demo, an Overhead cloud layer and a Horizon ring cloud. The 3dsMax models used to create these layers are Included in bigworld/doc/tools_tutorial_examples/working_files/sky box/example_dual_layer_skybox.max.
The fantasy demo highlands space uses two different sky boxes clear_overhead.visual and horizon_ring_cloud.visual. The clear_overhead.visual is a plane that stretches off into the distance. The horizon_ring.visual is a topless cylinder. If you open either of these assets in Model Editor and apply a light only shader to them you will be able to view them as they were created in 3dsMax.
How big?:
Objects using the above sky box effect shaders are drawn first in the scene, this ensures that the sky box will be behind every other scene object giving it a distant appearance. The shader also ensures that the sky box position is fixed to the camera. This simulates the lack of parallax movement that occurs with very distant objects.
When creating a sky box in your 3d application, the size of the sky box doesn't matter. A 10meter X 10 meter sky box will appear the same as 1km X 1km sky box because of the way it is rendered and its position relative to the camera.
Painting Maps for the cloud_layer Effect Sky domes Take a look at the following maps used on the sky domes in the fantasy demo highlands space.
mf\bigworld\res\system\maps\cumulus_horizondark_cloud.tga
mf\bigworld\res\system\maps\cumulus_overhead_cloud.tga
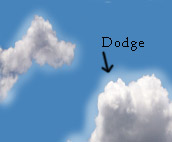
These skydome maps were created by stitching a series of photographs together, pay close attention to the white rim that surrounds each of the clouds. This white rim helps reduce the blue that can creep in from sky in the bitmap.
I used Photoshop's dodge tool to create the white rim around the clouds. Alternatively you could de saturate the area around the cloud rim.
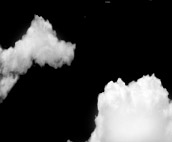
A section of the cumulus_horizondark_cloud.tga showing the white cloud borders and its associated alpha.
Weather system special effects and particle systems The Special Effect File <sfx> entry defines a special effect file which enables the user to associate a number of special effects with a weather system. In the <snow> example below a particle system called snow_flakes.xml is attached to the player model.
<snow>
   <Actor> particles
   	<ParticleSystem> sparticles/snow_flakes.xml </ParticleSystem>
   </Actor>

   <Joint> particles
   	<DummyModel/>
   </Joint>

   <Event> particles
	<ForceParticle/>
   </Event>

   <Event> particles
    <RampTimeTriggeredParticles>
   	 <fadeTime>	2.0	</fadeTime>
    </RampTimeTriggeredParticles>
   </Event>
</snow.xml>
To create the density of particles needed for a weather system most particle systems use the wrap barrier which moves a particle from one side of the barrier to the other when it collides with the barrier edge.
A particle created at position 1. will hit the barrier at position 2 where it is teleported to position 3. This ensures that the density of particles remains high around the player.
If this system was not used a fast moving player would run past the particles before they had a chance to spawn.
Weather particle systems can be restricted to only render outside by setting the outside only parameter of the sink component to true.
Bloom The BigWorld engine simulates the blooming that occurs when looking at strong light sources by overlaying a blurred image of the screen that has been through a power function
The artist has control of these bloom parameters per weather system from the WorldEditor weather panel or may choose to edit the weather.xml file located in C:\mf\fantasydemo\res\scripts\data\weather.xml.
Here is an example of the Snow weather system from the weather.xml file.
<Snow>
   <sky box> system/models/storm_overhead.model </sky box>
   <sky box> system/models/horizon_ring_storm.model </sky box>
   <sun>  1.0 1.4 1.8 1.0 </sun>
   <ambient> 1.1 1.1 1.1 1.0 </ambient>
   <fog> 0.8 0.8 1.0 2.0 </fog>
   <temperature> -5.0 </temperature>
   <sfx> sfx/snow.xml </sfx>
   <windSpeed>	5.0 0 </windSpeed>
   <windGustiness>	1.0 </windGustiness>
   <exclude>	spaces/desert	</exclude>
   <bloom>
   		<attenuation>	1.010000 0.990000 0.980000 1.005	</attenuation>
		<numPasses>	10	</numPasses>
		<power>	8.000000	</power>
		<width>	2	</width>
   </bloom>
</snow>
Attenuation: <attenuation> Defines the colour change applied to the bloom filter R, G, B and a multiplier value.
Num Passes: <numPasses> Defines the number of times the bloom filter is blurred before being applied to the screen
Sensitivity: <power> Chooses a brightness value, above which the bloom will be applied. Small values indicate higher sensitivity.
Filter Width: <width Offsets the each pass of the bloom filter
Bloom parameters can also be defined within the C:\mf\fantasydemo\res\scripts\data\bloom.xml file. This has been done in the example below, where the Standard bloom parameters are defined in the bloom.xml file.
<Cloudy4>
   <sky box> system/models/overhead04.model </sky box>
   <sky box> system/models/horizon_ring_cloud.model </sky box>
   <windSpeed>	1.0 0 </windSpeed>
   <windGustiness>	1.0 </windGustiness>
   <bloom> Standard   </bloom>
</snow>
Space environment settings Changing hour length and start time The start time (for WorldEditor only) and the speed at which time passes within the game can be altered per space.
Sun and Moon angle The angle of the sun and the moon in the sky can be altered. You may want to drop the angle of the sun to simulate a more polar or winter environment, for example.
Sun Flare Instructions on how to customise the sun flare can be found here
Time of day The time of day can be altered in WorldEditor, but only as a preview feature, and does not affect the time of the day within the game.
Ambient and Sun Light Both the colour and value of the sun and ambient lights can be animated throughout the course of the day. Keys can be created and removed, and the colour of each key can be altered.

These animation keys are stored as in the sky.xml file's <lightkey> tag for the chosen space.
Atmospheric effects The environment settings are editable per space from within WorldEditor. You
can also edit the sky's configuration file ( fantasydemo/res/environments/sky.xml for FantasyDemo, for
example).
The fields for environment settings are explained below:
MIE Amount - Amount of
scattering applied to light as it travels through the atmosphere.
Turbidity Offset -
Amount of suspended particulate matter (proportionally affects MIE scattering
effect).
Turbidity Factor -
Defines how MIE scattering responds to increases in the global fog amount.
Vertex Effect - Vertex
height contribution to MIE scattering (the vertex effect gives the scattering
an elongated shape at the horizon).
Sun Height Effect - Sun
height contribution to MIE scattering (the sun height effect decreases the
overall amount of the effect when the sun is high in the sky, i.e.,
noon).
Power - Mathematical
power of the MIE scattering effect (it makes the effect looks less like a flat
shaded circle, and more like a circular gradient with emphasis being put on
white nearer the sun).
Changing far plane settings To change the far plane setting, you have two options: set a per-sky far plane, or set a per-space far plane.
Set a per-sky far plane –
Set the farPlane tag in the sky configuration file specified in
your space.settings file (for example, the desert space uses the desertsky.xml file).
Set a per-space far plane
– Set the farPlane tag in the space's space.settings configuration file – this will
apply only to the given space, and will override any such setting in the sky
file.
 The far plane should be
a floating-point value and, for the best results, should be between roughly
200.0 and 1500.0 meters.
The far plane should be
a floating-point value and, for the best results, should be between roughly
200.0 and 1500.0 meters.
Pre 1.9 CloudsBefore BigWorld 1.9 a much simpler cloud system was used. These clouds are defined in bigworld/res/resources.xml – this file points at the two bitmaps to be used for the cloud
textures.
The clouds are represented by two planes, each with its own unique texture map:
The lower plane uses cloud_loom_brood.tga to simulate the part of the cloud in shadow.
The higher plane uses cloud_edges.tga to simulate the higher part of the cloud that is
lit by the sun.
The excerpt below displays the relevant tags in bigworld/res/resources.xml:
   <cloudEdgesBmpName> system/maps/cloud_edges.tga      </cloudEdgesBmpName>
   <cloudBodyBmpName>  system/maps/cloud_loom_brood.tga </cloudBodyBmpName>
Clouds can only be set per game, i.e., all clouds in all spaces must
be the same – they cannot be set per space. To use your own clouds, either
overwrite the existing bitmaps, or point the <cloudEdgesBmpName> and <cloudBodyBmpName> tags to your own maps.
You can preview the clouds in FantasyDemo by accessing the client watchers (via the ~(tilde) + F7 keyboard shortcut), or through the client
access tool CAT.
Weather can also be adjusted in WorldEditor, so that the clouds are visible by using the Weather Preview panel.
1-For more details, see Client Programming Guide, section Debugging, Watchers.
2-For more details, see Client Programming Guide, section Debugging, Client Access Tool (CAT).
3-For more details, see Content Tools Reference Guide, section WorldEditor, Panel Summary, Weather Preview Panel.
Copyright 1999-2011 BigWorld Pty. Ltd. All rights reserved. Proprietary commercial in confidence.