Lighting Environments
- Light types
 Light properties
- Light placement
- Visualising lighting contribution
- Placing ambient lights
- Placing lights
- Adjusting the colour
- Adding coronas and streaks
- Adding spotlights
- Creating and editing flares
Lighting EnvironmentsLight typesLight propertiesLight placementVisualising lighting contributionPlacing ambient lightsPlacing lightsAdjusting the colourAdding coronas and streaksAdding spotlightsCreating and editing flares Lighting Environments
There are two types of lighting environments within the BigWorld engine:
 Indoor lighting
Outdoor lighting
Indoor LightingIndoor lighting only applies to objects within shells, it is a more highly customisable lighting setup than outdoors lighting.
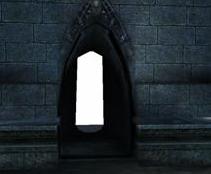
Heavenly portals allow sunlight in: Because heavenly portals allow sunlight into shells, objects within shells that have a heavenly portal will be affected by both indoor and outdoor lighting. To get a completely indoor effect, your shell must not contain a heavenly portal.
Vertex-based indoor lighting: Because the BigWorld static lighting is vertex-based, it is important to design your shells to include enough vertices for sufficient shadow and lighting precision. For more details on how to create shells for optimised lighting, please see lessons Create an Internal Shell in 3ds Max and Best Practices.
Outdoor LightingThere are two options for outdoor lighting. You can choose a lighting type from within World Editor.
Option 1 (Default)
Outdoor lighting consists of two lights:
Ambient lighting
The sun (directional light)
Four Dynamic and two Specular lights per outdoor chunk
This option gives you a dynamic time of day. The sun rises and sets, shadows lengthen in the afternoon. The dynamic time of day comes at a trade off, you cannot have static lights in the out
An example of a fantasy demo space that uses this option is fantasydemo/res/spaces/highlands, and fantasydemo/res/spaces/min_spec
Option 2 (Unsupported)
Removes dynamic time of day lighting and allows you to add static lights to the outdoor world.
Outdoor lighting consists of two lights:
Ambient lighting
Unlimited Static Lights
Four Dynamic and two Specular lights per outdoor chunk
It is essentially similar to converting your outdoor environment into one giant indoor space.
An example of a fantasy demo space that uses this option is fantasydemo/res/spaces/urban.
Note: indoor (shell) lighting is identical between both options.
Light typesThere are five true light types in BigWorld Technology, and two image-based lights types.
True lightsAmbient – Each
indoor chunk can have a single ambient light. This type of light has no
direction, and simulates the background light intensity.
Omni – Spherical
lights with a decreasing area of effect along an outer radius.
Spot – Conical
lights, such as a flashlight.
Directional –
Lights whose rays do not diverge. Consequently there is no option to add
further directional lights in WorldEditor
Pulse – An Omni
light whose multiplier and position are animated. It is a true dynamic and
specular light source. The light's multiplier animation is defined and editable from within the properties tab.
The first number defines a time and the second a multiplier. So in the image below at 1.2 seconds the light is only 41% as bright as its default value.
The light's positional animation is defined in the animation property. The animation file is of a Hard Point named "HP_light", the light will be attached to this hard point and animate accordingly.
Image-based lights (flares)Image-based lights (or flares) do not actually emit light – they are special effect objects that mimic the effects of lights. There are two types of image-based lights:
Coronas –
Coronas are a spin to face additive texture. Useful for glow effects, such as
the tips of candles.
Streak – Streaks
consist of two components: a spin to face streak, and a lens flare. These lights
look good when place on extremely bright light sources.
A blue corona |
A streak effect |
You can create your own flares – for details, see Creating and editing flares
Light propertiesEach of the true light types can be a combination of the following properties:
Static lights: Apply
to static indoor scene objects only.
In particular, they contribute to the 'static lighting' values, and thus only work on indoor shells and their models. Static lights do not light up the character or other dynamic objects (i.e., entities ).
Static lighting is vertex-based. You may have any number of static lights, since their contribution is calculated offline.
Static lighting only occurs within shells, there is no static lighting outdoors.
Specular lights: Apply
to objects that have materials with specular maps – this includes dynamic
objects (like the character), and static ones.
There can only be two specular lights per shell.
Note: Spotlights cannot be specular only.
Dynamic lights: Apply
to dynamic objects (like the character) and outdoor objects.
There can be up to 8 dynamic lights affecting any object – the engine will choose the closest 8 ones to illuminate it. Therefore, while there is nothing stopping you from having more than 8 lights in a shell, only 8 of them will affect each object.
Note: All objects outdoors are considered dynamic objects. If you use an outdoor light it must be set to dynamic.
Light placementWhen placing more than 8 dynamic lights in a particular area, you should test for pops in the lighting as the engine chooses a different set of lights to illuminate the dynamic object.
To avoid these pops, follow the guidelines below:
Reduce the number of
lights.
Reduce the intensity of
individual lights.
Make sure that each light has
a falloff, so that by the time the object moves away from it, its contribution
to illumination is minimal.
The 8-light limit may be any combination of:
Up to 4 Omni lights
Up to 2 Spot lights
Up to 2 Directionals
The diagram below illustrates the following:
How to illuminate a shell to
avoid light 'popping' – at no point in the shell do more than 8 dynamic
lights overlap.
How to ensure that the player
avatar will receive specular from within every position of the shell.

When the light limit is reached the BigWorld engine will take into consideration both proximity and light radius when it removes the influence of a light from an object.
Note: The objects bounding box is used to calculate its distance from a light source.

Visualising lighting contributionWorldEditor allows you to visualize which dynamic lights are contributing to a models lighting. Select a model then Right click - Visualise dynamic light contribution.
Yellow lines indicate active lighting contribution.
Grey lines indicate lights that are within range but not used for lighting contribution (due to light limit restrictions)

Lights can be forced to contribute to a scene by changing their Light Priority setting in the lights property tab in World editor
Placing ambient lightsAmbient lights are used inside shells to illuminate the scene with a minimum uniform intensity. Ambient lighting will modulate a models surface colour, so an ambient light value of 64 will cause a pure white model to be displayed at a value of 64 on screen. (64/256)*256 = 64.
To place an ambient light within a shell, first place a shell in the world – when a shell is initially placed, it has no lighting.
Choose object placement mode to make placing the light more simple – this is configured in Object panel's Locking Mode group box.

Move inside the shell, then add the ambient light. To do that, follow the steps below:
1 Select the Asset Browser panel's Lights virtual folder.
2 In the file list, select the desired ambient light.
3 Place the light in the shell.
This can be done by dragging the file from the Asset
Browser panel's file list, or by moving the placement cursor icon in the
desired location in the viewport and pressing Enter.
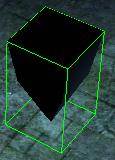
Ambient light placed within shell |
Shell with computed ambient light |
4 The ambient light is represented by a small white diamond, which positions itself in the centre of the shell.
Because ambient lights have no directionality, you cannot move its light source.
Ambient light placed in the shell
5 In the Properties panel, select the ChunkAmbientLight item entry's Colour property, and adjust it to the desired value.
Placing lightsThis section illustrates how to place a light model in the world (in this
case, the one in the omni_static_and_dynamic.xml file).
1 In the Object panel's Object Grip Snaps group box, select the Enabled check box.
2 In the Asset Browser panel, select the
Lights virtual folder, then in the file list, select the
omni_static_and_dynamic.xml asset.
3 Place the light in the world.
This can be done by dragging the file from the Asset
Browser panel's file list, or by moving the placement cursor icon in the
desired location in the viewport and pressing Enter.
The light model, after being placed
4 Adjust the light's inner radius and outer radius.
The light has a default inner radius of 1.0, and a default outer radius of 12.0. These properties can be changed in two different ways:
Via the Properties
panel – manually change the inner radius and outer radius
properties.
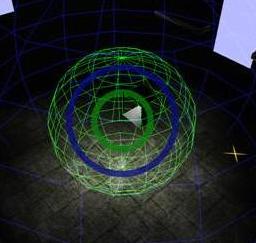
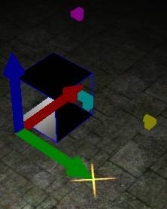
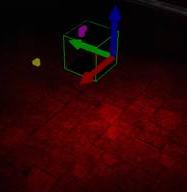
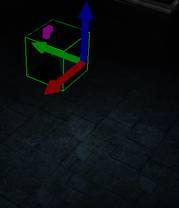
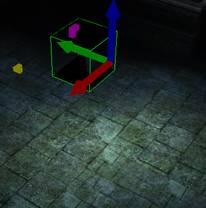
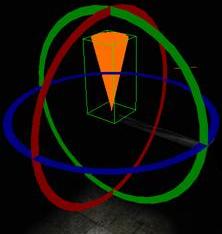
Via the Scale
gizmo (activated by the Alt keyboard shortcut) – drag the green
circle in the gizmo to change the inner radius, or drag the blue one to change
the outer radius.
Scale gizmo |
Light, placed inside shell, being resized |
Adjusting the colourThe light's colour can be changed in the Properties panel's Colour property in 3 different way:
By typing the RGB+Alpha
value.
By clicking the
 button then selecting a
new value in the Color dialog box.
button then selecting a
new value in the Color dialog box.
By expanding the property
(via the  button) then
changing the value of the Red, Green, or Blue field.
button) then
changing the value of the Red, Green, or Blue field.
Changing the light colour in the Properties panel

Light with different colour, and its effect in the world
 You can use copy-and-paste to set
multiple lights with the same colour.
You can use copy-and-paste to set
multiple lights with the same colour.
The light also has the Multiplier field, which sets the intensity (brightness) of the light, without affecting its hue.
Difference between a Multiplier set at 0.5 (left) and Multiplier set at 2.5 (right)
If you want to change the
Colour or the Multiplier property of multiple lights, then select
them and change the property to the desired value.
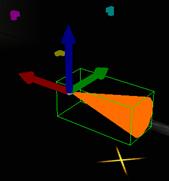
Omni and spot lights also have the properties Static, Dynamic, and Specular, which can be turned on or off. Setting the Static property to False changes the light's model to an inverse pyramid.
Model of a light with the Static property set to False
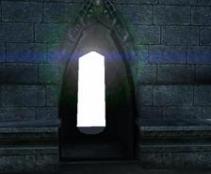
Adding coronas and streaksCoronas and streaks are used only for representing or simulating sources of light, such as a candle flame or a neon bulb. Or in the case of a streak, a large powerful flood light of some sort. They cast no light themselves and are used purely for effect.
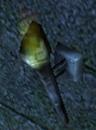
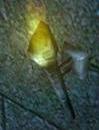
A before-and-after shot of a light source using a corona
Coronas have a default colour value of #3E50CA, and like normal
lights they too can have their colour value changed to match that of the light
source they are representing. This is found in the Properties panel.
A before-and-after shot of a large light source using a streak
Adding spotlightsAs the name suggests, spotlights only light the spot to which they are pointed. They have no inner or outer radius, only an angle radius which will dictate how large the lights diameter is.
To place a spotlight:
1 Select the Asset Browser panel.
2 Select the Lights virtual folder.
3 In the asset list, select the spot.xml file.
4 Place the light in the world, either by dragging the file
from the Asset Browser panel then dropping it in the desired location in
the viewport, or by moving the mouse to the desired location in the viewport
then pressing Enter.
The spotlight model
5 Configure the spotlight's area of influence (i.e., its inner radius and outer radius properties – you can do that in 2 different ways:
In the Properties panel,
manually change the inner radius and outer radius properties.
-or-
Using the Scale gizmo
(activated by the Alt keyboard shortcut), use the green circle to
adjust the inner radius, and the blue circle to adjust the outer radius.
The spotlight's Scale gizmo (green circle adjust inner radius,
blue circle adjust outer radius, yellow circle adjusts cone angle
6 Change the cone's angle – you can do that in 3 different ways:
In the Properties panel,
manually change the cone angle property.
-or-
Using the Scale gizmo
(activated by the Alt keyboard shortcut), use the yellow circle to
adjust the cone angle.
-or-
Using the Rotation gizmo
(activated by the Shift keyboard shortcut), use the yellow circle
to adjust the cone angle.

The cone angle can be adjusted via the yellow circle
7 Point the light to the desired location.
Unlike all other lights, spotlights can be rotated to point in
different directions. To rotate a spotlight, use the Rotation gizmo (activated
by the Shift keyboard shortcut), and drag the axis on which to
rotate the light.
Rotating a spotlight
 Spotlights also have the
colour and multiplier properties, which work as described in the
previous session of this lesson.
Spotlights also have the
colour and multiplier properties, which work as described in the
previous session of this lesson.
Creating and editing flaresFlares are additive images placed in front of light sources, usually used to simulate lens effects or to amplify the intensity of a light. The sun flare used in the fantasy demo can be found in bigworld\res\system\data
The sun flare (fx_sun.xml) shown below is a multi-stage flare. When the source of the flare becomes obscured, a different stage flare is used – this simulates the streaking that occurs as a light source becomes obscured.

When creating your own flare, start by modifying one of the existing flares. You will also require a programmer to add the flare to the world.
The following is a breakdown of fx_sun.xml (see notes below):
<root>
   <maxDistance> 1000000 </maxDistance> A
   <area>        75      </area>        B
   <fadeSpeed>   0.1      </fadeSpeed>  C
   <Flare>
      <occlusionLevel> 0.5                        </occlusionLevel> D
      <type>           materials/fx/sun_flare.mfm </type>           E
      <size>           1.0                        </size>           F
      <secondaries> G
         <Flare>
            <type>    materials/fx/secondary.mfm </type>
            <size>    0.1                        </size>
            <depth>   0.3                        </depth> H
            <rgba>    255 128 0 48               </rgba>  I
         </Flare>
         <Flare>
            <type>    materials/fx/secondary.mfm </type>
            <size>    0.2                        </size>
            <depth>   0.2                        </depth>
            <rgba>    255 0 0 32                 </rgba>
         </Flare>
         <Flare>
            <type>    materials/fx/corona.mfm    </type>
            <size>    0.1                        </size>
            <depth>   -0.1                       </depth>
            <rgba>    255 255 0 32               </rgba>
         </Flare>
         <Flare>
            <type>    materials/fx/secondary.mfm </type>
            <size>    0.05                       </size>
            <depth>   -0.4                       </depth>
            <rgba>    128 255 0 32               </rgba>
         </Flare>
      </secondaries>
   </Flare>
   <Flare> J
      <occlusionLevel> 0.1                        </occlusionLevel>
      <type>           materials/fx/sun_split.mfm </type>
      <size>           1.0                        </size>
      <rgba>           255 255 255 128            </rgba>
   </Flare>
</root>
A maxDistance is the distance beyond which the
flare will not be seen.
B area determines how large the visibility test
is. This area is used when calculating the flares occlusion, and represents the
size of the flare source in number of pixels on screen.
C fadeSpeed is a multiplier that effects how
slow the flares fade in/out. Larger numbers result in slower fade in/out speeds.
D occlusionLevel is the minimum percentage of
the flare that needs to visible in order for this stage of the flare to appear
in the world – this sets the percentage of flare visible needed to use the
next flare stage.
E type is the material file used to describe
the flare. Alternatively the effect file and bitmap can be directly defined,
eliminating the need for an MFM.
F size scales the given material.
G secondaries specifies the multiple images
that make up a single flare. These images are splayed outward from the initial
flare source towards the centre of the camera. This simulates the effect of
light passing through a camera lens.
H depth specifies the distance from the
primary flare to the secondary flare.
I rgba specifies the colour values of the
flare.
J This is the flare that will be seen through the trees. The
engine automatically uses a new flare stage when the light source is partially
obstructed. If it is fully obstructed, no flare will be shown. The point at
which the next flare stage is rendered is controlled by how much of the flare
remains visible, as determined by the occlusionLevel setting
(see note D).
Copyright 1999-2011 BigWorld Pty. Ltd. All rights reserved. Proprietary commercial in confidence.