Table of Contents
When creating large worlds in a multi-user environment, it is necessary to have a mechanism in place that controls the access by multiple world builders to the same space at the same time.
World Editor has built-in support for concurrent access, provided by its lock server bwlockd. It allows various users to edit the same space simultaneously, without conflicts.
When using the lock server, you will need to lock the regions of the world that you want to edit, so you have exclusive access to it
To use the Lock Server (also called BWLockD) in World Editor, some steps must be followed both on the server and on the client machines.
The following sub-sections describe these steps.
To enable concurrent editing of the world without conflicts, the BWLockD service (the Lock Server) has to be running. It should be run on a Linux server.
There is a script at
bigworld/tools/server/install/bwlockd.sh that can
be used to install the BWLockD service. Run the following command as
root in the bigworld/tools/server/install
directory.
# ./bwlockd.sh install
This will install the lock server init-script into
/etc/init.d/bw_lockd and install symlinks for the
/etc/rc*.d directories, such that the lock server
starts up at boot.
By default, the log file is at
/var/log/bigworld/bwlockd.log. Check the log for
a text message saying the daemon is listening on port 8168.
You can edit the installed
/etc/init.d/bw_lockd to tune the behaviour of the
lock server. In particular, useful variables to change are:
-
BIND_IP: the interface address the lock server binds to -
PORT: the port the lock server listens on -
LOG_OUTPUT_PATH: the output path for the log, by default this is set to/var/log/bigworld/bwlockd.log -
BW_LOCKD_DATA_DIR: the directory for the state files used in BWLockD.
As a system service, you can query the running state of the Lock Server.
# /etc/init.d/bw_lockd status
You can also run the lock server from the command line in the
foreground. There are various command-line options as the
--help output shows:
usage: bwlockd.py [options]

options:

  -h, --help            show this help message and exit
  --daemon              run process in the background (daemon mode)
  -I BIND_IP, --bind-ip=BIND_IP
                        IP/hostname of interface to bind to (default all
                        interfaces)
  -p BIND_PORT, --port=BIND_PORT
                        port to listen on (default 8168)
  --pid=PID_FILE
                        default daemon PID file (default "bwlockd.pid")
  -o OUT_FILE, --output=OUT_FILE
                        default daemon output file (only applies to non-daemon
                        mode, default "bwlockd.log")
  -v, --verbose         verbose output (only applies to non-daemon output,
                        daemon output is always verbose)
  --history=HISTORYPATH
                        output a history file that contains recent lock server
                        operations in XML format
  --data-dir=DATADIR
path to the data directory If you run the Lock Server from the command-line, you can pass
the --history option for the daemon to output a history
file, which contains a list of recent operations that the Lock
Server has processed. This is useful for debugging in conjunction
with the logging output. By default, no history file is
created.
In the event that you remove a space and recreate it before all clients have relinquished their locks on the old space, you may need to clear the locks and restart the lock server.
BWLockD maintains its state in files with the
.computer suffix for each workstation that has ever
created a lock. Each .computer file is an XML file, such as the one
below.
<?xml version="1.0"?>
<hostname>
    <space>
        <name> space_name </name>
        <lock>
            <rect> left top right bottom </rect>
            <username> username </username>
            <desc> lock_description </desc>
            <time> timestamp </time>
        </lock>
        <lock>
            ...
        </lock>
        ...
    </space>
    <space>
        ...
    </space>
    ....
</hostname>
</time>
</lock>
<lock>
...
</lock>
...
</space>
<space>
...
</space>
....
</hostname>|
|
|
|
|
|
|
|
|
|
|
|
|
|
For each space the given host has ever locked, there is a
space element that contains a name element
for the space, and multiple lock elements that describe
the locks that the workstation has currently acquired. Each lock
element has a rect element describing the lock rectangle,
who locked the region described by the username element,
the lock description entered when the lock was made in the
desc element, and the lock time in the time
element.
It may be necessary to clear locks manually by remove sections
from the .computer state files. For example, if a space
is removed and a new space is recreated with the same name, any
existing locks on the old space will be applied incorrectly to the new
space.If modifying the state files is required, you should shut down
the lock server, make your changes, and restart the server.
The PySVN library is used by svn_stub.py to interface with Subversion.
There is some additional configuration when using Subversion
server hosted using the svn+ssh scheme. This is not
required for the svn, http or
the https schemes. As an example of this, you may
have a Subversion URL
svn+ssh://developer@repository/srv/repos/.
In this case, there is a user called developer with
an account accessible by SSH on machine called
repository, and the repository is located at
your_game/trunk/srv/repos/,
and the trunk branch is at the top-level called
trunk.
your_game
The Subversion version control stub uses the PySVN client, but
by default, the it has no way of authenticating automatically with
your server over SSH. We supply the authentication mechanism by using
PuTTY and its associated utilities PuTTYgen and PLink. To download
these tools, go to
http://www.chiark.greenend.org.uk/~sgtatham/putty. The
documentation for PuTTY can be found on that site as well.
Use PuTTYgen to generate a key-pair to use when authenticating
to a Subversion server hosted over SSH. This key-pair can be saved
away on the client machine somewhere memorable (it will be saved into
a file with a .PPK extension by default). Part of
the output of the key-pair generation will be a string that can be
used in a SSH authorized_keys file. This string
will need to be added to the user's
.ssh/authorized_keys on the machine hosting the
repository.
PuTTY can also protect the key-pair so that a passphrase is needed to use it. It also comes with a authentication agent called Pageant that you can use to keep decoded keys in memory so that key-pairs that are protected can be used after only unlocking them once per session. Refer to the PuTTY documentation for more details.
Subversion has a per-user config file that can usually be
located in the user's directory under Application
Data\Subversion\config. A new option needs to be added to
the [tunnels] section that calls the PLink
executable with the key file that you created in PuTTYgen. For
example:
[tunnels]
ssh=C:\Program Files\PuTTY\plink -i C:\...\keypair_file.ppk
The link can be tested by running a command such as svn update on a working copy already checked out (using TortoiseSVN, for example) using the svn+ssh scheme.
The path to the Perforce command line client is specified in the
P4_PATH module variable in
bigworld/tools/worldeditor/resources/scripts/p4_stub.py.
World Editor can be configured to use BWLockD server as follows:
-
Open World Editor's options file - bigworld/tools/worldeditor/options.xml (for details on this file's grammar, see the document File Grammar Guide's section options.xml → World Editor).
-
Update / add the following section as a child to the root node:
<bwlockd> <use> true </use> <host>
server_name:server_port</host> </bwlockd>The server_name is the name of the computer running BWLockD server, and server_port is an optional extension used to specify a particular port, which defaults to 8168. For additional information on changing the port BWLockD server listens on, see above in Server.
NavGen can be configured to use BWLockD server as follows:
-
Open NavGen's options file
bigworld/tools/misc/navgen_settings.xml(for details on this file's grammar, see the document File Grammar Guide's section navgen_settings.xml). -
Update / add the following section as a child to the root node:
<bwlockd>
server_name:server_port</bwlockd>The server_name is the name of the computer running BWLockD server, and server_port is an optional extension used to specify a particular port, which defaults to 8168. For additional information on changing the port BWLockD server listens on, see above in Server.
-
Update / add the following section as a child to the root node:
<standalone> false </standalone>
Use of the BWLockD server can be temporarily disabled by setting this tag to true.
The Lock Server supports the use of stubs for version control systems, which can be defined in World Editor's configuration file options.xml(for details on this file's grammar, see the document File Grammar Guide's section options.xml → World Editor.).
If no version control system stub is defined, then World Editor will use the default resources/scripts/svn_stub.exe for Subversion support. We also provide a p4_stub.exe script for Perforce.
Important Note: You can use any executable file or any file that has an associated default program as a stub. The provided stub exe files are compiled from python files in the same folder with same name by using py2exe. For more details visit py2exe's website at www.py2exe.org. If you want to use .py file directly, you have to ensure that .py file is associated with a Python interpreter. The Python installer on Windows will do that automatically.
A stub must support following commands:
-
addfile
Syntax:
<stubname>addfile<filename>AAdds the text file to the repository.
-
addbinaryfile
Syntax:
<stubname>addbinaryfile<filename>AAdds the binary file to the repository.
-
removefile
Syntax:
<stubname>removefile<filename>ARemoves the file from repository.
-
commitfile
Syntax:
<stubname>commitfile msg<filename>[ ,<filename>]* ACommits the files to the repository (the commit operation is recursive).
-
updatefile
Syntax:
<stubname>updatefile<filename>[ ,<filename>]* AUpdates all indicated files.
-
updatefolder
Syntax:
<stubname>updatefolder<foldername>Recursively updates all files in the indicated folder.
-
refreshfolder
Syntax:
<stubname>refreshfolder<foldername>ARecursively refreshes the status of all files in the indicated folder.
-
managed
Syntax:
<stubname>managed<file_or_folder_name>AReturns 1 if the file or folder is managed by the repository, or 0 otherwise.
A — filename may include the wildcard character * (asterisk).
In order to be able to share your spaces with other world builders, you need to follow a few simple steps. If the new space is created while World Editor is connected to bwlockd, the whole space will be locked for editing automatically, but if the space is created while World Editor is disconnected, the whole space will not be locked for editing.
When you create a new space while connected to the lock server, you need to follow these steps in order to share the space:
-
Go to Project mode, by clicking the Project Tool toolbar button —
 — (for details, see Toolbar).
-
Make sure that World Editor has successfully connected to the Lock Server.
-
Click anywhere on the space.
-
Enter a commit message and click on Save and Commit, and wait for the source control operation to complete.
On the other hand, if the space was created before connecting to the lock server, you will need to follow these steps:
-
Go to Project mode, make sure that World Editor has successfully connected to the Lock Server.
-
Select any area inside the space using click-and-drag.
-
Enter a descriptive message and click the Lock Selected Chunks button. Note that even if you select only one chunk, the whole space will be locked because it hasn't been committed yet.
-
Finally, if the space is not under source control, enter a commit message and click on Save and Commit, and wait for the source control operation to complete.
Once these steps have been completed, it will be possible for other world builders to get the space using the source control tools and then lock/unlock areas of the space to work on it simultaneously. For more details please refer to Locking an area.
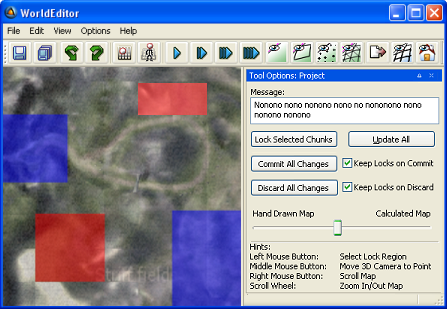
While in Project mode, you can see the locked regions of the space. The red regions correspond to chunks locked by other world builders, while the blue indicates editable regions.

World Editor displaying editable regions in blue and non-editable regions in red
Note
As the mouse is hovered over a locked region, a tooltip is displayed with information on that lock, such as user, machine, date/time, chunk ID and lock message.
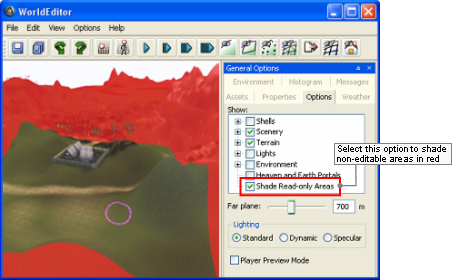
To enable or disable displaying non-editable areas shaded in red, select the General Options panel's Shade Read-Only Areas check box (for details, see General Options panel).

Non-editable areas shaded in red
To lock an area for editing, follow the steps below:
-
Click the Project Tool toolbar button —
 — to activate the Project
mode.
-
Make sure that World Editor has successfully connected to the Lock Server.
World Editor tries to connect to bwlockd upon startup, using the settings specified in bigworld/tools/worldeditor/options.xml. (for details on this file's grammar, see the document File Grammar Guide's section options.xml → World Editor).
If it did not connect successfully, then the Message field will contain the text "failed to connect to bwlock, you cannot use the related functionality", and the Lock Selected Chunks, Commit All Changes and Discard All Changes buttons will be disabled.
-
Click-and-drag over the area that you want to lock for editing.
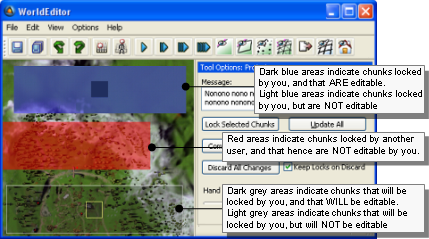
The selected area will be shaded, indicating the chunks that will be locked and editable. Around that area, an area shaded in light grey will be displayed, indicating an area that will be locked but non-editable.

World Editor displaying information about chunks' lock and edit status
The actual editable area of a locked region is smaller by 1 chunk around the border. This is necessary to prevent tearing in the terrain that may occur if two people edit adjacent terrain chunks to different heights.
-
In the Message field, type a text indicating the reason for the lock.
This message will be displayed on a tooltip when other users hover over the locked area in World Editor while in Project mode.
-
Press the Lock Select Chunks button.
The selected chunks and the ones surrounding it will be shaded in blue, to indicate the success of the operation.
This process can be repeated many times if you want to lock an irregular area.
Once the world is complete, you will have to perform a pass over it to fill in the details in between previously locked sections.
